


Here’s a really simple drawn thread embroidery treatment that you can work with coral knots. Once you’ve bunched up threads this way, there are further possibilities of embellishment, too, so this is just a basic treatment which can be further expanded with other embellishment.
The coral knot stitch in drawn thread embroidery is often used to bunch together threads. If you haven’t looked at the photo tutorial for the coral knot, you may wish to, since this basic treatment depends on the coral knot.
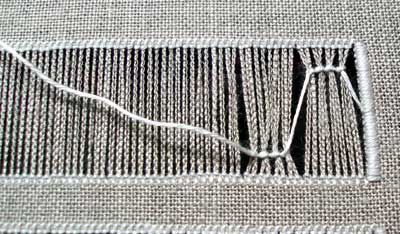
Beginning with a relatively wide strip with threads withdrawn, anchor your working thread in the satin stitch bars on the right. Take the working thread up from this central point to the top of the vertical threads. You can work as many coral knots across the top as you’d like – it depends on how many bunches of vertical threads you want to group together. Here, I’m grouping together four bunches of vertical threads, so I’m working four coral knots, one around each bunch.
Then, move your thread down to the bottom of the area of withdrawn threads, and work an equal number of coral knots around the bunches. Move back up to the top, and group together the same number of bunches. Continue across the whole strip, then anchor the working thread behind the satin stitch bars at the middle point of the edge (exactly opposite where you began in the right side satin stitch bars).
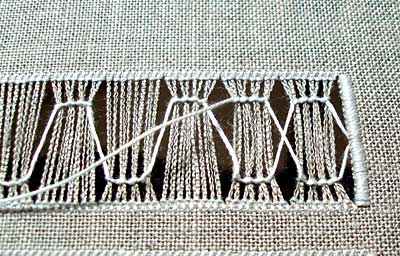
Return to the right side of the piece, and anchor your working thread in the same place behind the satin stitch bars.
Now, work down then up with your coral knot bunches, so that your working thread crosses over the thread of the previous journey, to form an “X” between the groups of coral knot bunches.
Continue this across to the left side of the area, then anchor the working thread behind the satin stitch bars where you anchored your previous thread.

Now you have a simple “canvas” for further embellishment, if you like. Or, you can leave it as it is. I decided to try some woven wheels around the “X” between the coral knot groups…
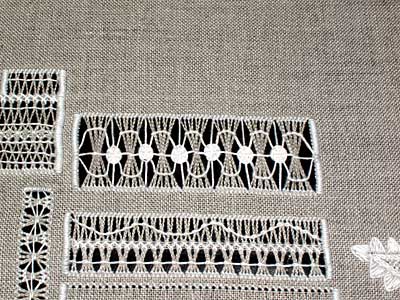
But, to tell you the truth, it is my least favorite motif on the sampler. The wheels are not quite even, they look “heavy” compared to the rest of the work around them, and I don’t like the vertical white threads. But – live and learn! That’s the whole point of a sampler!
Next time I work this basic motif, I’m going to work an opened diamond in the middle of the coral knot groups. I think that’ll look nice… When I get to that point, I’ll show you how to do it!
For further information:
More Drawn Thread and Whitework Embroidery
Drawn Thread – Securing Edges with Re-Weaving
Drawn Thread – Securing Edges with Satin Stitch
Drawn Thread – Hemstitch Tutorial
Drawn Thread – Chain Loop Bunches
Sampler Update with Schwalm Embroidery
Online Book on Drawn Thread Techniques
Diamond Stitch in Drawn Thread Work
Coral Knot Bunches in Drawn Thread Embroidery
Zig-Zags in Drawn Thread Embroidery
All Whitework Articles on Needle ‘n Thread
You can find more tips and tricks for hand embroidery – including all the above tutorials – indexed on my Tips and Tricks for Hand Embroidery page.
Hi there, Mary-
I have a suggestion you might want to try. There’s no reason you need use the same weight floss for the woven wheels (or spiders, as my instructor called them) as the rest of the drawn work. I’ve had outstanding success on punto in aria work using a lighter gauge of floss in places like this. Bear in mind, I have only used linen thread on needle lace–and it may make a difference (I’m really not sure).
BTW, You’ve inspired me to try my hand at goldwork. Even using the mystery threads I picked up at a flea market, I was pleased with the results! Thank you!
I got so far behind with my RSS feeds that it has taken me two weeks to catch up! And I saved the best for last. Do you know I had 40 unread posts of yours, so I have spent an entire evening with you 🙂
Love the Or Nue, I look forward to seeing that develop. Christiana’s peacocke feather is awesome, thanks for sharing that.
I smiled when I read about your 15 minutes aday. A change of routine means that I am able to fit in 30 mins of JE before I go to work. No, I don’t get much done each day, but as you say, it adds up but more importantly, it makes a HUGE difference to my day.
CA
I like the effect very much and I think it may only look ‘heavy’ because it is not in fact ‘white’ whitework since you chose the different colour ground to make the stitching show. If it were on a white ground it wouldn’t be so prominent and might look less ‘heavy’.