


You know, the fun thing about this goldwork pomegranate project so far has been the fact that each little piece of the fruit has been a section unto itself – so no individual part of the piece has taken all that long to do. I always find that, when working on a whole project, if I can parcel it off in my head in little pieces and conquer each little piece at a time, then the whole project is more manageable, more enjoyable, and has more of a chance of getting finished! Launching into the stem on this goldwork project, I came to the realization that, design-wise, I may have overdone it with that circular swashy stem thing! I’ll explain what I mean…
If you look at the original design for this stylized goldwork pomegranate, you’ll notice that the stem begins narrow enough, works around the piece of fruit, and then wides with those swashy wave things. I did that on purpose – I wanted the right side of the circle to kind of “balance” the fruit. And that’s all well and fine…
… until you start filling in all that space with one strand of silk at a time!
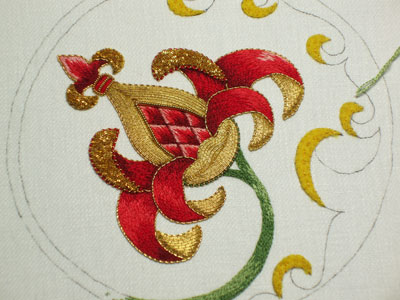
I’m using one strand of Soie d’Alger on the stem, in two shades of the green so far. I admit I didn’t plan out a definite shading pattern – my plan was more or less to keep the shading to a minimum on the majority of the stem, and then to concentrate shaded areas on the underside of the turn-overs on the “waves” on the other side of the stem. Basically, I’m just filling the stem with the greens.
I’ll also admit that, while I’ve been using long and short stitch up to the point you see in the photo above, shortly after this (I’ll show you further photos of the stem later, when I get to a stopping point in the next “area”) I switched to split stitch. If you work in split stitch rows and stagger where you split the stitches, and you split them fairly deeply into the previous stitch… well, taken as a whole, what is the result? It pretty much looks like long and short stitch!
My plan for the stem is as follows:
The body of the stem will be filled with shades of green. Underneath the turn-overs, I’ll concentrate on some darker shading in order to give the right effect.
The turn-overs will be worked with chip work (like the large turn-overs on the fruit) and outlined with stretched pearl purl.
The stem will be outlined with gold threads – you’ll see that when I get there!
And then!! It’s done, right? Weeeellllll…. no. There’s one more finishing touch I’m planning.
So that’s where I am right now, plodding my way through filling the vast expanse of green stem space! It’s not that bad, actually – it’s very relaxing and easy stitching. It’s just a matter of finding time to finish it!
For all the posts in this series, please visit the following links, which are arranged in the order of the project’s development:
Stylized Pomegranate Pattern used for this project
Setting up the Project on a Frame
Preparing the Ground Fabric with Felt Padding
Selecting Colors of Silk for the Project
The Stitching Begins – SIlk Shading
Continuing the silk shading – the left side
Finishing the silk shading
The Goldwork Begins: Smooth Passing Thread
Check Thread for Outlining
Chip Work Filling with Check Purl
Outlining with Stretched Pearl Purl
Filling the Bowl with Passing Thread
Finishing the Tips with Passing Thread
Finishing the Fruit
Beginning the Stem
Continuing with the Green on the Stem
Almost finished! Chip work on the Stem
The Finished Goldwork Pomegranate
I am just loving this – adore the green stem. It is far and away above the stuff I do and keeps me inspired.
Thank you for such lovely lovely delicate work.
Regards
Jane from Bristol
The more I see you do, the more I like this design and the way you are working it. The best part is that, because I've seen it all happen in stages, I do not have the usual feeling of 'this is beyond me'; rather, I am inspired and feel that this is something that I, too, can do. Thank you for helping me realize that I can make beautiful things and it's all a one step at a time process.
G'day Mary,
The green and red 'zing' each other nicely.
Very interesting about the split- stitch-switch from long and short stitch. Sounds good.
Say 'split-stitch-switch' quickly a few times! Split-stitch-switch, spich-stwich-swish, swshpichsitchpishwhichspish! Pheew. Not unlike those words we have to verify to post our comments. Sometimes I think I could make a new language using them. Or even just to put meanings to them for fun. A game for the kids, young and old.
Cheers, Kath
It's looking really good – I'm looking forward to the swishy bits!
It's looking fantastic!
It's looking Good. I admire your persistance (is that the right word?) because about now is when I'd put it aside for a bit. And then work on it very sporadically. And then "forget" about it for years, as the large crewel wildflower picture I started xx years ago when I was in high school demonstrates. I really should check if the wools are any good yet. And that I still even like what the finished result is. Maybe next year :).
How long do you let a project "ferment" before totally/permanently putting it on the scrap heap. Or un-kitting/giving away/burning it?
I have another question on the pomegranate – how large is it? I looked at the pattern, and it doesn't look nearly as large as the photos. I'm not sure if it's the closeups, or if it's because I'm thinking of crewel, and when I see the threads you are using, I think wools. Something has me picturing this as being about a foot in diameter. Thanks!