


Chip work is a wonderfully sparkly filling technique used in goldwork embroidery. I think I’m part crow, because I love sparklies! So it isn’t odd that chip work would make its way into my current goldwork project. Today, I’ll show you where it’s going and how it gets there.
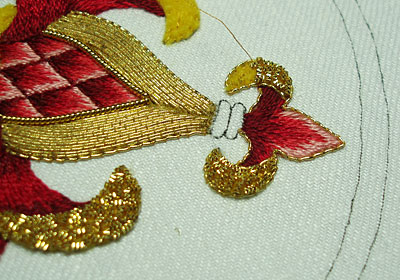
The goldwork pomegranate, when we last left it, had acquired a nice coating of smooth passing thread, a touch of pearl purl, and an outline in wavy check thread. This is what the piece looked like before getting into the chip work:
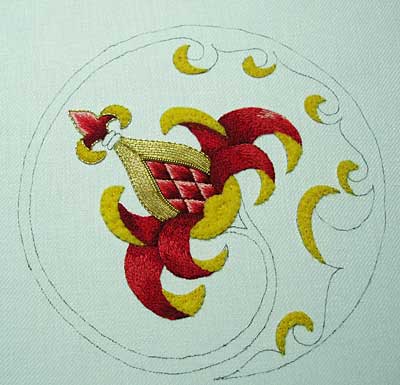
I apologize for the greenish tint in the photo. I’m longing for sunny days again – goldwork photographs much better in natural sunlight!
Now we’re going to address the yellow felt areas on the tip of the pomegranate and on the larger turnovers on the “petals” protruding from the side of the fruit.
I’m working with Gild Bright Check Purl #7. This come in 18″ lengths, and, if you’re planning on following along with the project and doing what I do, then you’ll probably want to order two 18″ lengths. This will give you plenty of bright check purl for all the chip work in the design, plus a little left over for future projects (or to make up for mistakes!)
You should use a velvet covered board (or velveteen, or any fabric with a short nap) to cut on, as the nap of the velvet keeps things in place. I have a velvet board (in red), but I also use a loose piece of black veveteen in a box lid to cut on, or the lid of this velvet-lined tin that I use for goldwork, too.
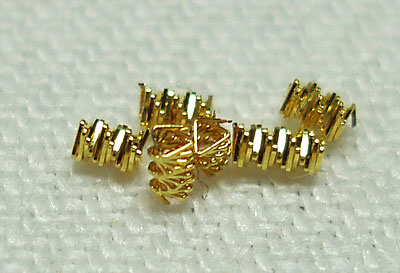
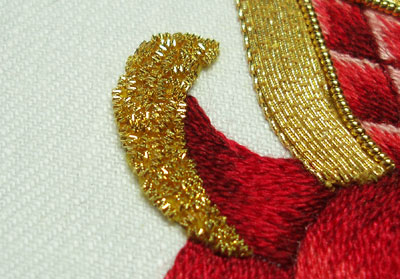
Bright check purl, also called “frieze,” is made from a metal wire that is coiled like a triangle and twisted to make a faceted tube of spiraled gold wire that is loose and limp when left in long lengths. When it is cut into small “chips,” the chips are a bit stiffer, but still retain the ability to be pulled or stretched out of their spring-like shape. They do not spring back, so if you pull check purl out of shape, it’ll stay stretched out of shape.
The purl is cut carefully into small lengths – I usually cut them about 3 or 4 twists long, as in the photo above. They can be cut smaller, too, to fill in small spaces. When cut, they are like beads. You can see pretty clearly in the picture that, when cut, they make what could be described as a hollow, faceted gold wire bead.
To cut them, you can either leave your length of check purl on the velvet and place the tips of your scissors over it and snip, or you can, as I do, hold the check purl down next to the velvet close to the end where you’re going to cut it, and then slide it onto the edge of your scissor blade. The purl will separate a bit over the scissor blade and snip without any crimping or warping.
They’re pretty, aren’t they? And they’re a lot smaller than they look!
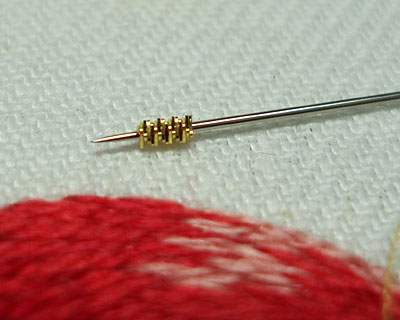
These little chips are picked up just like beads and sewn onto the gold felt padding in the same manner one would sew on beads. Here, you can see the needle picking up one little chip.
I’m using a #11 crewel needle (you can probably get away with a #10, which is more readily available than the smaller #11) and the same YLI 100 wt thread that I spoke of in article on smooth passing thread. My thread is waxed well, since the abrasion from the gold necessitates protection for the thread!
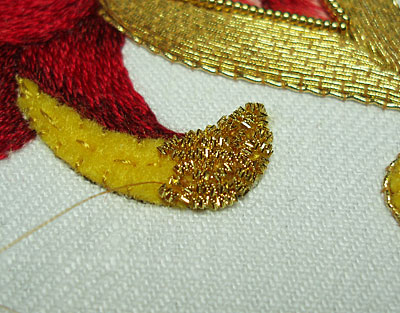
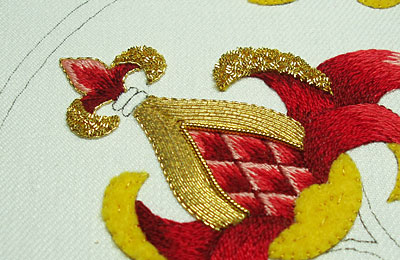
Here, I’m working on one of the turn-overs on the top petals next to the body of the pomegranate. The chips of gold are sewn on randomly, covering the felt. They should be stitched on in various directions, so that the light catches them well, and so that they fill the space as thoroughly as possible. Regarding filling, though, it is important not to crowd the chips so much that they buckle up on top of each other. They should fit snugly next to each other, but not bulge over each other. Since they have that spiral, springy nature, they will bend and buckle and bulge if they are crowded.
I did my best not to let the chips overflow the felt area, too. I am going to edge the felt with a different gold thread to give it a clean finish, and I don’t want the chips to interfere with the outline.
Using the same random sewing-on-of-chips, I filled in the turn-overs on the fleur de lys at the tip of the pomegranate as well. These, I fit into the outline of check thread that was already there, being careful not to cover the outline.
When filling with chip work, there may remain some tiny spaces of yellow felt that aren’t covered between the chips. This is ok. The felt, because of its color, won’t be noticeable.
Photos don’t do justice to the sparkly nature of chip work!
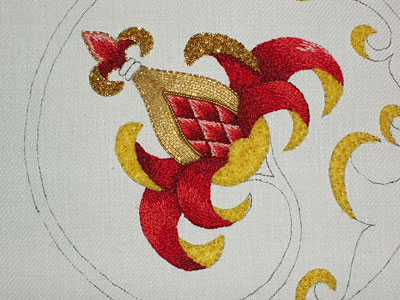
Pulling back a bit, this is the piece so far…
And then I moved over and finished the chip work on the other side of the fruit.
Chip work is fun! It’s a bit tedious in a way, due to working with very small pieces of gold and having to take a lot of stitches to fill in an area. But really, it’s simple stitching! And the results are worth it! It’s great fun to watch an area fill up with chips of gold!
Next time we visit this project, we will look at outlining those turn-overs with one of my favorite edging techniques.
For all the posts in this series, please visit the following links, which are arranged in the order of the project’s development:
Stylized Pomegranate Pattern used for this project
Setting up the Project on a Frame
Preparing the Ground Fabric with Felt Padding
Selecting Colors of Silk for the Project
The Stitching Begins – SIlk Shading
Continuing the silk shading – the left side
Finishing the silk shading
The Goldwork Begins: Smooth Passing Thread
Check Thread for Outlining
Chip Work Filling with Check Purl
Outlining with Stretched Pearl Purl
Filling the Bowl with Passing Thread
Finishing the Tips with Passing Thread
Finishing the Fruit
Beginning the Stem
Continuing with the Green on the Stem
Almost finished! Chip work on the Stem
The Finished Goldwork Pomegranate
This is just gorgeous! I love watching you create such beauty!
Your embroidery is absolutely exquisite!
Mary, the chip work is fascinating. I can't wait to see the next step on this project. It is lovely and the colours are so regal.
Linda
Fascinating to watch the process of the chip work. Your attention to detail while photographing the work is greatly appreciated.
I really enjoy this series. So wish all the stuff you are using was freely available here where I live. When I win the lottery the threads for gold work will be on top of my shopping list 🙂 Elza Bester. Cape Town
I'm in awe, so beautiful Mary.
Wow, is ever a stunning piece. Love it!
Carol S.
Looks beautiful as always. I'm a sucker for sparklies too!!
G'day Mary,
From now on I will certainly take heaps more notice and interest in any goldwork articles and projects in mags etc.
I too am so gratefull for your clear and detailed explainations and photos.
The difference some understanding on a subject makes. Especially when the teacher is enthusiastic and so warmly human.
Consider yourself hugged Mary.
Cheers, Kath.
Beyond awesome!
I am so impressed with your photography here, Mary. I know how small the pieces are are, and photographing them can't have been easy!
That Gild Bright Check Purl #7 sure fancied things up! I've never used it but it looks like fun.
I use a piece of ultrasuede in my chipping box. I like the firmness of it vs. velvet.
As others have noted, your photography is great; very clear and it captures the sparkle. – JL in KC
hi Mary
this gold work pomegranate project is awesome. The clear step by step instructions and photos are great. waiting impatiently for the next step.
kanwal, UAE
Hi, Mary
Would you know, by chance, how chipping or chip work can be translated into French ? I am translating Hazel Everett’s gorgeous book, but it seems in France they do know (I asked at Le Begionia d’Or which is the reference in Goldwork in France)this technique. So strange ! I asked my former teacher too, but no answer… Feeling a bit lost .. Thanks so much for any help you can provide me with…I just do not want to mistake in my translation.
Hi Mary,
Where can you buy gold work supplies in the US? The only places online that I’ve found to get items I need – gilt purl, colored chipping, metal threads, etc., are in Europe or Australia. I even had trouble finding an Etsy shop that sells all these items. Do they have to be bought internationally?
Thank you,
Patty
At this time, yes, pretty much – if you’re looking for a variety of types of goldwork supplies, you won’t find too many places in the US that sell them. When I’m ordering retail, I normally order from Alison Cole in Australia or from Tanja Berlin in Canada. Hope that helps!