


After finishing the chip work on the “petals” on the goldwork embroidery project I’m currently working on, I set about outlining the larger areas of chip work on the top petals. The method I used is really very simple, and it makes a really nice edge!
Outlining various parts of a goldwork project with a different metal thread helps not only to make the edges look neat and finished, but also helps to set off an area filled with gold. Pretty much every filled element in my goldwork projects ends up with some kind of different thread as an outline, and in this case – outlining the larger chip work areas – I’m using pearl purl.
Above is an image from a previous article on pearl purl.
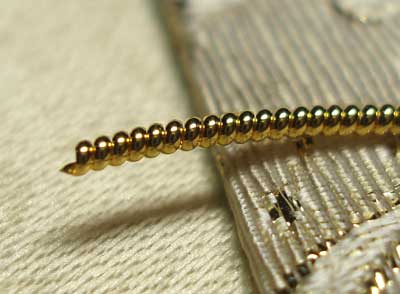
This is what pearl purl looks like – it’s a solid metal thread (not wrapped around a string core), coiled to form a “thread” (more like a wire) of pearl-like bumps. Pearl purl is spring-shaped – if you stretch it, you can see that it has that same spiral make-up of a spring. It does not spring back if it’s stretched.
You can check out the earlier article on this metal thread to see how I cut it, and how it is stitched onto the fabric when un-stretched. It is a couched thread. Using waxed couching thread, you couch the pearl purl onto the surface of the fabric, pulling the couching down in between the “pearls” of the metal so that it doesn’t show.
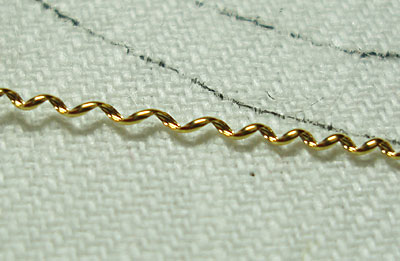
For this project, I’m working with Gilt Pearl Purl, size Fine 1.
I calculated the length around the turn-over on the petal, and cut a little more than half that length of pearl purl. Then, taking the very ends of the piece of pearl purl in my fingernails, I pulled gently on it to stretch it out to twice its length. I’ve covered the topic of stretching pearl purl previously, but here I’m going to show you how I couched it for this project.
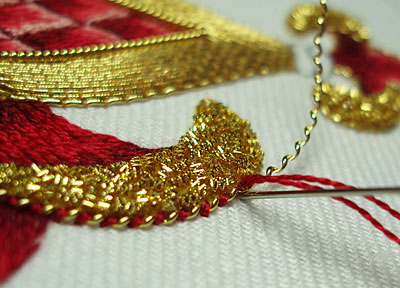
Using two strands of Soie d’Alger (in one of the middle shades of red) in a #9 crewel needle, I took a couching stitch at every “valley” in the stretched pearl purl.
A couple technical notes:
1. Begin couching just at the point where you want your pearl purl to begin. I forgot to take a picture! I began at the sharp lower tip of the area filled with check purl.
2. (And this point is debatable) Don’t wax your couching thread. Some might think this is imprudent, since the metal thread can be kind of rough on the silk, and the wax provides extra protection. But the wax also darkens the thread and makes it look gummy, so whenever I’m couching pearl purl like this, using a decorative thread over the stretched purl, I don’t wax my thread. I like the clean bright look of the decorative thread. If you’re more comfortable waxing the thread, go for it….
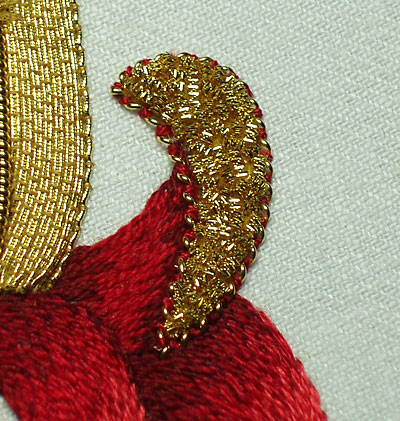
Here’s one turn-over completed. I started at the lower tip, worked around the right side toward the top, pinched the pearl purl with tweezers to get it to turn sharply around the top, and then headed back down to the lower tip, where I ended with a final couching stitch.
Pearl purl is not plunged to the back. It begins and ends with a couching stitch.
If your pearl purl is too long, just snip it carefully before you take your last couching stitch, leaving enough of the metal thread to hold a final stitch.
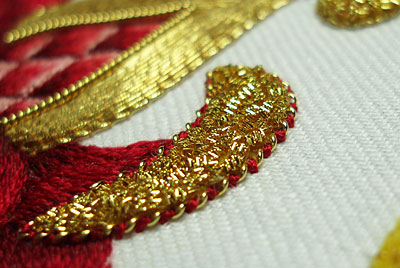
I think this edging is really one of the prettiest techniques in goldwork – I like the alternating twist with the colored silk and the gold.
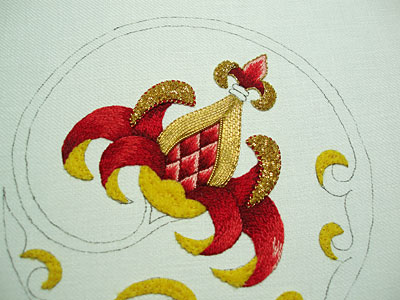
And here’s the design so far. Little by little, we’re getting there!
Next up, we’ll address the larger felt area below the body of the fruit!
For all the posts in this series, please visit the following links, which are arranged in the order of the project’s development:
Stylized Pomegranate Pattern used for this project
Setting up the Project on a Frame
Preparing the Ground Fabric with Felt Padding
Selecting Colors of Silk for the Project
The Stitching Begins – SIlk Shading
Continuing the silk shading – the left side
Finishing the silk shading
The Goldwork Begins: Smooth Passing Thread
Check Thread for Outlining
Chip Work Filling with Check Purl
Outlining with Stretched Pearl Purl
Filling the Bowl with Passing Thread
Finishing the Tips with Passing Thread
Finishing the Fruit
Beginning the Stem
Continuing with the Green on the Stem
Almost finished! Chip work on the Stem
The Finished Goldwork Pomegranate
Gday Mary,
I can hardly believe what I'm seeing and feeling here. The latest progress photos are making me feel excited. Never had that feeling before looking at Goldwork. Mmmmm.
Cheers, Kath
Wow, just Wow, Mary. This is coming along beautifully and I am learning so much. I like the look of the Pear Purl, it adds a lovely touch to the chip work.
Dear Mary,
I've said it before and I'll say it again "wow!" This is so interesting. I had no idea how goldwork worked and I am finding this step by step process fascinating.
Thank you!!
Looks great, Mary!
Wow!! It is so beautiful! Your work is so inspiring! I decided to try a goldwork kit from Alison Cole. Thank you a lot for such useful information about it.
And thank you a lot for ebay info about beetle wings, I found and ordered them.
Larissa
It's going to look amazing when it's finished – it looks fabulous already!
Wow, that is awesome. I have never been much of a fan of goldwork. but this might change my mind. Couching the purl is unbelievable looking. Love it.
Your project is a wonderful learning experience for me. It is so beautiful and I am waiting to see what other stitches and techniques you will use.
Your project is a wonderful learning experience for me. It is so beautiful and I am waiting to see what other stitches and techniques you will use.
Wow! And, again, WOW! This seems to be the word of choice and I'm no exception. This is a beautiful technique and I'm soooo happy you are showing us. Thank you!
I love the stretched pearl purl, Mary. The design is really great. I'm working on another icon with some gold work and may use that technique on it. Thanks for the great pictures. AnneG
Dear Mary, I am really fascinated By this gold work piece you are doing. Now being completely ignorant I would like to ask you a question. It was just an idea I had looking to the couching with the pearl purl. Not really able to determine the dimensions I was wondering how it would be if you use a appropriate tiny gold bead together with the couching? In other words when the needle comes up through the linen you also pick up a bead and this cover the thread. Is this perhaps sacrilege as far as gold work goes? Thank you.
Kind regards,from a very ignorant Elza Bester. Cape town 🙂
Thanks, everyone, for your comments and encouragement! The project has been quite fun so far – only a few little moments of frustration, but overall, it's been a real pleasure to work on and document as I go.
Elza – I'm not quite sure about the bead. I can't picture how it would work or fit, though it might be something to play with, if you have a particular look in mind. I don't think there are any fixed rules that have to be followed, when it comes to combinations in embroidery. Beads are often used in goldwork pieces. But I'm trying to picture how a bead would fit in with pearl purl. The pearl purl is in itself rather bead-like, and I wonder if a bead might look a little "out done" by the real gold thread. But, in any case, it might be something fun to try, to see how it would look!
MC
Using the Country Bumpkin stretched pearl purl technique in conjunction with silk work – brilliant!
Hi Mary Thanks for the feedback. I do a lot of ribbon embroidery, needle painting and different forms of beading, so hence the question. I always try to do something different and then at times, my imagination has the habit of running a little wild. 🙂 Kind regards Elza.
Hi, all – thanks again for your comments. Elza, no worries – It's actually something I was thinking about last night when I was stitching, wondering how it would work. If I can try it out, I will, and I'll let you know if the combo works! Imagination is a great thing, isn't it??
Megan – thanks – I love this technique. It isn't what I'd call a "Country Bumpkin" technique. They do cover it in their A-Z Goldwork book, which is excellent, but other goldwork books published before that one cover it as well – I have a feeling stretching and couching the pearl purl has been going on for a while!
MC
Your goldwork is TOO beautiful and made me want to try it-first time in 30 years.
I have finished a Schwalm version of your design but it looks very sad in comparison with your glorious colours.
tricia elvin-jensenin cape town
Hi, Tricia! I'd love to see your Schwalm version! I bet it's beautiful!
Following you I have discovered so much things!! And today I have ordered all the materials to start your project, it will be my first Goldwork ! I'm really trilled !
Thank yo so so much for such clear instructions !!
I have seen here this 0.03 art pen, have you never tested it for tracing the drawings on fabric ??
http://www.dickblick.com/products/copic-multiliner-sp-pens/
Hi, Francesca –
I haven't used that particular pen, but it looks like the same idea behind the pens I use. I wonder if an 03 might be a little large. I use an 005 and occasionally an 01 when I trace using a pen. The 005 makes a tiny line that's easy to cover. Remember that the pens aren't guaranteed on cloth – they can still run if soaked in water. I only use them on pieces that I know I won't wash.
Hope that helps!
MC
Hi Mary !!
is not a 03 pen, but 003 so thinner than 005, this is because it could be interesting…
Again a little help…on the other Pomegranate goldwork you did, the instructions on Inspirations says that the red silk soft shading part of the fruit, has red felt padding uder the silk.
Did you padded it ?
I never did it on felt and seems to me to be a little difficult to make soft shading on felt…
Again thanks and have a lovely day !
Hi, Francesca –
Ah – the 003 would be very nice to have! Tiny!
For the goldwork pomegranate in Inspirations, yes, I did pad the fruit with red felt. It helps raise that area up so that it is on the same level as the gold. It's actually surprisingly easy to stitch the soft shading on the felt – it fills up and looks nice and full. If you follow the same techniques you normally would for long and short stitch shading, I think you'll find it works out ok!
Hope that helps!
MC
Is this Crewel with goldwork?
Hi, Sarah – No, this is silk embroidery. It’s pretty much just surface embroidery in silk with goldwork.