


Once I selected the colors for my current goldwork embroidery project, it was time to start stitching. I began with the “arms” or leaves that come out of the body of the stylized pomegranate (see the original design). Using long and short stitch shading techniques, I started filling in the individual leaves. So today, I’ll show you my progress on that, and point out some tips along the way.
If you are familiar with goldwork embroidery and silk shading, you’ll be able to follow this with no problem. For those who are new to these techniques, I recommend that you check out my long and short stitch shading lessons. You may find the long and short stitch videos handy, and, as far as the lessons are concerned, you might want to look particularly at lesson five: shading around curves.
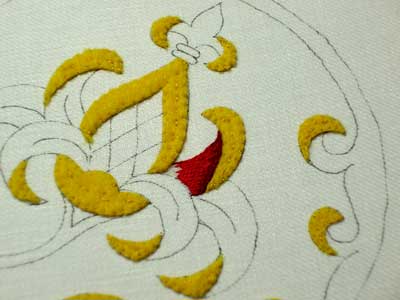
I began on the right side of the pomegranate, with the the smallest arm. The yellow felt padded overturn of the leaf sits above, so I wanted to cast a shadow underneath that turnover. I began with the darkest red and worked into the medium reds and back to the dark for this particular leaf.
Then I moved to the second leaf on the right. You can see that I used the lightest shade of the reds (the pink!) to outline the shape. At first, I was intending to add more pink to this leaf than I ended up actually adding. Hence, the pink outline. You can outline the leaf with one of the medium reds (in the middle of the range of colors) if you, like me, decided not to use so much of the pink.
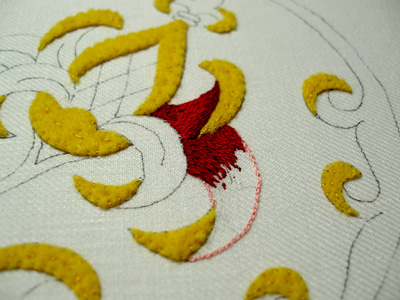
Working around the curve is somewhat difficult. It may be helpful to draw guidelines with a pencil on the fabric. I began with the darkest red close to the body of the fruit, and then worked through the range of red, getting lighter as I rounded the curve, and then moving back into the darker reds as I approached the tip.
The lighter color should move to the outside of the curve. Here, if you look closely, you can see five shades of the red, with the light red (but not the pink) on the right side of the leaf.
I wanted to pick up a little bit of light right on the top of the curve. I’m picturing the light source coming from the top right of the design, and I wanted just a glint on this curve on the larger leaf. So I stitched in just a touch of the light pink.
Then I took it back to the mediums and the medium-dark, but I did not go all the way back to the darkest shade of red at the tip.
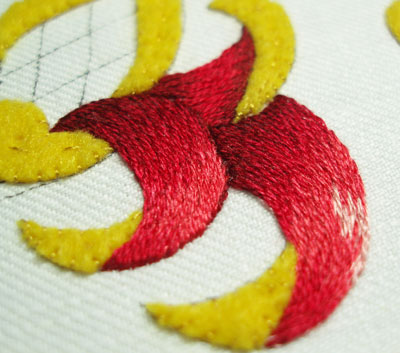
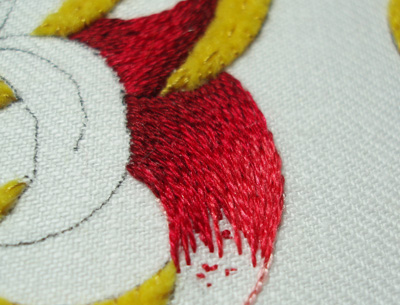
I outlined the third leaf (it’s the leaf in the forefront of the design) with one of the darker reds, and I followed the same stitching technique around the curve of the leaf, gradually changing shades so that the lightest shade (just short of the lighter pink) is hitting the curve.
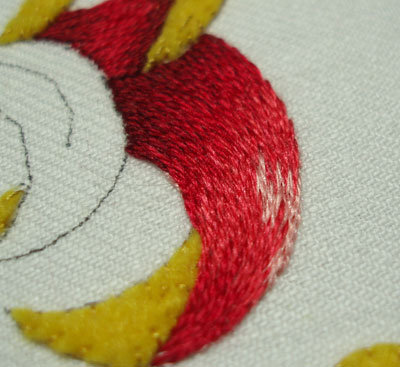
And there’s the first embroidery stitches on this goldwork / silk project. So far, I’m ok with it. One point I’m not perfectly happy with is the first leaf I stitched, the one farthest back. I didn’t quite catch the turn on that one, and I think it could have used another step in the shading. I may indeed pick that one out. But first I’ll stitch the leaves on the other side and think about it.
I finally bought a decent stopwatch, by the way! I know that sounds pointless and completely out of the blue, but I would like to keep track accurately of the time spent on various projects. This will help me judge better how much time a particular project will take. I tend to underestimate the time a project will take – I was thinking I’d have this goldwork piece, for example, finished by this weekend. It’s not happening!
Unfortunately, I didn’t get the stopwatch until after this part was finished. Still, I estimate that I’ve spent about 5 hours on the project to this point. It seems like a lot of time, for such a little bit of color!
Hope you have a terrific weekend and can get some time in with your needle ‘n thread!
For all the posts in this series, please visit the following links, which are arranged in the order of the project’s development:
Stylized Pomegranate Pattern used for this project
Setting up the Project on a Frame
Preparing the Ground Fabric with Felt Padding
Selecting Colors of Silk for the Project
The Stitching Begins – SIlk Shading
Continuing the silk shading – the left side
Finishing the silk shading
The Goldwork Begins: Smooth Passing Thread
Check Thread for Outlining
Chip Work Filling with Check Purl
Outlining with Stretched Pearl Purl
Filling the Bowl with Passing Thread
Finishing the Tips with Passing Thread
Finishing the Fruit
Beginning the Stem
Continuing with the Green on the Stem
Almost finished! Chip work on the Stem
The Finished Goldwork Pomegranate
Gday Mary,
Thank you for your efforts in being really descriptive in this including the pictures. It is all very, very helpful.
The 5 colour shades make the shading quite easy to understand. I'm especially happy about learning that.
You seem to be taking fairly short stitch lengths with the shading.
Ok, I just went back into the suggested posts. All questions answered.
My, that shading sampler is interesting. Saw it when went further back still to the triangle shading. My doodling often ends upwith a lot of shading. I'll follow the sampler all along tomorrow. I mean today, after I've had lots more sleep. I've woken and getting my embroidery fix before going back to bed.
Cheers, Kath
Thanks Mary for sharing the way you work and also the little reasons why something doesnt look quite right. For a beginner trying Goldwork for the first time, I know that these will be the areas where I will pay more attention.
I almost always underestimate the time I take to finish projects and that is so annoying. So your stop watch is a great idea.
I'm following this project veru closely. I want to try my luck with this design too. But I'll wait 'till your finished! And I'm sticking to Rennaissance Dyeing Wool before trying silk. I need some practice before I try that! I'm going to stitch the design on a red stool cover. Any tips on colors by the way? I was thinking white, red and pink… (and everything in between of course for the shading.)
Another beautiful project.
You are such a wonderful source of inspiration.
Pierrette =^..^=
i love this project, Mary!
Can´t wait til you put the golds!!!!
Vince
As usual I love this project!
Me too, Vince! Waiting for the golds… I'm not doing this project…yet! Hope to join the supplies in a near future…:)
I absolutely LOVE hearing all about your "process". This means SO MUCH to fellow stitchers. I feel like I am right there, looking over your shoulder (don't worry! I won't block your light!). Thank you so much for sharing. It is inspirational, instructive, and something I look forward to each day!
So interesting! Now I've gone back and seen your long and short stitch tutorials. Maybe I could try the sampler. I'm so grateful for your patient details. You're very inspiring!
WendyBee
Mary, I have one question about the silk threads that you have used on the project so far.. I know that the Soied'Alger comes in 7 strands. Do you use a single stand or do use the 7 strands together?
Hi, all –
Thanks very much for your comments! I'm really enjoying this project so far! Glad you are, too!
Jayashree – I'm using a single strand for all stitching. Hope that helps!
MC