


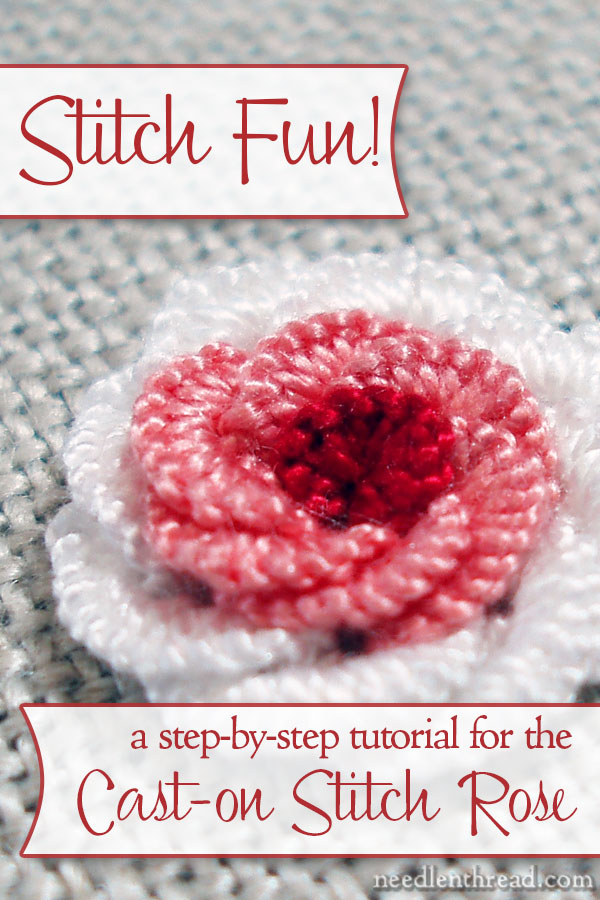
The cast-on stitch is a beautiful hand embroidery stitch that can be used to embroider gorgeous, rich, dimensional flowers. The stitch is used frequently in Brazilian Embroidery, and it can be used just as effectively in stumpwork embroidery.
Now that we’ve looked at how to work the cast-on stitch, and we’ve gone step-by-step through making a little cast-on stitch layered flower, we’ll look at building on that layered flower concept a bit, to create a cast-on stitch rose.
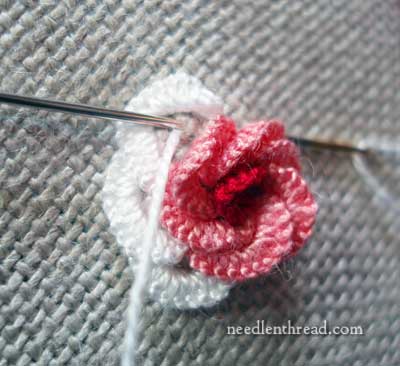
This is the rose I’m going to create in today’s Stitch Play tutorial. When you choose the colors to make this flower, feel free to select colors that blend together better. I selected white for the outer ring for two reasons: 1. I thought the contrast would make the photos for the tutorial a bit clearer; and 2. I didn’t have a lighter pink, anyway! But you can work the flower from the dark center to light on the outside, using a gradual change of shade for each layer (it will look a little more natural), or you can work from light in the center to dark on the outside, depending on the look you want.
If you’d like to work this flower, it will help to familiarize yourself first with the cast-on stitch and then with the simple cast-on stitch layered flower.
You don’t need to mark the shape of the flower onto the fabric, as everything builds from the center out.
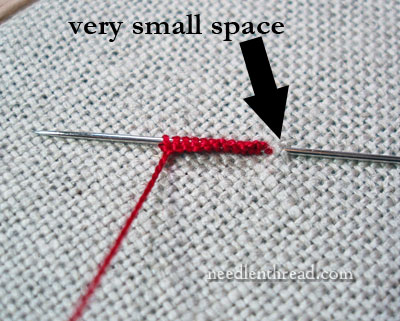
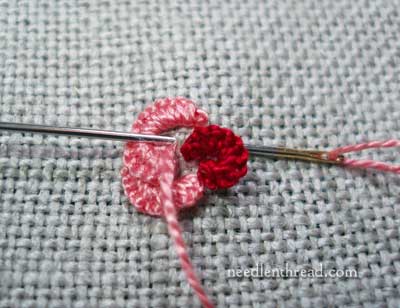
To build the rose, start by working a central petal in the cast-on stitch. The amount of fabric that you’ll pick up to make the stitch is minimal. I picked up only two threads of fabric for the petal. Cast about 12 stitches onto the needle, so that when you pull through….
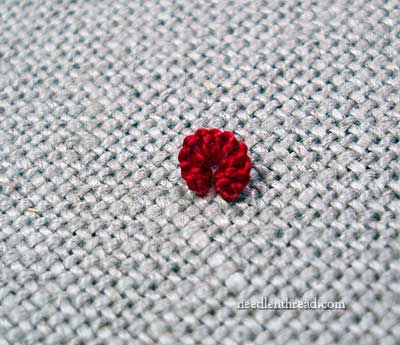
… you end up with a petal shape on the surface of your fabric.
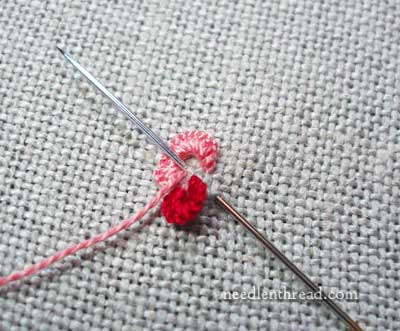
Now, begin working the next color around your central petal, making a petal shape by picking up a longer bit of fabric and casting on enough stitches to cover double the length of the fabric you picked up (see the simple cast-on flower tutorial for more detail on this).
For this middle layer of petals, I cast 16 stitches onto the needle.
Work one cast on stitch in the middle color right next to your central petal. Work close to the central petal. Build the stitches around the central petal, starting each stitch inside the curve of the previous stitch, as shown in the photo above.
As you move around that central petal, you can nudge it out of the way if you need to.
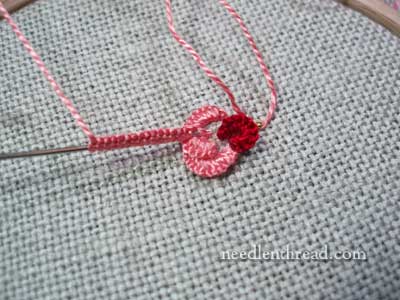
You can see in the photo above that the casting on is done with the needle coming up inside the curve of the previous petal.
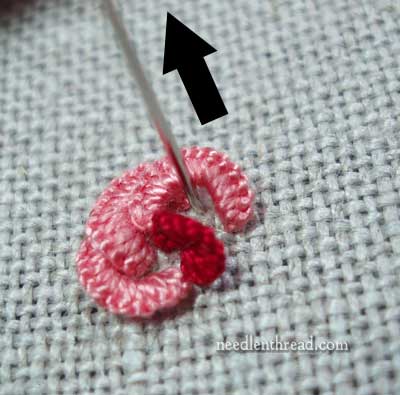
Keep working around the central petal, always starting your stitch (coming up with the needle the first time) in the curve of the previous petal, which will be the same point where the petal-before-last ended.
You can see that I’ve taken my needle down somewhat close to the central petal and brought it back up where I first emerged, on the inside curve of the previous petal. This is the position of the needle when you begin casting on your stitches.
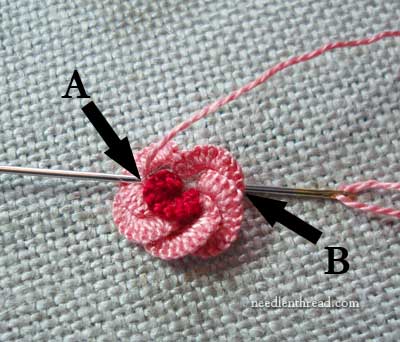
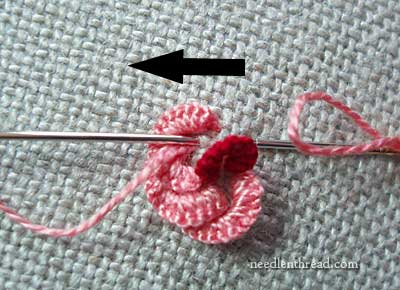
When you get to the point of the last petal to complete the layer, you’ll bring your needle up at A, inside the curve of the first petal worked in the layer, and take it down at B, from the outside of the last petal you worked. Getting the placement of this stitch right is important, to make sure the layers all swirl together the way they’re supposed to. So do make sure that point B is approached from outside the last petal you worked.
In your final step for this layer, to end your last cast-on stitch petal, take the needle to the back at point B.
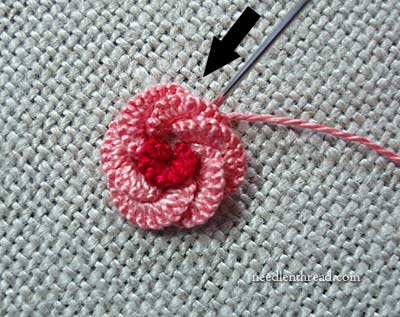
That finishes the second layer. This is a good stopping point for a small rose-like flower. But if you want a larger flower, then you can work another layer around the outside of this layer, in the same manner.

Now that you have one full layer of petals already worked, you’ll use that layer as a guide for the placement of your next layer. As you work the outer layer, you will probably have to cast more stitches onto your needle, because you will picking up slightly more fabric, to work around the outer circle. I cast 18 stitches onto my needle for the outside layer of petals.
Work all the way around the rose again, making sure that you’re bringing your needle up the first time for each stitch, inside the curve of the previous cast-on stitch petal.
This is what the set-up for your needle should look like, before you start casting on the stitches. If the center part of the rose gets in your way, just fold the petals out of the way. You can put them back in place once the whole flower is finished.
You can see here that I’ve got that inside part of the flower really folded out of the way, as I work on the outer layer. It’s not going to hurt the flower, so don’t worry about pushing the petals out of the way if you need to.
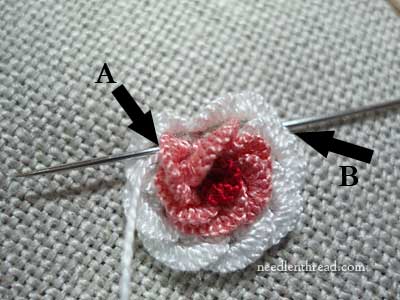
When you get to the last stitch on the outside layer, remember that you will come up at A, inside the curve of the first petal you worked, and go down at B, which is accessed from the outside of the ring of petals.
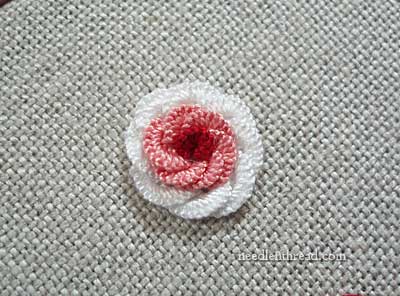
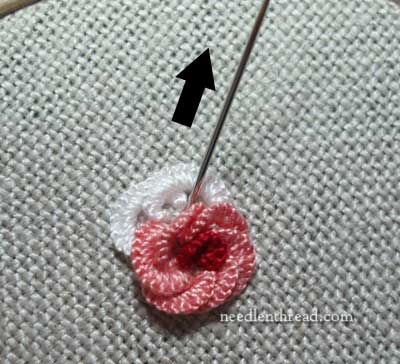
When you pull that final stitch through, this is what you’ll have!
Once you practice this cast-on stitch rose a few times, you’ll find it quite easy to make. You can vary the look of it by changing your color placement, by changing the number of layers in the rose, by changing the size of the whole flower – play around with it a bit to see what you can come up with!
Hope you enjoy it!
You can find a Stitch Play Printable for cast-on stitch and double cast-on stitch that includes this rose, plus three other cast-on and double cast-on stitch flowers, available in my shop!
Stitch Play is a series of articles on Needle ‘n Thread that features photo tutorials for creative ways of using embroidery stitches. If you’d like to read more of the Stitch Play articles, you can find them all lined up here in the index. You can also find the Stitch Play index of articles on the Tips & Techniques page, listed in the main menu at the top of the website. You’ll find all kinds of helpful tutorials and how-to articles listed on that page, if you’re looking for any particular information, or if you just want to browse.
This is such a pretty little flower. I’ll certainly be utilizing it. Thank you for showing us how to work it, Mary.
ooohhhhh aaahhhhhh!!!!! beautiful!!!!
you’re an artist. a real, true, original artist.
i’m so glad to know you, Mary, even if its only virtually.
Hello,
This is just beautiful
Thank you
PRETY!!
Bem, como faço para adquirir estes ponto de impressão aqui no Brasil… Aguardo resposta…
Hello, Rose – You can find them in my online shop (using the link at the top of the page). The payment method is through Paypal which allows you to use a bank card without having an account, if you like, and the e-books are delivered via a download link that comes in your e-mail. The text is English, and the files are PDFs. ~MC
…….HOLA MARY ¡¡¡¡QUE BELLA ROSA ME ENCANTAN TUS PROPUESTAS UN ABRAZO
Lindo o seu bordado,parabéns …..
Прелесть розочка! Отличный мастер-класс! Большое спасибо!
j’aime bien
Bonjour Mary,
This is simply Magnifique… I love this piece.
You have put so much work into it and it shows.
Congratulations and thank you for including us in this project.
France
oi tudo bem são maravilhoso as suaspostagem de artesanato um encanto
Delicado, simples ,sofisticado !!!
Amei!!!
Ha sido Ud. muy generosa al publicar con tanto detalle la explicación para realizar las Rosas.
Muchas gracias.
Lamento no saber ingles pero debo comunicarme con ud. para decirle que en su pagina he encontrado las herramientas para mejorar mi borado, estoy iniciándome en un pequeño emprendimiento y estoy muy contenta de lo que estoy aprendiendo Gracias
Ho trovato questo ricamo bellissimo.
Me encantó esa técnica!!!Muchisimas gracias por compartirlo!…Saludos desde Argentina
Bom dia!, Gosto muito dos seus bordados, você grava no YouTube? Se não fica uma sugestão.
I can see using this technique for pansies, too. Thank you for posting this!
MARAVILHOSO
Thank you for a clearly worded tutorial. I love cast-on stitch and it makes a welcome change to bullion roses.
gracious this is beautiful and clever. found this while looking for a way to embroider a rose on my great grand daughter’s afghan. haven’t embroidered for years but this makes me want to start again.
didn’t see how to subscribe so with just bookmark you
Hi, Dot – I’m so glad you stopped by! You can subscribe via email or feed in the left column on the website, if you’re on a regular computer or laptop. If you’re on a mobile device, you can use the drop down menu in the top right corner. If you scroll down the menu, you’ll see the subscription there.
Hi,
Thanks a lot for this tutorial. I have been following your work and have been very inspired. Thanks again!!
Me encanta mucho bordar pero no sabía este petado bordar para mi es nuevo y me gusto, me gustaría que sea más clara la enseñanza ya que se ve la aguja pero no se ve cómo seguir enlazando el hilo de bordar gracias
This is a fantastic tutorial, clear and so beautiful stitch. Thank you.
I’ve started embroidery now because of your demotrating types of embroidery.