


Oyster stitch is an isolated embroidery stitch made up of a twisted chain stitch wrapped with a regular chain stitch, to form a chubby roundish-oval stitch that works well for petals and the like. I’m pretty sure it’s called oyster stitch because it resembles the shape of an oyster shell.
I like oyster stitch, but I don’t use it too often on its own. Lately, though, I’ve taken to stringing oyster stitches together into a line of oyster stitches, so that they look like little buds.
For today’s Stitch Fun tutorial, I thought I’d show you how to make some oyster stitch buds, using oyster stitch as a line stitch.
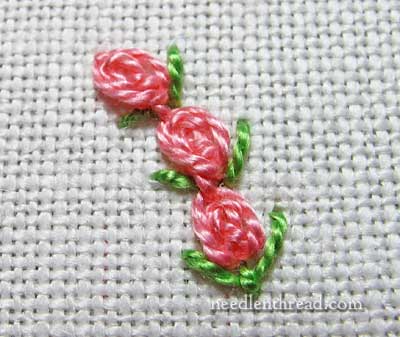
Here they are, three oyster stitches worked in a line, and then accented with green.
To help you out with this process, you might want to check out my oyster stitch video tutorial first. Oyster stitch isn’t difficult, but, like many stitches, if you see it worked out by someone else, it’s easier to get it.
For this tutorial, I’m working with perle cotton #5 with a #3 crewel needle on Legacy’s round yarn linen. You can certainly work the stitch with much finer threads, for a more delicate result.
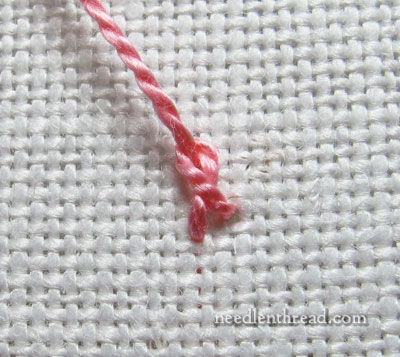
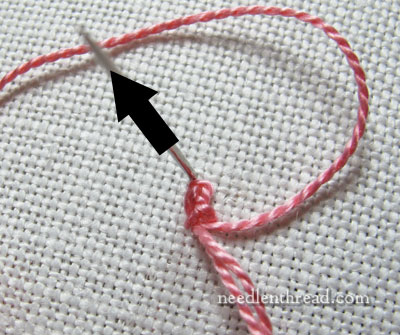
Here’s the beginning – it’s the first part of a twisted chain stitch. Notice that the stitch hasn’t been finished, though – it’s not been anchored at the tip. If you need help making the twisted chain stitch, check out the twisted chain stitch video or the oyster stitch video. Each of those shows you how to start the twisted chain stitch. (Or you can just read on, because we’ll be making more of them below!)
Take note at the two crossed-over “arms” at the beginning of the stitch. They are important – you’ll want to make your twisted chain stitch in such a way that those arms are not too tightly twisted on top of each other. You want to see the split clearly enough to be able to pass under one arm.
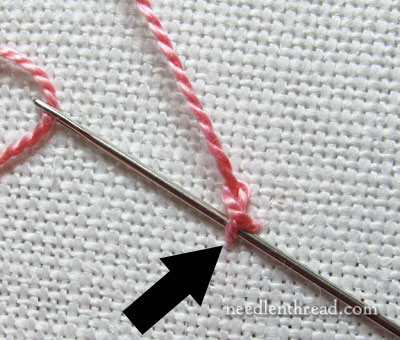
With your first twisted chain stitch formed but not anchored, pass the needle under the left arm of the twisted chain stitch, without picking up any fabric.
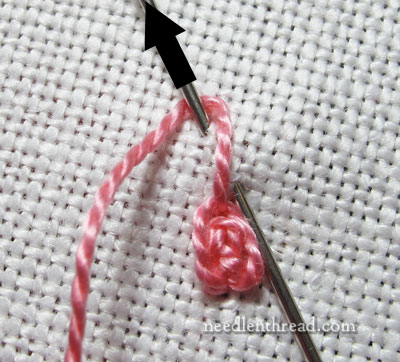
Pull the working thread all the way through underneath the arm (pull gently – you don’t want to pull too tightly during this stitch) and then take the needle down into the fabric right between the two arms of the first twisted chain stitch.
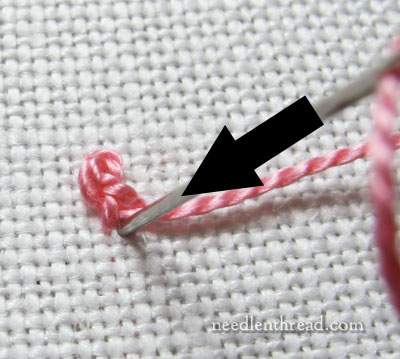
Now, bring the needle up in the fabric at the top of the stitch and inside the loop of your working thread, as if you are making a chain stitch around the twisted chain stitch (because, indeed, you are!).
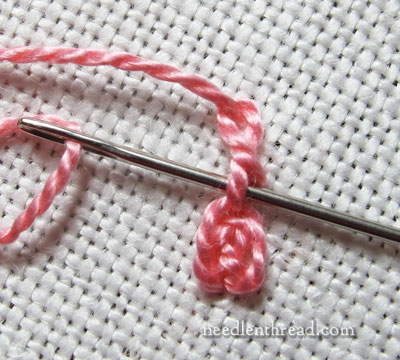
Pull the needle through to tighten the chain stitch around the twisted chain stitch…
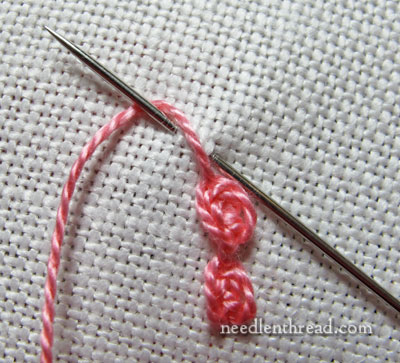
…and then you’re ready to start your next oyster stitch. Move up slightly along your line to begin the next stitch.
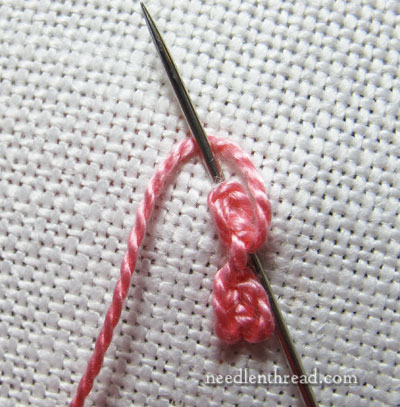
You’ll begin with a twisted chain stitch again, and you can see here the typical set-up for that stitch. The needle has gone down into the fabric a little bit to the right of where the last oyster stitch ended and emerged the stitch length away, and then the working thread crosses over and under the needle, so that when the needle is pulled through, the loop catches on the working thread to form the twisted chain stitch.
Once the twisted chain stitch is formed, pass the needle from left to right underneath the left “arm” of the twisted chain stitch, which is also the bridge between two oyster stitches here.
Take the needle down into the fabric between the two arms of the twisted chain stitch and pass it out again at the end of the twisted chain stitch, over the working thread, to form the outer chain stitch.
Pull the needle and thread through to snug up the chain stitch around the twisted chain stitch, and then start your next twisted chain stitch a little way down the line.
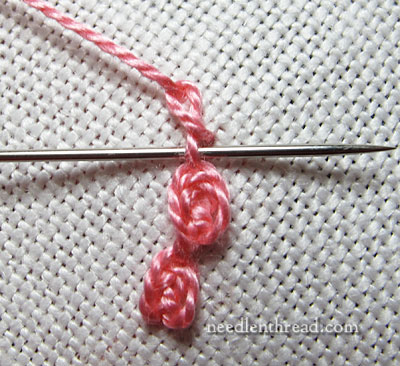
The farther away you make your next stitch, the longer the “bridge” stitch between the two oyster stitches. Here, I’ve kept them pretty close, but you can make them longer if you wish.
So, in the photo above, I’m passing the needle under the left “arm” of the twisted chain stitch (or the bridge between the two stitches)…

…and then, between the two arms of the twisted chain, the needle goes into the fabric and out again at the tip of the twisted chain, over the working thread to make the outer chain stitch.
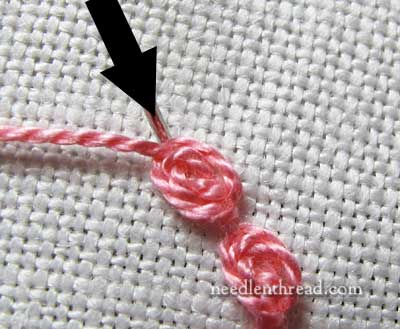
At the end of the line of buds, take your needle down into the fabric just over the outer chain stitch, to anchor it.
Then you can add a bit of greenery if you like, using whatever stitches strike your fancy. I used a fly stitch at the base of the first bud in the line, and then straight stitches next to the other two.
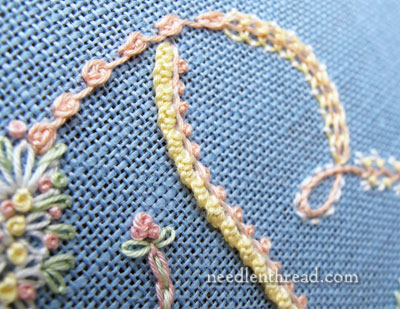
Several weeks ago, I posted some photos of an embroidered initial B on which I used this stitch, though without greenery. It can make an effective knobby-looking line stitch.
Now, go add a little spray of oyster stitch buds to your garden of stitches! Hope you enjoy them!
Stitch Fun is a series of articles on Needle ‘n Thread in which we explore different stitches and stitch combinations just for the fun of it. If you’d like to see previous stitch tutorials in this series, feel free to visit the Stitch Fun Index, where you’ll find a list of all the tutorials in the series.
I’m working on adding random embroidery motifs to an 18th century embroidered pocket. This stitch will be a beautiful addition to it.
So pretty! I’ve never heard of this stitch before and will have to have a go with it!
So pretty. I’ll have to add this to my stitch repertoire. Thank you.
Dear Mary
Thanks for the tutorial on the Oyster stitch fun it’s really pretty I remember the B monogram and thought it was lovely and loved the pastel colours you used for it. I love the stitch fun series as it’s always so interesting and I learn a lot about how to use different stitch techniques. Thanks.
Regards Anita Simmance
Thank you, dear Mary – you are a born teacher! I had never thought of stringing together an oyster stitch, what fun. You are a blessing 🙂
Tomi Jane
Oh, that IS lovely! I just love how it looks when all the oysters are strung together. Thanks for sharing, Mary!
G’day Mary,
Particularly lovely. Beaut tute! Thanks. Cheers, Kath
CO-O-O-Ol!
I have a needlepointed texas Mitten that needs a spray of Bluebonnets, and I belive this will add additional texture to the typical French and Colonial Knoted flowers.
Thank you, so VERY much, Mary!
Rosalie, from where it’s too hot to do anything but stay inside and stitch Central Texas.
Aloha Mary,
That is a lovely stitch. I like it than bullion for rose buds due to the texture. Thank you for this great stitch.
ji
Mary, I love this idea! Never thought of this stitch. Thank you for a wonderful idea. I don’t know where you get your inspiration but I believe it is a God given gift. You are blessed and to pass it on, thank you.
Beautiful Stitch! I had not seen that one before and it gets me to thinking.
cute. I already did it in my stitches sample, so I’ll not forget it.
HI mary, thank you again for another informtive and helpful tutorial. I have a question concerning the small length of thread that links the two oyster buds together in the string – could the green thread representing the right leaf be stitched OVER this linking thread to hide it?
Marian, from where it will be another Wintery wet day tomorrow, so lots of stitching (Dunedin, NZ)
Hi, Marian – Yes, sure it can. I kept the buds relatively close together, because, when they’re “buds,” it looks strange to have the longer “bridge” stitch there. You could also stitch them individually along the lines, and use a fly stitch with a longer tail (in green – leaves and stem) to connect the line. I just tried that the other day, and it looks good! ~MC
Thank you Mary, I will stitch both options on my sampler of stitches.
Thanks for these great, well stated instructions. Will be trying this out! Your work is wonderful!
Boa noite
Amo seus trabalhos pois são lindos.Parabéns!!!
Adorei ver os seus trabalhos. Vou tentar reproduzir, não sei se serei capaz de fazer.
Eu resido em Portugal, não sei se é esse o local que pretendem saber.