


What do you get when you cross a hummingbird wing, a frustrated embroiderer, the wrong colors, and a pair of sharp scissors?
Right.
A larger orts pile.
I’m sure there’s a joke in there. If I tried really hard, I could probably string this whole thing out into a series of lousy puns.
But I’m too nice to put you through that!

My orts pile is growing – I think there’s more thread in it than there is in the hummingbird’s wing.
On the bright side, the Pile gives me something to talk to while I stitch. Oooooh, look at you! Aren’t you growing so big?
I fear that, some day soon, it will respond with Feed me, Seymour!
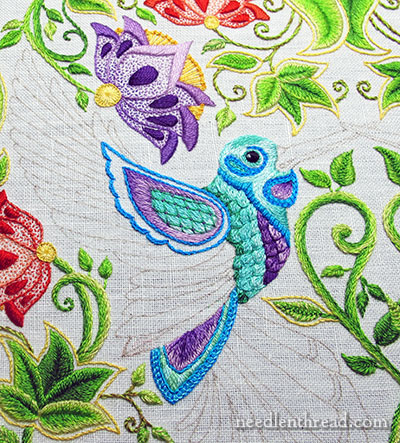
In any case, this is where we last left the hummingbird wing.
And I did it again. I did things without taking pictures. I can’t even remember what I did. I just know that at some point, I ended up here:
And I remembered to pick up the camera again.
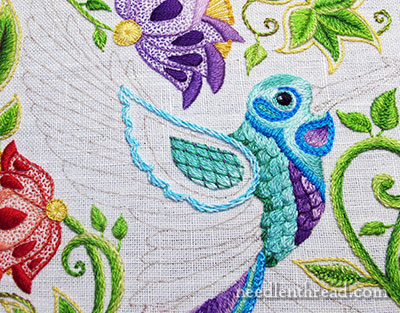
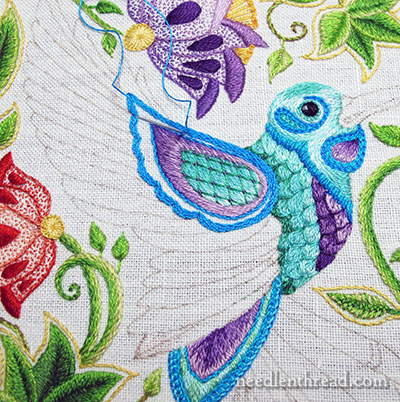
I dabbled a bit with the notion of a light colored outline on the wing, even though originally, I had planned a darker, brighter fill in this area.
And to achieve the kind of lightness I wanted, I combined one strand of the very light blue (747) and one strand of the lightest bright blue (3846). (You can find the whole color list for the hummingbirds here.)
I figured a stem stitch filling would work well to give this area a kind of heather-ish look. And I figured two strands worked together in the needle would give the outer part of the wing a little more thickness.
After all, I used two strands of floss and stem stitch to work all the stems, and it worked well. Why not try it here?
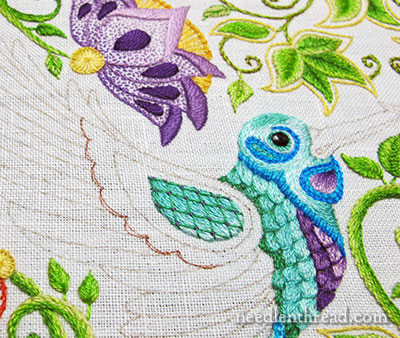
And then I stopped on the stem stitch on the outside, and somehow again ignoring the camera, I worked the center part of this wing section in three shades of purple, in long & short stitch.
I started the long & short stitch at the tip, and worked it from dark to light.
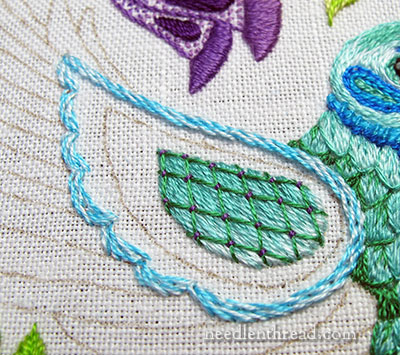
And then I took out the stem stitched outline.
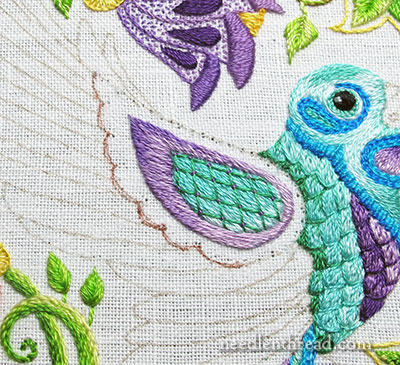
Which brought me back to this point.
Two steps forward, one step back… You do eventually get there, but it takes a heck of a long time!
Then I went to my original idea, which was a darker, brighter blue here. And, using one strand of floss, I began stem stitching to fill this area.
And I kept stem stitching, until the area was almost full.
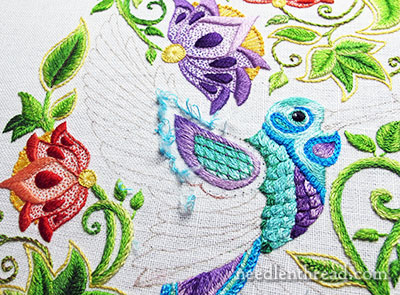
And then… well, then I changed to a different color thread. And I have about six more stitches to touch in on the scallops, to show you the finished result.
And it will definitely be the Finished Result on this area. No more frogging, no more feeding the Orts Pile. Forward, ho! and all that.
So, next time we look at it, this finished part of the wing, and then we’ll move into those feathers, which I’m just tickling to get on with!
If you’d like to follow along with the Secret Garden Hummingbirds project, which features a design from “Secret Garden: an Inky Treasure Hunt & Coloring Book” by Johanna Basford, you can find all the articles relating to this project arranged in chronological order in the Secret Garden Project Index. Among the articles, you’ll find plenty of tips and techniques that will help you with your own embroidery projects.
Don’t worry about your orts talking, Mary. It’s long since been proved that life only comes from pre-existing life!!! (And people *still* believe in evolution. Hmmmmmm!)
Looking good, birdie!
LOL You made me almost spit out my drink from laughing at the ‘Feed Me Seymour’ comment. Love that movie. 🙂
I like how the hummingbirds are coming together. I have the book (I’ve done other embroidery projects based on different pages) and I keep looking at the birds but I just wasn’t fond of them. But then I come here and see what you’re doing, and I love them again.
Dear Mary
Oh poor you Orts and all, the embroiders decisions and dilemmas of what stitch and colour thread to use. I’m sure the day is coming soon when you will feed the hummingbird. I love what you have done with the light and dark thread colours they really combine nicely with the rest of the design. I can’t wait to see what you decide to embroider on the wings. Thanks for sharing with us your ups and downs and two step back and one step forward (it sounds like a dance routine ha! ha!) progress on the project.
Regards Anita Simmance
Good Morning, Mrs. Corbet 😀
Oh, how can I even attempt to tell you how utterly amazing I think your talent and generosity is! I’m a writer, and I don’t have the words to do you justice! Actually, that’s quite bad reflection on my abilities. Oh well, it’s true.
I’m still not 1000% percent certain how I feel about the matching purple, Part of me still worries that in the end, the Hummer won’t stand out enough. HOWEVER, your stitching is so exquisite, and it looks so lovely with the light blues, and greens.
I admit to being COMPLETELY, UTTERLY, AND SPACTACULARLY, WRONG, about the scallops! Please forgive my earlier revulsion. I couldn’t understand what you had in mind seeing the drawing, and now I know that inexperienced stitchers like me shouldn’t judge until they see an area actually STITCHED! Mea Culpa! I do think you made the right choice with the brighter blues, it really looks superb!
This project is teaching me so much!
1. Don’t be judgmental about stitches. I thought I hated Seed Stitch, now, it’s the main element on my current project.
2. Stop being petrified about so-called ‘thread waste’ there was a time not too long ago (about a month) when I was determined not to have over an inch of leftover thread! Now, I realize my misplaced sense of frugality was having a negative impact on the quality of my work. My new motto, “Orts are OK!”
3. Experiment! It keeps things fun!
THANK YOU SO MUCH!
The part of your comment about thread waste made me giggle. I read in one of the comment sections here about putting the Orts out in the spring so the birds can use them to build their nests. I like that idea, so now I am “okay” with a bit left over (four inches or less)as we’ll have pretty bird nests next spring. I live in a national forest where there are over 200 birds species; one of my favorite being the blue jay. I am really looking at them more and more as I am interested in needle painting one. We have a craft fair once a year where the local artists sell their wares and I really want to embroider some of the local birds, especially the blue jay! It’s funny how I look at animals in a different way and truly see their beauty and the many different ways nature has shaded them in magnificent colors! Oh how wonderful and beautiful my world has become since I started learning about embroidery! Such a beautiful world in which we live!
Still giggling!
Christi ;0-)
Dear Mrs. Corbet,
glad I was right about the scallops! They look amazing in the darker blue. Just keep on on dancing (tangoing?) on!
Mary, he is looking fabulous! I know that you feel it’s been a one step forward and three steps back process – – – but it is teaching us all so many things:
It doesn’t have to be perfect first time round.
Linen is wonderful to stitch on – and very forgiving!
If you don’t like it – just have a go at another variation.
LOTS of info. on the types of stitches to use and their variations.
Why some stitches don’t work – and others do.
Don’t be afraid to play around with colour.
This stitching stuff is great fun!
I could go on and on – – its been wonderful to watch this project progress – and thanks so much to you for sharing the god, the bad and the ‘otherwise’ with us.
Oh yes, that darker outline does look much better. Thanks for sharing, Mary!
Mary,
Is it possible that you are having these problems because the colours that you are using are ones that you do not usually use and so do not go together easily in your mind’s eye?
I suggest this because I have just that problem when I am using unfamiliar colours – they just don’t look RIGHT!
Oh the irony: you could do what I did once with an abundance of orts. Put them in a mesh bag (the ones you get garlic or such in) and hang it in your shrubbery. The birds (hummers too) pull out and use the threads in their nest-building. You can, if you’re lucky, see colored threads woven in them in the fall when the leaves drop and the birds have moved on.
I generally do designs that come with a color chart so I don’t have to make decisions. It boggles my mind how you decide which colors will look when the project is done. I know you switch them out now and then but you’re still looking ahead.
For now I’m working on a snail (yes, a snail) and I had to change the color to green. I stitched and stitched and kept telling myself how horrid it looked. I couldn’t picture it all together. But once I added the metallics and did the backstitching to give it the snail swirl, it looked great. First of all I don’t care for green but it fit in with the other colors. And second, my mind can’t visualize things well. So I applaud your ability to dream in living color.
The darker blue makes this a perfect balance for the doodad on the birdie’s chin; the lower portion of his body, and the breast feathers – all have at least some bright blue border. Which makes me even more intrigued as to how you will approach the wing and tail feathers!
Dear Mary,
I am glad you resisted the temptation to pun, because that situation does not sound like one you orts to laugh about.
😉
Oh dear! LOL!
Oh I am enjoying watching this project unfold! Initially, I liked the pale blue stem-stitch scallop edge to the wing so when you took it out I was a bit disappointed. Then I scrolled down a bit further and when I saw the brighter blue replacement, I completely understood! It does work much better and balances the other bright blue highlights elsewhere on the bird. Love it! 🙂
Oooooh, I literally love EVERYTHING on this wing!
I love love love my orts! I stuff them in mason jars and close the lid when the jar is full, they end up being surprisingly pretty; in fact, my mother asked for one of my jars as a present and she keeps it on a shelf in the living room.
I like them because its like an archeological record of the needlework I’ve done 🙂