


Just over a week ago, we began a mini series on how to make a hand embroidered Christmas ornament from embroidery supplies in your stash.
Even though time was ticking quickly towards Christmas, I proposed that we still had plenty of time to embroider an ornament – a fun ornament! – and have it hanging on the tree or wrapped as a gift before Christmas.
In the first article, I showed you how I set up my ornament and began the embroidery. In the second article, we looked at the embroidery techniques I used on the front of the ornament.
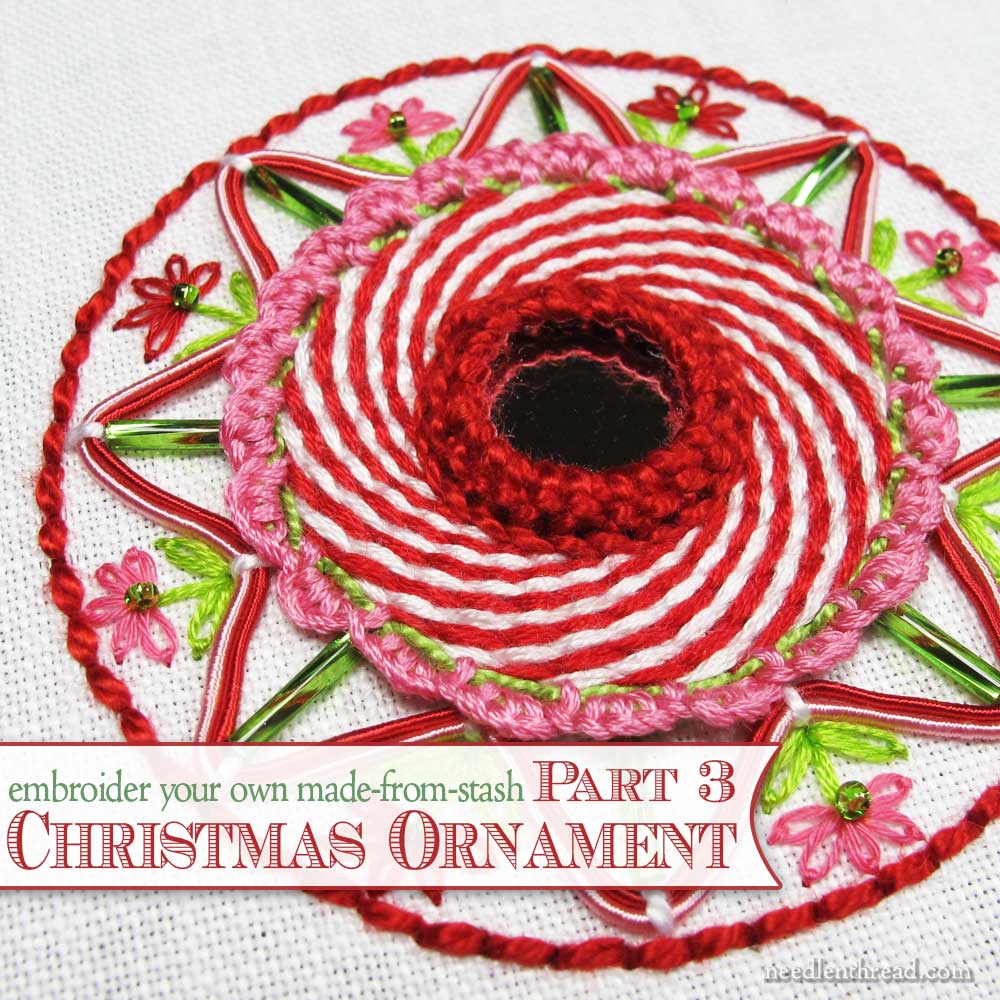
Today, I’ll show you how I finished embroidering the front and the back of my ornament, and tomorrow, I’ll show you how to finish the ornament – a simple but effective finish, that takes about ten minutes. I promise! Only ten minutes!
Don’t forget you can click on any of the photos in the article to view them larger.
For this Christmas ornament, I really wanted to use only supplies that I had on hand – I wanted the entire thing to be made from stash.
If you’re making a similar ornament, use what you have on hand. Make substitutions for the threads I’m using, if you want. In fact, threads, colors, and stitches are all fair game for making substitutions! The point is to have fun making the ornament, with any stitch, color, or thread type that grabs your fancy.
The Stitch Fun series here on Needle ‘n Thread features a bunch of fun embroidery stitch tutorials for composite stitches, complex stitches, or just jolly good fun stitches. You can find plenty of stitch inspiration there to make your own ornament unique.
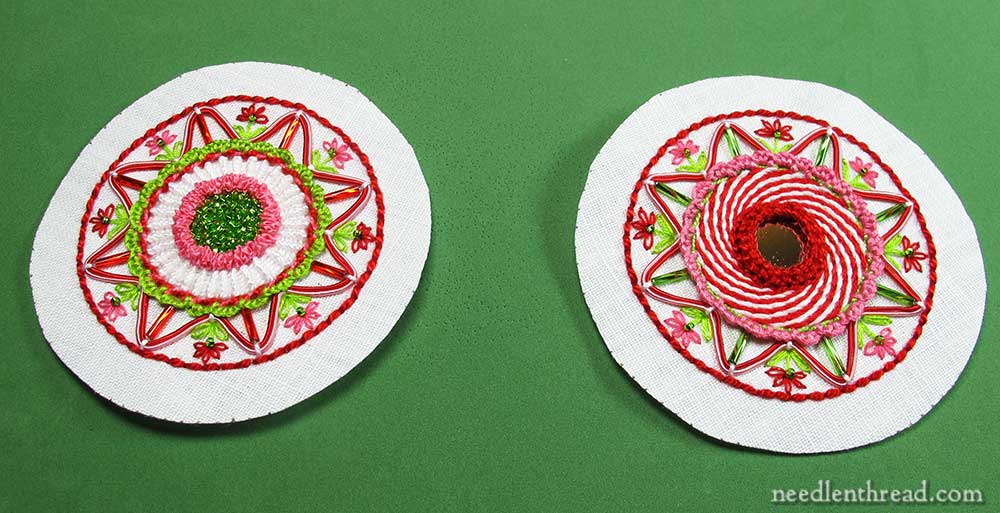
When we last visited the front side of the ornament, I had worked a red buttonhole stitch around the rouched pink silk ribbon wreath. I didn’t like the effect so much, so I changed it to a ribbed spider web stitch in the area just outside the ribbon wreath, in white perle cotton #5.
To set up the foundation stitches for the ribbed spider web, I started by dividing the area into four…
…and then I split up each section, trying to keep the spacing relatively even, since I was doing it by eye.
The spacing is not perfect, but once the ribbed spider webbing is worked over the foundation stitches, any minor irregularities in spacing won’t be as noticeable.
This video tutorial for the ribbed spider web stitch will help you, if you’re not familiar with how to work the stitch.

So, this is one side of the ornament, finished.
Now, on to the other side!
Of course, if you don’t want to work two sides, you can cut the project time in half by backing the ornament with a nice coordinating fabric.
But… I figured I might as well go whole hog and do both sides!
I set up the second side of the ornament exactly the same way I set up the first side.
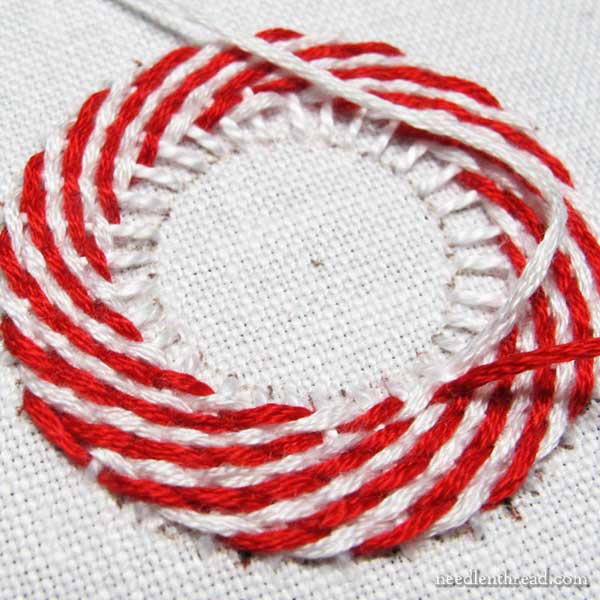
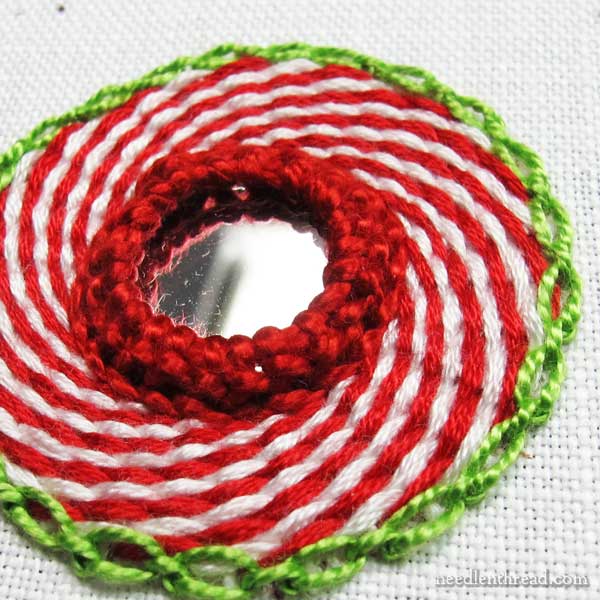
Filling the space of the two thin rings around the center ring, I used the same technique used to create a diagonally striped raised band, only I worked it around in a circle.
There’s only one trick you have to pay attention to, if you want to end up with a circular striped swirl: the foundation stitches around the circle must be odd in number. If you have an even number of foundation stitches, you won’t get the swirled effect.
Besides that one point, there’s no difference in the method of working this diagonally striped band around a circle or in a straight line. You’re welcome to refer to this tutorial for the diagonally striped raised band, if you’re interested in using this technique. Just make sure your spokes are odd in number!
I started with a #5 perle cotton in white for the foundation stitches around the circle, and then, for the stripes, I used a full six strands of regular DMC cotton floss in 321 (red) and white, working from the outside of the circle inwards, filling up the foundation stitches until they were completely covered.
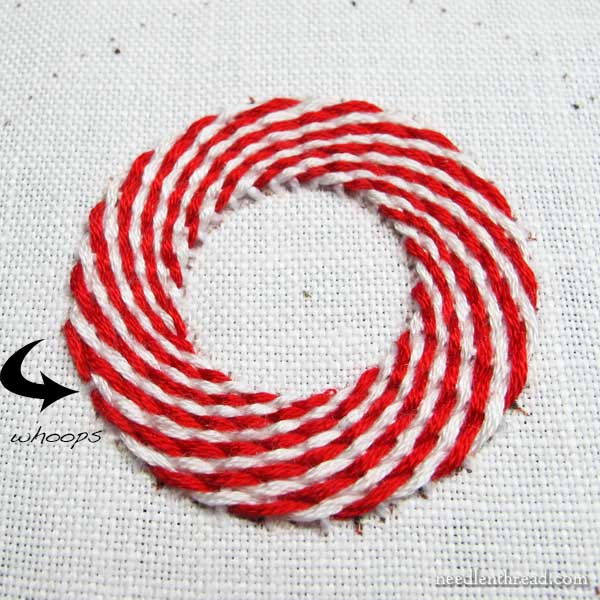
There’s the completed peppermint swirl.
I did make one wee mistake – it was with the first white stitch around the outside of the circle. But I didn’t notice it until I was halfway finished. Since I knew I’d be covering the edges of the peppermint swirl, I left it.
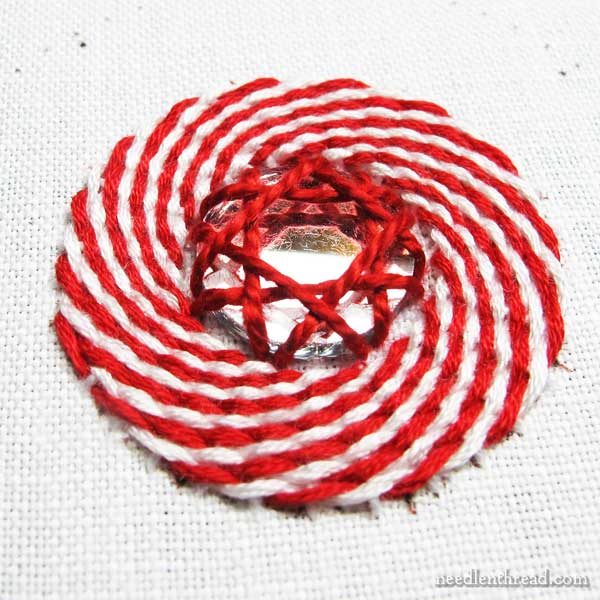
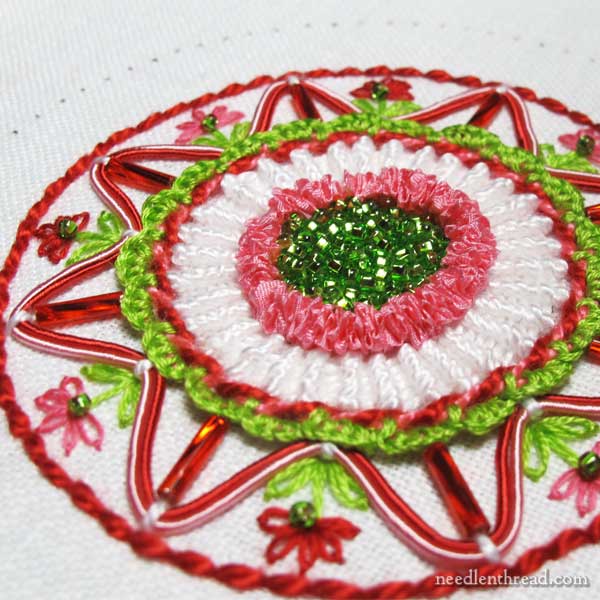
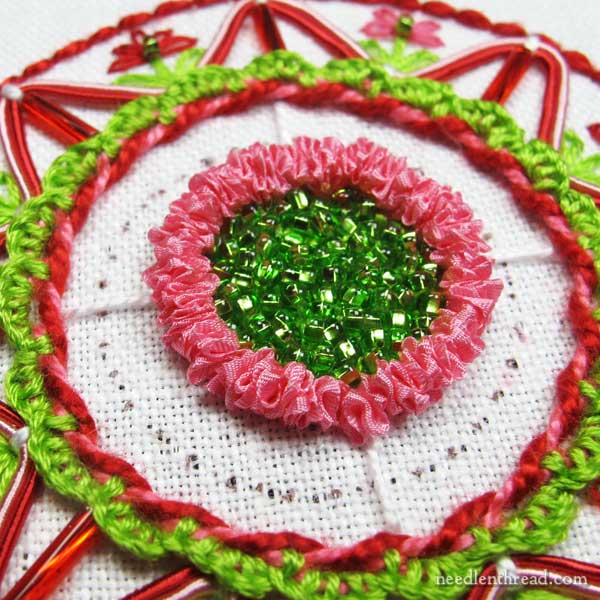
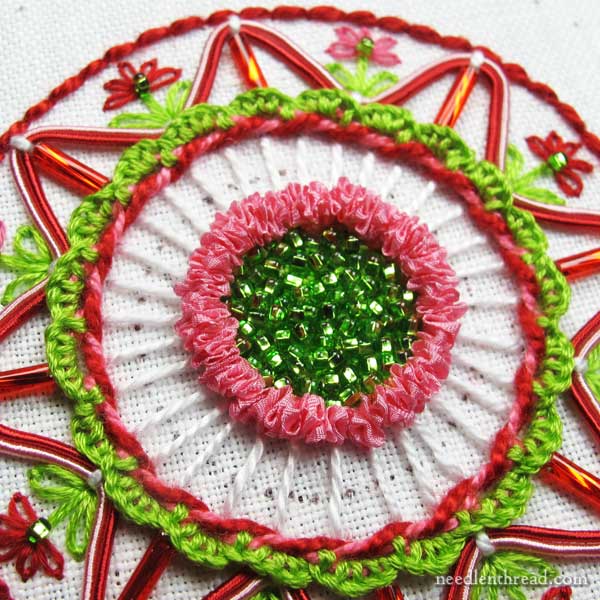
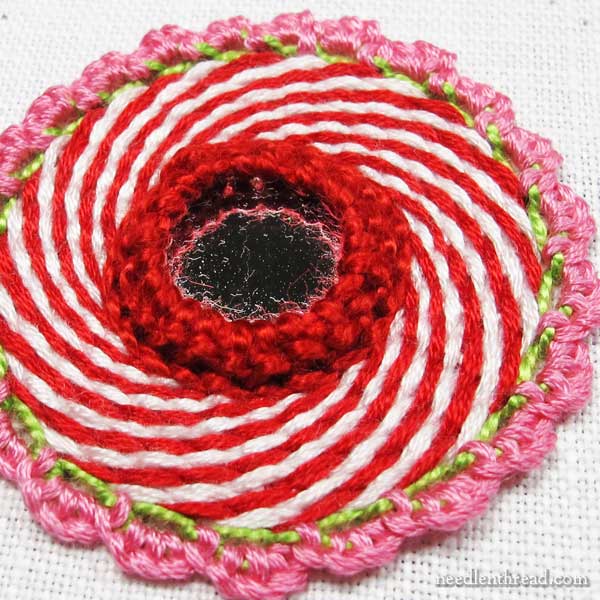
In the very center of the ornament, I fixed a shisha mirror to the fabric using #3 perle cotton.
You can find a complete step-by-step photo tutorial for shisha embroidery here.
If you like the technique, but you don’t have a mirror, you can still use it. I’ve used shisha embroidery to fix circles of decorative card stock to fabric, and it works great! As long as the piece isn’t going to be laundered, you can use paper. You can also substitute other items, like buttons, shells, beetle wings, and so forth.
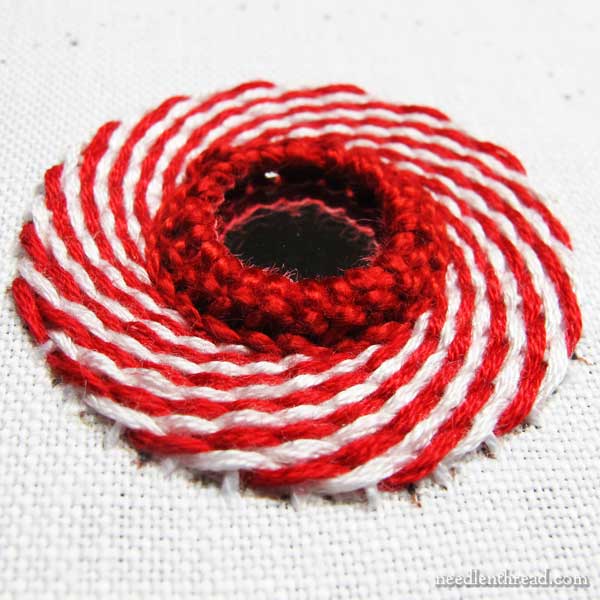
Here’s the mirror, attached with the shisha stitch. I like the dimension it adds.
Next step, a cable chain stitch circle around the outside of the peppermint swirl, in a #5 perle cotton in bright green.
I worked the buttonhole stitch scallops in 6 strands of pink DMC floss over the cable chain stitch, just as I did with the same area on the front of the ornament.
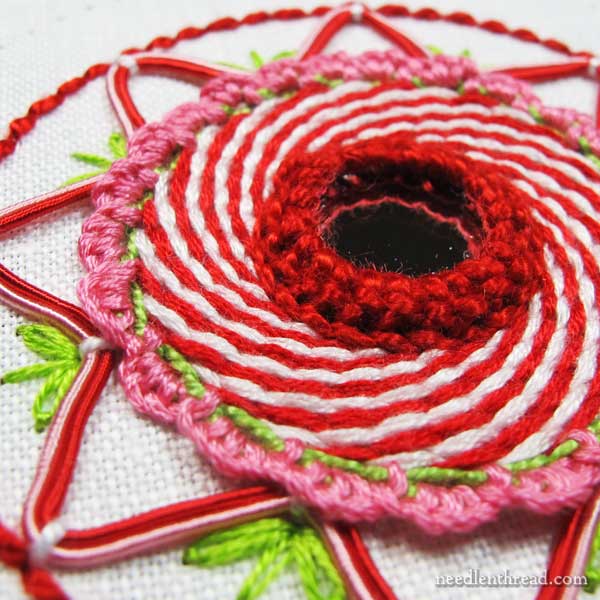
Then it was time for DMC Memory Thread, using the same couching method and design I used on the front of the ornament, only I reversed the position of the pink and red Memory Thread.
Once the Memory Thread was couched on, I worked the same green straight stitch stems and daisy stitch leaves (using three strands of DMC floss), just like on the front of the ornament, working the flowers in each “trough” of the Memory Thread waves.
The flowers are daisy stitch as well, just like the flowers on the front of the ornament, with a green seed bead in the center of each.
And in each wave, I attached a twisted bugle bead, just like on the front, but this time in bright green.
The whole ornament was outlined in backstitch using #3 perle cotton in red, just like I backstitched around the perimeter of the first side of the ornament, except that I added the backstitch here almost last.
The backstitch outline is very important – it should be the same on both sides of the ornament.
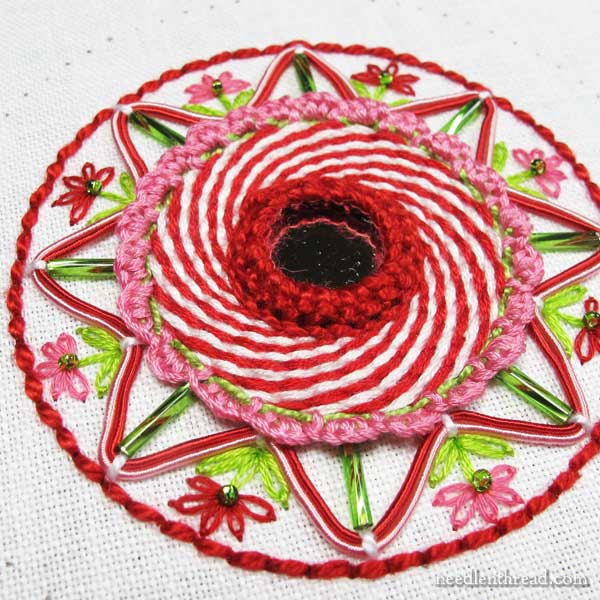
And that’s the end of the second side!
Above, you can see the two side cut out, ready for finishing.
Since I set these up on a frame, I didn’t need to block them when I cut them out. They’re smooth and very stiff, thanks to the type of linen and the amount of embroidery on the linen. I don’t need to do anything else to the pieces before doing the finish work.
If you use a hoop, though, you might need to block and damp stretch the embroidery before cutting it out.
I purposely echoed a similar design layout on the front and back of the ornament, because I wanted some continuity between the front and the back. If you’re embroidering both sides, though, this might not matter to you. Feel free to mix things up!
You can find the rest of this series on making your own hand embroidered Christmas ornament through the following links:
Part 1: Setting up the Christmas ornament and starting the embroidery
Part 2: The embroidery on the front of the ornament
Tomorrow, we’ll finish the ornament up so it’s ready for the tree! Can’t wait!
If you have any questions, comments, suggestions, do feel free to leave a comment below! I always enjoy the chatter…
Needle ‘n Thread, Daily!
Did you know there are seven terrific reasons to sign up for the Needle ‘n Thread daily newsletter? Check them out and sign up today!
Dear Mary,
Thank you so much for this fun series! I learned something new today: diagonally striped raised band worked in a circle. It just screams ‘must try’.
Have a lovely Christmas and a happy new year.
Love, Jessica
Hi, Jessica – it’s fun, isn’t it? I think it’d be fun to embroider up a ton of little red and white swirled pieces just in this technique, about an inch and a half in diameter, and hang them all over a little tree. They’d be so cute!
Good Morning Mary, I usually read your site in the evening but this morning I had a moment to read it. I can’t wait to start this ornament. I am going to give it to a dear friend. She is away until after the new year so I have time to complete it. Thanks for sharing your thoughts as you work a project. Your creativity is inspiring. Have a Blessed Christmas
Victoria in VA
Glad you enjoy it, Victoria! And I’m thrilled you’re making an ornament, too. Have fun with it!
Mary, What is the name of your circle tool?
Have a Blessed and peaceful Christmas!
Hmmm….not sure what you mean, Chris? What circle tool? do you mean the template I used for marking the circles on the fabric? I included a PDF in the first article, that you can print out. I linked to the tutorial in the article above, on how I transferred the design from the printed circle. If this isn’t what you’re talking about, though, please let me know!
This looks good enough to eat. It’s lovely and yummy looking!
Absolutely beautiful! I can’t wait to see it hanging on the tree. Lots of techniques here that I would like to try.
These are just wonderful, thanks so much for sharing!
thanks, Cris – glad you like it!
Hi, Mary!
Off topic a bit. But did you get my message (with photos), which I sent a couple of days ago? I just want to make sure it did not get lost (sometimes messages can just dissolve :)) or go to spam folder)
That peppermint swirl came out so well! Great idea. It’s all looking so pretty so far, can’t wait to see it all together!
what a lovely gift to us. Thank you and Merry Christmas.
Your ornament is such fun to see! Reminds me strongly of ‘The Grinch’ (the old Boris Karloff version) which is my absolute favourite and a must-watch every year.
Dear Mary
Oh these are beautiful and I really like what this fun series. I like the spider web on the front of the ornament and I really like the peppermint on the backside of the ornament and the shisha mirror looks lovely and compliments the decoration. You’ve made me want to follow you on this and make an ornament as well, but I will have to make one for next year as it’s to late now. Thanks so much for instructions on how to create a Christmas ornament and for sharing the information with us, I can’t believe Christmas is in a couple of days and still lots to do.
Regards Anita Simmance
Thanks for all you share throughout the year with us. You are truly amazing. I can picture a tree with tons of these ornaments on it… if I start now, maybe I could have enough for a tree in my next life!!!!
So pretty! Thanks for sharing that Mary!
So pretty!! Very inspiring. :)I can’t wait to try it. Perhaps everyone will get ornaments for next Christmas!
Such beautiful, cheerful Christmas ornaments!
These would make wonderful little pincushions, or sachets filled with lavender. It would be a great way to enjoy them throuhout the year.
Carolyn in SoCal
Hello Miss Corbet,
Not that your work isn’t always exquisite (I’ve been a long-time lurker…), but I just adore the red&white swirl you did 🙂
I’ve bookmarked this page because I’ll feel the need to try this for myself in the not too distant future.
And while I’m here; thank you for your wonderful video tutorials, you truly have a gift for teaching!
Happy Christmas,
C.J.
Dear Mary, I can understand your candy fix the other day now as it mirrors the reverse (?) of your pretty ornament. It looks like a Christmas sweetie. The swirled banding is a stroke of genius! And we now know the way to use Memory Thread as well. Thank you. Wishing you a Blessed Christmas and a very Happy and Peaceful New Year, Catherine
My reaction when I saw the top picture in my blog feed: WOW!
This is gorgeous Mary. Thank you for sharing your creativity with us once again.
I wish you a Christmas as wonderful as this ornament.
So glad you like it, Irene! It was such fun to make – just the right “stitching tonic” for this time of year!
Dear Mary,
My question is not related to this post. (These ornaments are very beautiful by the way)
I am in the process of deciding about the techniques and materials for a big project that I have in hand. First I was going to fill large areas with gold passing thread, but decided that I needed a smoother surface than what passing thread gives me. So I thought maybe leather would work better than passing thread. Now I am looking for some resources about using leather in embroidery. I would like to learn how to stitch leather on the surface neatly, and how to pad it correctly. I have not yet been very successful in finding such information. Would you kindly do me a favour and if you are aware of any resources for such information, share them with me?
Thanks a lot and Merry Christmas
Cheers
Hi, Naz – Most goldwork books will have at least a small section on appliqué of kid leather in goldwork. It’s not difficult, except for the whole stitching-through-leather thing, which can be rather painful. Essentially, you stitch the leather on just like you’d stitch felt padding on, stitching from outside the shape to the inside, just over the edge, spacing your stitches evenly as you go. You don’t have to pad kid leather unless you really want something with higher relief. It sort of creates its own puffiness. In any case, kid leather is going to give you a decidedly distinct look from smooth passing thread for gold Japanese thread. It’s not the same look at all, just so you know. It is definitely a solid fill, but it adds a whole different aesthetic to the finished piece. It doesn’t blend the same way. Anyway, maybe if you try Hazel Everett’s goldwork book – I think she mentions leather appliqué. Hope that helps!
Thank you so much for these valuable information Mary. You are always very generous in sharing knowledge. Thanks.
I have registered an account on “Ask & Share”. Once that is confirmed, I will upload my design. I would love to have your advice on material selection. I have been examining various techniques since early summer in order to find the one that best suits this project. Yet, I feel lost.
Merry Christmas Mary! Thanks so much for all the ways you inspire, encourage, challenge and of course teach us through this wonderful daily newsletter. I am in awe of all you do and still take time to invite us into your world of embroidery. We are so much richer because of the many ways you share your passion for your “needle and thread” with all of us. Enjoy a nice long restful holiday. Restful of course meaning perhaps a bit more time for yourself and your wonderful stitching projects. I truly appreciate you…and look forward to hearing from you again on Monday!