


Well, hello there!
Ready for a really colorful, super-fun hand embroidery project?
The concept for these hand embroidered kaleidoscopes that I’ve been playing with this year developed from a combination of inspirations and ideas: the whole adult coloring book craze, the desire to embroider with lots of lively color, and the addictive practice of doodling repeat geometric designs.
Earlier this year, the folks at Commonthread by DMC sent me a set of their new thread line, Coloris, and I agreed to work up a project and write an article about it for them. You can find my overview of the Coloris line here, and a handy chart of DMC floss colors that correspond with Coloris here.
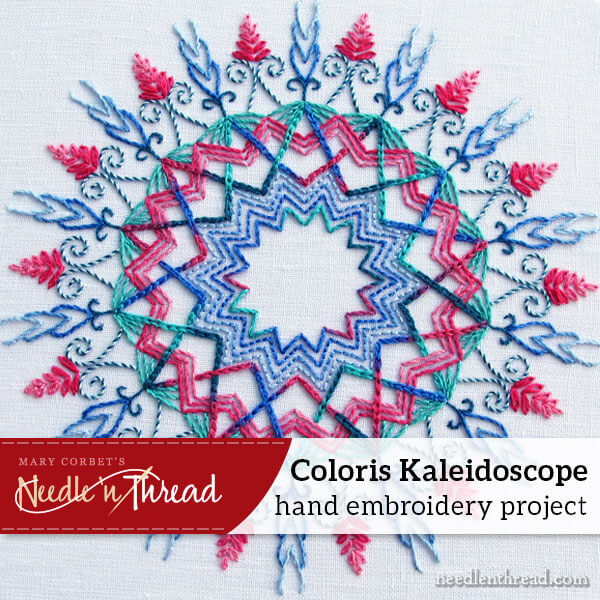
When I first started playing with Coloris threads, I realized that they would work great, incorporated into a kaleidoscope design!
So today, I’m going to walk you through my Coloris Kaleidoscope so that you can embroider it, too. You’ll find a printable embroidery pattern at the end of today’s article. As always, feel free to mix up your own batch of stitches and colors. Maybe you have a particular Coloris color way that you love – just match up some corresponding DMC floss colors with it, and you can create your own unique version of the Coloris Kaleidoscope!
Materials
Remember, you can make substitutions as you wish! This is the list of materials that I used for my Coloris Kaleidoscope:
1. Fabric: White linen backed with cotton muslin. I used a lightweight linen which was slightly transparent, which is why I backed it with a good quality white muslin. If you’re using a medium weight or heavier linen, or any other heavier fabric that isn’t transparent, you don’t necessarily need to back it.
2. Threads:
DMC Coloris: 4507
DMC Floss (stranded cotton):
blue (798, 799, 800)
pink (600, 601, 602, 603)
aqua (959)
turquoise (3808, 3811)
3. Crewel (embroidery) needles #7 and #9; tapestry #26
4. 8″ embroidery hoop
5. Embroidery scissors and a pen or pencil to transfer the design
Transferring the Design & Setting Up the Project
To transfer the design, I used Sublime Stitching’s iron-on transfer pen, which I reviewed here. I found that the iron-on pen worked well for an intricate design like this. However, if your fabric is easy enough to see through, or you have a good light source behind your fabric, you can trace the design using a pencil or a water soluble transfer pen.
Once the design was transferred to the linen, I hooped up both the linen and the backing fabric, ensuring that they were drum taut in the hoop.
Selecting Thread Colors
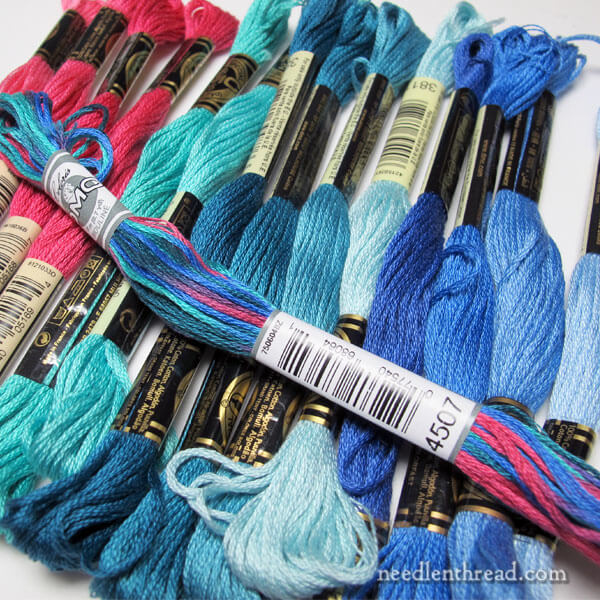
Using this chart to select DMC floss colors that correspond with Coloris 4507, I picked out shades associated shades in each floss color, so that I had a range of shades of each color of solid floss to work with.
As easy way to pick out shades of any solid floss color is to refer to the color number. Normally, shades in the same color family are will have numbers that are very close in sequence to the solid color’s number. For example, the pink in Coloris 4507 is 602. Other shades of that pink color family are numbers 600, 601, and 603.
If you decide to use a different color family, you can find associated shades of your solid floss colors the same way.
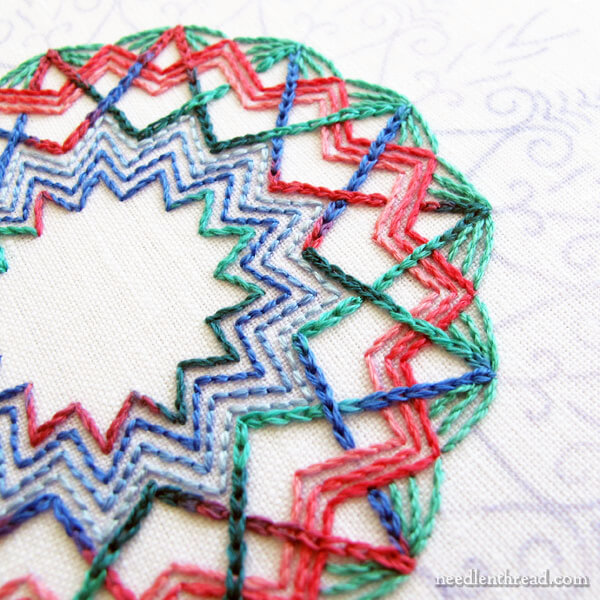
Order of Work: Inside to Out
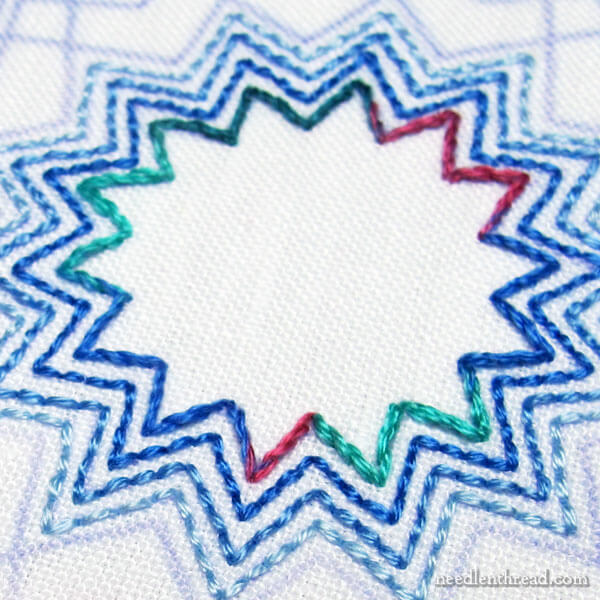
Stitch from the inside of the kaleidoscope design to the outside.
The innermost line is worked with Coloris 4507, with two strands of floss in the needle, using stem stitch.
The next three lines out are worked in blues, from dark to light, in backstitch, with two strands of floss in the needle.
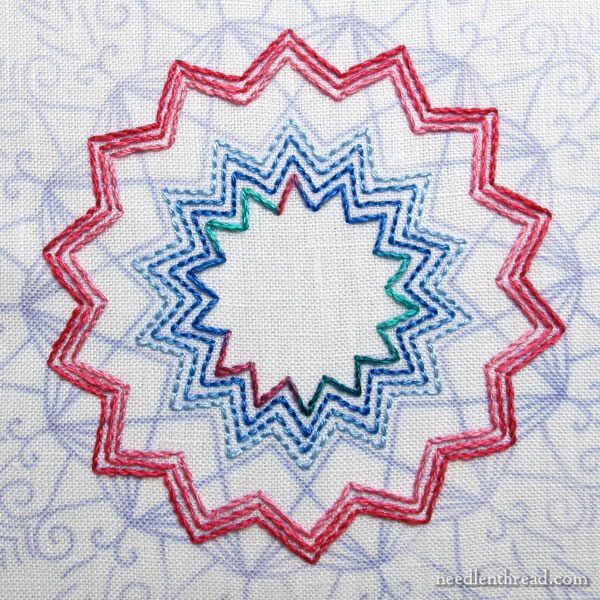
After finishing the closely grouped innermost lines, I skipped forward to the next group of three lines, pictured above. These are worked in stem stitch, in pinks, from light to dark, with two strands of floss in the needle. For these lines I used 603, 602, and 600.
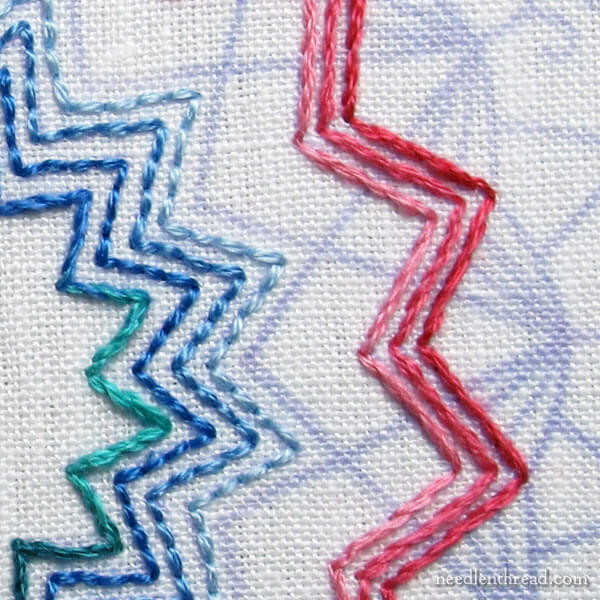
To come to a sharp point with stem stitch, you’ll find this tutorial for stem stitch on sharp corners handy. Even though the tutorial focuses on scallops, stitching the sharp stem stitch corners in the kaleidoscope design use the same concept.
The Coloris Bursts
The Coloris bursts in the center of the design look interwoven. To achieve the interwoven look, this is how I stitched these two lines.
The Coloris bursts are worked in chain stitch, with two strands of floss in the needle to create a nice, bold line.
First, embroider the line in the design that does not have any breaks in it. This is a continuous burst pattern, and it will cross over the pink stem stitch lines.
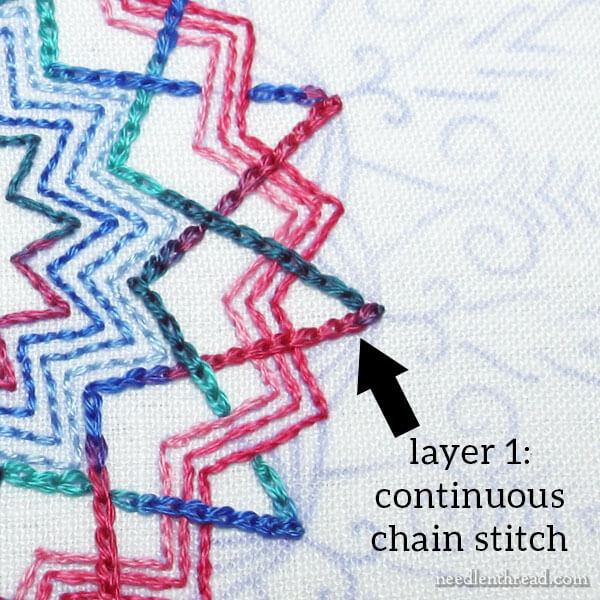
You can see in the photo above that Layer 1 in the burst pattern in chain stitch does not stop and start again over the pink stem stitch lines. Just work your chain stitch right over them!

Layer 2 of the burst pattern seems to pass over and under the pink stem stitch lines and the previous Layer 1 of the burst pattern. The line of chain stitch simply breaks and starts again to give the effect of passing under those previously stitched lines.
On the printable pattern, you’ll see where the line of layer 2 breaks for the pink stem stitch group of lines. Use that break to gauge where you pass over and break for subsequent stitched lines.
Just remember: the first layer of the burst is a continues chain stitch. On the second layer of the burst, work the chain stitch so that it looks like an over-under sequence.
Chain Stitches on a Sharp Corner
To work the chain stitch on a sharp tip, like the tips in the large Coloris burst in the middle of the design, simply end each chain stitch line in the pattern as you normally would with a little anchor stitch at the end of the line.
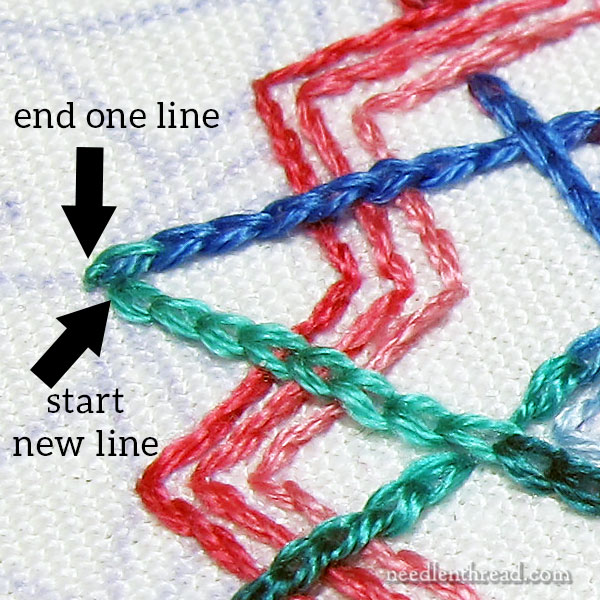
After making the little anchor stitch, start a new line right up next to the end of the first line, as shown in the photo above.
Aqua Layer
Once the Coloris bursts were finished, I added three layers of stem stitch in aqua around the tips of the burst. Use two strands of floss in the needle for each layer.
The Outer Edge

The first element I stitched on the outer edge are what I call the blue lobster claws.
The small scrolled base of these blue lobster claws is worked in the dark turquoise, in stem stitch, using one strand of floss in the needle.
The blue layers are also stem stitch, worked in blue from dark to light, using two strands of floss in the needle.
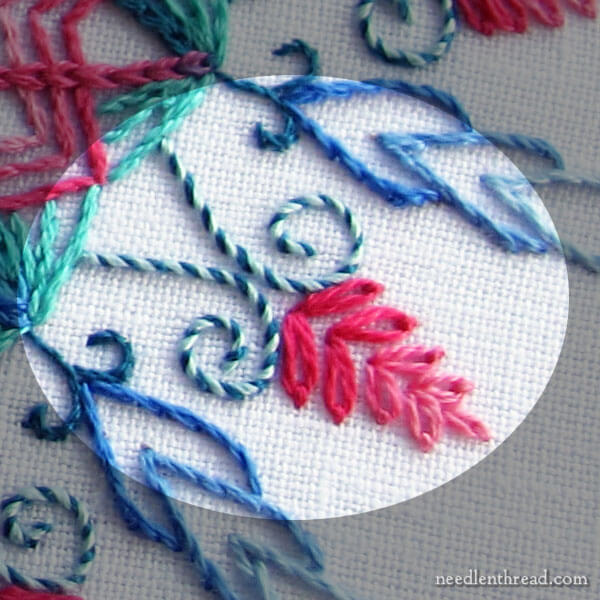
For the pink triangular bunches on the outer edge of the design, I worked the swirled base in whipped backstitch, using the dark turquoise for the backstitch and light turquoise to whip the backstitch. I used two strands of floss in the needle. To whip the backstitch, use the tapestry needle so your needle doesn’t snag your stitches.
The pink bunch is worked in detached chain stitch, from dark pink to light pink. The two detached chains at the base of the bunch are 600, the next two up are 601, the next two are 602, and the last three detached chains at the tip are 603.
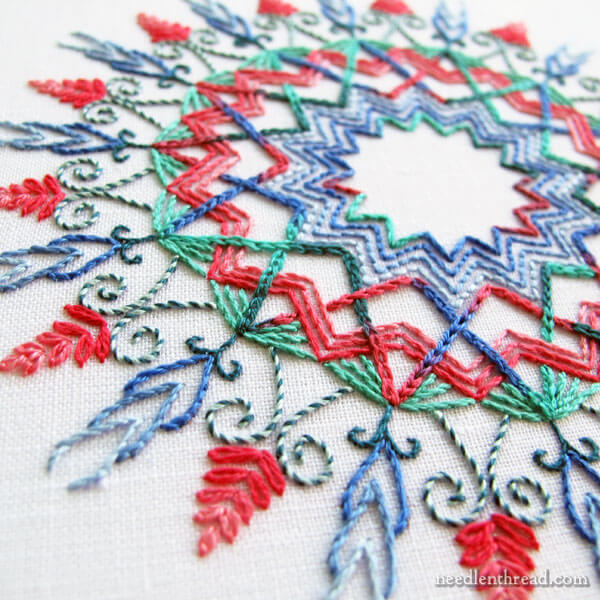
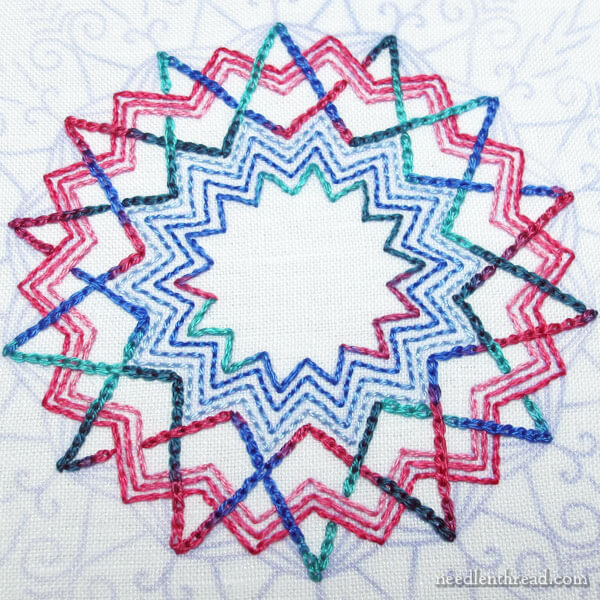
And that’s it! The design is finished!
This kaleidoscope design stitches up pretty quickly. The layers of lines make it a good study in line stitches, and the whole stitching experience is relaxing and fun. There’s just something mesmerizing about watching the whole piece grow in color from the inside out!
Embroidery Pattern for the Coloris Kaleidoscope
Here’s a link to the PDF for the Coloris Kaleidoscope. The design prints at 6″ in diameter, if you choose 100% or “no scaling” in your printer options. You can enlarge and reduce it as you wish. I worked it at 6″ in an 8″ hoop.
Coloris Kaleidoscope – PDF
Resources
You can find stitch tutorials for all the stitches used in this project (and lots of other stitches!) here.
If you don’t have Coloris available locally yet, you can find it available online through DMC. It’s also available through Amazon. You’ll find it listed here on my Amazon recommendations page.
I hope you enjoy embroidering this colorful kaleidoscope and that it gives you a good excuse to have some fun playing with colors and stitches!
This article contains an affiliate link to my Amazon Recommendations page, which means that Needle ‘n Thread receives a small commission for any purchases made through that link, without any extra expense to you. Thank you!
Looks Lovely. I just wish my local Michaels, Joanns and Hobby lobby would stock Coloris. It always takes them a couple of years to start stocking new color, and then only does so in packs….. Very frustrating since I have seen, and would like to try the Coloris colors.
I’ve heard that some readers have found them at JoAnn’s and I think Michael’s, too….
I know some branches do stock it, just not mine (I have looked) and I know from experience (over 20 years) that because needle hobbies are not popular around here, they will not for a while. Usually around Christmas we visit the closest (about an hour drive away) LNS to us, and they will more than likely have it, so I have to wait.
A little awhile ago I received an email from DMC. They now have the Coloris threads available online at http://commonthread.us/coloris-24-colors-available-1.html being sold by THE SINGLE SKEIN! I wanted to share the news for those who have not been able to find it locally. Their price is $1.54, which is lower than I have seen it in a few places.
Beautfull!! Thank You!
Mary: I’ve been wanting to do this kaleidoscope since you first showed it. Thank you so much for sharing! I’m going to start getting it organized today!!
As soon as I heard Commonthread had Coloris in stock I bought the set which contains one skein of each. I also bought some extra floss cards to get the free shipping. I made some french knots and stem stitch with each one and used my Pigma Marker to label the color number. I love how quickly the Coloris changes color and bought with flowers and leaves in mind but I’ll definitely make this as I love mandalas. It’s smaller than I imagined but would be pretty for a small throw pillow or I may enlarge it for a larger throw pillow or place it in a cheap hoop and hang it. I can see crocheting an Irish Rose for the center or a button or a fabric yo-yo with a button. Inspiring! Thanks so much Mary.
or a monogram in the center and buttons at the top of each what I call V spokes…..Afterthoughts and I’m sure I’ll think of many more.
This is just beautiful – I love the clear instructions (as always) and the extra tips on how to get the look just right. Thank you!
Thank you thank you for two things. I’ve been itching to do the Kaleidoscope and will probably start one this afternoon. Second…I was stuck on doing a bullion stitch, not one of my reference books seemed to help. Then I remembered the ONE source I could count on. Pulled up your bullion stitch tutorial and sure enough, after a few practice stitches they finally started looking pretty good.
Mary…you ROCK!
My personal opinion: It is too bad that Commonthread has such a bad representation of the Coloris thread on their web site. I can’t tell what the colors are and there doesn’t seem to be a way to enlarge the skeins so that you can see the color changes. I do really like what you are doing with the embroidered kaleidoscopes!
Hi Mary,
Curious what you plan to do with the design? Would like to do the embroidery, but not sure what I’d do with it when finished
Let’s see…some ideas beyond framing….decorative pillow front, journal or book cover, iPad cover, outer pocket on a tote bag, the front of an apron bib, the center of a quilt square, the corner of a decorative towel, the lid of a box…. anyone else?
I’m planning to enlarge it a bit and place a few kaleidoscopes along the middle of a large tablecloth.
Thank you so much!! I’ve been waiting for this to appear! 🙂 Can’t wait to start it. You’ve done an amazing job on designing it! It’s a beautiful design!! Hugs, H
Thank you! I’m within days of finishing a big WIP and I have just the project in mind for this.
This is Awesome!!
Thank you Mary 🙂
God Bless
Ohhhhhh, how much fun am I going to have with this one!!!
Good idea to highlight the close-up areas in the photos, Mary!
Thank you Mary! I’m adding it to my list of things to do… I think I have this Coloris Thread in my stash already.
RMW,
Visit the DMC site and order online; what a fun package that will be to get!
Thank You for the tip Carol, but I do not order on-line unless there is absolute necessity and then it is from Herrschners so my mother can order things for her craft also. 5$ shipping for $2.32 floss order is idiotic and we have no budget to just toss in a few extra un-needed, space-wasting items to make it reasonable. I will wait and buy it from the distant LNS or if they do not have it yet, Herrschners.
Hi Mary,
When you’re changing colors so often, how do you like to carry your threads to the next place? Do you keep several needles going at the same time?
Love the cheery colors. I have inherited a bag of embroidery thread from my husbands mother and her mother. they both liked bright colors. This would be a fun project to show off their favorites.
Hope you are felling well,
Sharon
Hi, Sharon – the nice about this piece is that you don’t really have to change threads too often. Each round is a different thread, but it takes a whole piece or two to work the whole round. On the outer edge where the motifs are small, you have to start and stop the threads and finish them off on the back, but that’s the only area where you have to do that. You wouldn’t want to cross from motif to motif on that outer edge, because the threads carrying on the back would be pretty long. You could, I suppose, turn the work over and whip around the backs of stitches, following a path to the next motif, or you could just end them and start again. But you don’t want to carry them across unstitched areas. Again, that’s only for the motifs on the outer edge. The inner layers are all continuous stitching.
So …. FUN. Your descriptions and pictures are always so clear Mary. Thanks for this!
Dear Mary
Missed this yesterday as I was engrossed in embroidering a tree. The Kaleidoscope embroidery is lovely such easy stitches to follow and you explain the tips and techniques so thoroughly that it’s really easy to follow. I think the only thing that would be difficult on this design would be the transfer of the pattern. There are so many things that this embroidery design would look lovely on. Thanks for sharing the free pattern and all the accessories, colour threads and the tips and techniques needed in the Kaleidoscope project and for taking the time to photograph in detail the techniques.
Regards Anita Simmance
Hi Mary
This is my first experience of the new website. Wow! It looks great and I don’t even have to type in my name and email to make a comment.
The kaleidoscope is very pretty. So pretty I may even have to work one although I have a squillion other things in progress and no idea what I would do with it once it was finished. But every now and then we have to indulge our impulses, yes?
The $25 extra fee for a small order (under $85) to Canada from Commonthread completely alienates me. I resent retailers who impose such a fee.
This Coloris thread is almost unknown in Canada. I find it difficult to mail order thread without seeing the colour or laying it out next to threads I want it to go with. I went through a similar thing buying Presencia and Valdani perle cotton #12. Considering the expense, the “by guess or by God” method, particularly when colour is so important, just doesn’t work.
BUT, it’s still nice to see you using it Mary and to see the lovely colourways. The subtlety of variegated threads, really makes embroidery sing for me.
This is wonderful, Mary. Thank you, again, for sharing. Perhaps this is (hopefully) the start of a new book!
Hi Mary,
I’m sitting up late (NZ) having some inspirational and visual fun looking through your site once again! I do it often though never comment; but tonight I just wanted to say a big thank you to you Mary. You truly are such an inspiration and I just love receiving your emails – they add extra happy moments to my days! This little kaleidoscope number is definitely on my to do list and am thinking that it might make a fun project to teach some embroidery skills at one of our connect groups at church next year. Do you think it would be okay to stitch on calico? Just thinking of cheaper options for beginners and then using it for the front of a bag. Bless you Mary.
love your web side i tell all i know about it
THanks, Brenda!!
There is plenty of room for creativity in these designs. I can believe your explanation and demonstrations would be truly addictive!
I am loving this pattern! How much did you enlarge the pattern to make the sample?
Hi, Marcia – It is not enlarged. If you print the pattern at 100% or actual size in your printer settings, that’s the size I stitched it.
Thanks. I’m anxious to start!
Hi Mary. What a beautiful design. Our readers will love this! We’ve included it in our craft inspiration roundup. https://craftylikegranny.com/little-things-that-make-life-big/ Cheers Jodie 🙂
Glad you like it! Thanks for the link! 🙂
What do you normally do with the items you embroider? Do you frame them or use them as doilies, table toppers, or give them as gifts?
Wow, nice work. superb hand embroidery work and thank you for share.