


The last time we visited Party in Provence, an embroidered kaleidoscope project that we’re working through step-by-step here on Needle ‘n Thread, we worked the big petals in the center of the design and the little flowers between them.
Originally, I was going to start the week with some beadwork on Party in Provence, but as I prepared that article, it struck me that it might be better not to put the beads on until closer to the end of the project.
For those following along, don’t be too disappointed! I know you don’t get the finished look of the inside rounds until the dark blue beads are added to the larger petals, but there’s a good reason for not adding beads just yet.
You see, I’m all for avoiding as much frustration as possible when stitching. It’s easy for your working thread to catch on beads when you’re stitching other parts of the design, and since there’s still plenty of surface embroidery to tackle on this piece, we’ll try to avoid those little annoyances.
So, today, swirls. Lots of little swirls!
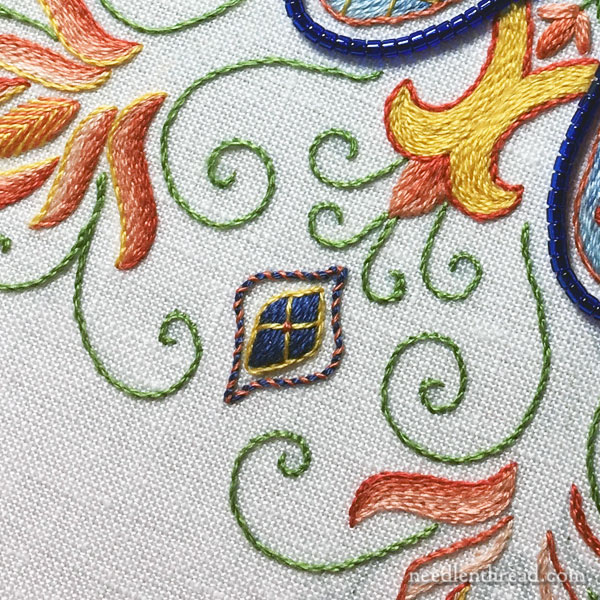
Now, the nice thing about all these little stem stitch swirls is that they will provide you with little breaks in other stitching.
If you’re following along with the project, but you’re still working on the inner rounds, stopping to work a few swirls in stem stitch here and there and then going back to the inner rounds will give you some variety in your stitching and entice you to keep going as you see other parts of the design developing.
Or, if you prefer to stitch in a definite order, you could just stitch the little swirls all at once! At this point, the order of stitching is totally up to you, because the rest of the design doesn’t depend on any particular order.
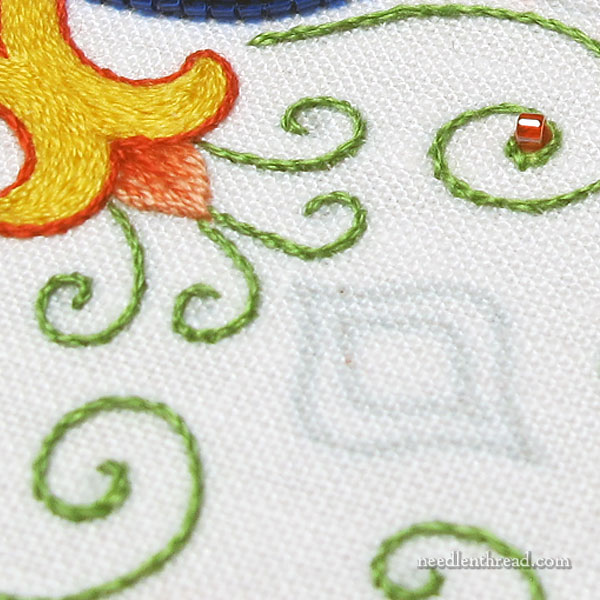
All the stem stitch swirls in Provence are worked with one strand of DMC cotton (from the six) in green.
By this point in the project, we’ve already worked quite a bit of stem stitch. If you hadn’t guessed, it’s one of my favorite stitches!
I’ve written a lot about stem stitch here on Needle ‘n Thread, with many tips to help you successfully master the stitch.
Stitching Tips
Here are the two instructional tips that will help you the most when working the swirls:
Working tight curves with stem stitch
The latter article uses the little swirls on Provence as the models. If you already know the stem stitch but have difficult with swirls, that’s the tutorial you want to reference while working the swirls on Provence.
Keep the Orientation of Needle to Thread
The one problem that many people run into with stem stitch on curves is that they tend to want to switch the orientation of the needle to the thread as they start around the curve.
If you turn your hoop or frame as you work around a curve, you’ll see that the needle and the thread always stay in the same position in relation to each other.
So, when you’re using DMC embroidery floss like we are in this project, if you are stitching left to right with the stem stitch (left handed stitchers can do this by stabbing the stitch rather than sewing or scooping it), then the working thread is always below the needle.
As you work your way around the curve, this orientation should stay the same. Imagine the curve turning to keep you stitching left to right, and you’ll know where the working thread should be (below the needle) as you work the stem stitch.
If you need to, you can “turn” the curve by turning your hoop or frame to keep you going in a left-to-right direction=.
Once you get the hang of stitching direction, needle and thread orientation, and the working method of stem stitch, you won’t need to turn your work – you’ll just instinctively work the stitch easily and correctly without thinking about it.
Next time, we’ll tackle some of the colorful outer elements – but you’ll have a while to catch up on the project. And even if you don’t quite catch up, you’ll be able access all the lessons whenever you need them, right here on Needle ‘n Thread.
The Project So Far
If you’re just joining in, or if you would like a re-cap of the project so far, here are the articles published for this project, in the order of development:
Let’s Get this Party Started! – Introduction, covering supplies, materials, set up
First Round & Order of Stitching
Big Petals and Little Flowers – the inside rounds of the kaleidoscope
You can find the design for Party in Provence in my e-book Favorite Kaleidoscopes: A Design Book for Hand Embroidery, available right here.
If you’re just joining in and you’re not sure where to start or what supplies we’re using, feel free to reference the articles listed above.
If you’re working along and you have any questions or you just want to chat about the project in general – or stitching in general – feel free to leave your comments below!
Hope your week’s off to a terrific start!
Dear Mary
Lovely stitching, the swirls in stem stitch look really nice and as you say the stem stitch is a lovely stitch but the only way I can stitch it correctly is to stay left to right if I go right to left I always get it wrong I don’t know why turning the hoop etc is a good idea to keep stitching one way. Thanks for sharing your tips and techniques on the stem stitch with us and for the links to the other instructions on the project.
Regards Anita Simmance
Hi, Anita – the hoop only turns as the line curves, so that you are constantly working from a left-to-right orientation on that particular line. That’s what I meant by turning the hoop or frame. You can also just turn it (so to speak) in your head, imagining the curve from left to right, so that you can keep the thread / needle orientation correct. Well, I’m sure you’ve got it! So no need to explain the stitch! 🙂
Dear Mary
Thanks for your reply and for the tips on working left to right on the stem stitch, I do see what you mean.
Regards Anita Simmance
Your timing is perfect! I was just wondering what section would be up next. I am working this piece on the back of a knit sweater. The instructions have provided excellent reminders and tips about some basic stitch techniques (and some more advanced ones!). I’m hoping it will all hold together when I remove the stabilizer from the knit.
Oooooh, I would love the see the results of this, Lu-Anne!!!
Hi Mary, just wanted to let you know that I’m greatly enjoying stitching this project with you!
Alas, I couldn’t stand waiting for the dressmaker’s carbon paper to arrive, so I decided spontaneously to transfer the design same as I did in the beginning of my stitching practice – using ordinary carbon copy paper. It’s not the worst way of transferring; with a very sharp pencil, it produces pretty subtle, but distinct lines, and it didn’t happen to me yet, that the paper rubbed off onto the fabric where it shouldn’t. With time and experience you learn which lines you should avoid tracing, because they will not be stitched over entirely (think lazy daisy). However, I didn’t want to put at risk my good new Newcastle linen and the DMC threads, means I’m stitching (once again) on an old bedsheet with cheap (but nice) threads, so the stitching doesn’t work out super neat. But that’s ok for me, it’s an exercise after all, since it’s only six months now that I’m into embroidery.
Your spacing card is a clever idea, thanks for it! Up to now, I still had a problem with spacing the length and direction of the petals of the lazy daisy flowers, but I just figured it out. In fact it’s quite simple, just turn the card around the center… 😉
At the same time, I’m working on my stitcher’s website, where I also published a reference to Needle’n Thread and your work in general. Hope to finish the bulk and and publish the link soon. 🙂
Angela from the Ore Moutains
Glad to hear it’s coming along, Angela!! Yes, I’ve used carbon paper before, too. It works ok! You can also make your own, by tracing the design on the back paper with a soft lead pencil, and then place the design, soft lead side down, onto your fabric, and trace over the lines on the front with a ball point pen. That way, you’re controlling where the “carbon” is on the design. Glad your project is underway and that you’re enjoying it!
For the first time ever, I have an objection to something your have said. Saying that lefties should just go ahead and stitch from left to right by stab stitching is nonsense. You would have to think consciously with every stitch to keep things straight and would never develop any sort of flow. It’s bad enough we have to “translate” every stitch, without this, too. Seriously, at least I got a good laugh.
Hi, Marti – Hmmmm….maybe I missed something here. I’m sort of “ambidextrous” when I stitch, as long as I’m stabbing. I use my right or left hand on top of the fabric and my right or left hand below the fabric – so both hands, interchangeably. So, if lefties stitch from left to right, stabbing the stitch, they don’t have to translate the stitch at all. It’s just the stem stitch, as it’s usually found diagrammed. The working thread is below the needle, just as it would be for a right handed person stitching left to right. It doesn’t change the movement of the stitch or the orientation of the thread to the needle, as it would if you were “sewing” the fabric (scooping all from the top) in which case, you’d have to work from right to left, but you’d have to keep the thread above the needle to achieve the stem stitch look (otherwise, you end up with the look of the outline stitch). Does that make more sense?
I’m working away here. Not quite caught up, but I’m really enjoying the project and learning quite a bit. Watching the design build up with the layers and outlines is fun, though doing the lazy daisies on a fairly thick pad of stitching is slightly more difficult than I had anticipated. Not to worry, I own sharp little scissors, and as eager as I am to get on to this week’s swirls and curlicues, I’m really not in a rush.
Sounds like it’s coming along well, Linda! Yes, the daisy stitches through the long and short can be difficult if you’ve built up a thicker layering of the long and short stitches. On my first petal, I really packed in too many stitches, and it was hard to work the daisy stitches. Then I started concentrating on an adequate coverage of long and short, but being careful not to fill in too tightly. Sometimes, when I step away from a project, I lose my rhythm and feel for a certain area, and my stitching will change somewhat, so I had to make a concerted effort to pay attention to my long and short coverage on the petals. That said, when things did feel a bit tight for the daisy stitches, a little rubber pad that I have on hand (it was from an old jar opener “cloth,” only made out of some kind of nubby rubbery material, which I cut into small squares for gripping needles) helps. Pliers also work! But I prefer a little bit of rubber grippy stuff, so that I don’t damage my needle.
I’m more or less caught up and working on the swirly stem stitch.
If you recall, back when we were filling the shapes with stem stitch in yellow, I was having some difficulty with splitting the thread when coming up through the fabric and now that we have miles and miles of stem stitch curlicues, I’m really paying attention.
The problem appears to be when the loose end of the thread is not pulled all the way through the fabric when the needle goes down, that part of the thread is being held right where one is stitching, but is not under tension and is likely to end up in the way when the needle comes back up. If the loose end of the thread is pulled all the way through the fabric, then it is likely to be further away from the fabric, and won’t be caught on the way back up.
I guess the idea of “a thread under tension is a thread under control” doesn’t just apply to weaving.
Hi, Linda! That’s right – the thread, when coming up with the needle, should be pulled all the way through, providing the final bit of tension on the previous stitch, that comes when you pull the needle back up to the front. That kind of “locks” the previous stitch. When you go down into the fabric for the next stitch, leave a small loop on the front of your fabric, and hold it out of the way with your thumb. That way, you won’t catch the working thread on the front, and on the back, the previous stitch should be duly tensioned already, from pulling through to start the new stitch. I’m glad it’s worked itself out for you! Funny how doing a gargantuan amount of the same stitch will pretty much eventually solve every problem with it! 🙂
Thanks, Mary. Yes, I was tensioning the working thread just fine, but wasn’t really thinking about the tail end.
Thanks for the huge inspiration you gave me today!I think you are amazing
Shucks, Thanks, Carol! I hope you’re enjoying the development of Party in Provence!