


On Monday, we looked at some introductory tips and information about stitching on organza.
Today, we’ll talk a little bit about the starts and the stops – that is, starting and ending threads when embroidering on sheer fabrics. I’m also going to share some news with you at the end of today’s article – there are a couple worthwhile things there to take note of!
The tricky thing when you’re working with fabrics as sheer as organza is this: any bit of thread that extends beyond the embroidery on the front is going to show. Whether it’s a little hairy smidgeon of thread from when it was snipped, or whether it’s a slight build up of thread right behind the stitching, if your fabric is transparent, there’s no missing that little extra something peaking out from the back.
Because of this, the starts and stops on your threads are important to consider!
Now, much will depend on the style of stitching you plan to do on the organza.
You can make a sheer fabric really work for you, by stitching in a very sketchy style that allows the threads on the back of the embroidery to play a part in the finished view on the front.
Or you can go the route of solid embroidery, where you’re approaching the organza as you would any ground fabric and working solid stitchery on the surface.
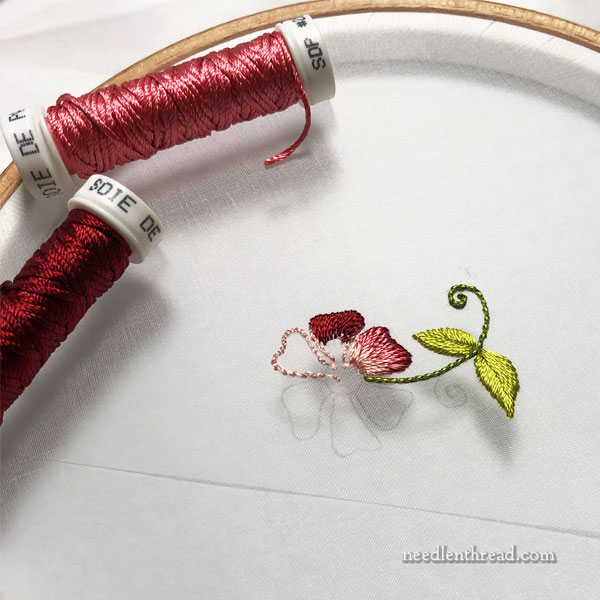
With this little sample bit, I’m doing the latter. But the very nature of organza and other sheer fabrics opens a whole experimental world up for you, if you want to play with the way threads show through when working on such fabrics.
For now, though, let’s just approach the organza with regular surface embroidery in mind. With the little flower, I stitched a stem out of chain stitch that I whipped with anther thread; I worked the leaves in fishbone stitch, so that they are fully filled; and the petals are long and short stitch. I’ll experiment with some ideas for the center of the flower when I get there.
So, the point is this: you need an invisible start and stop with your threads.
And here, I’m going to recap a method of starting and stopping threads that is used frequently in any kind of surface embroidery.
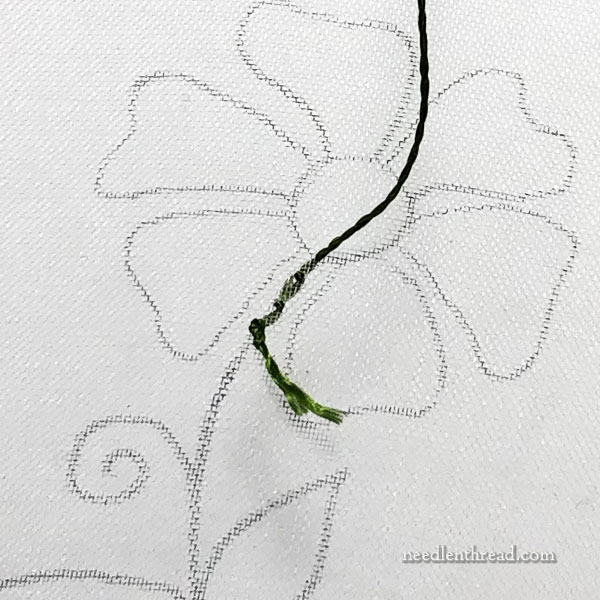
To start threads, we’ll begin on the top of the fabric with a waste knot that will eventually be cut away.
Knot the end of the thread you’re stitching with, take it down into the fabric from the top on the stitching line or inside an area that will be filled. If you’re working on a line, start a short distance away from the beginning of the line, working two or three tiny backstitches towards the starting point of the line.
Then simply stitch over these tiny stitches towards the knot, and snip the knot close to the fabric once you get very close to it.
Turn the work over and, using your finest and sharpest scissors and being very careful of the surface of the organza, carefully trim any bits of thread that may remain unanchored or uncovered by the embroidery stitches.
Then just continue stitching the line.
I’ve covered this method in several of my e-books under embroidery basics, and you’ll also find a more in-depth photo tutorial for this method of starting threads here.
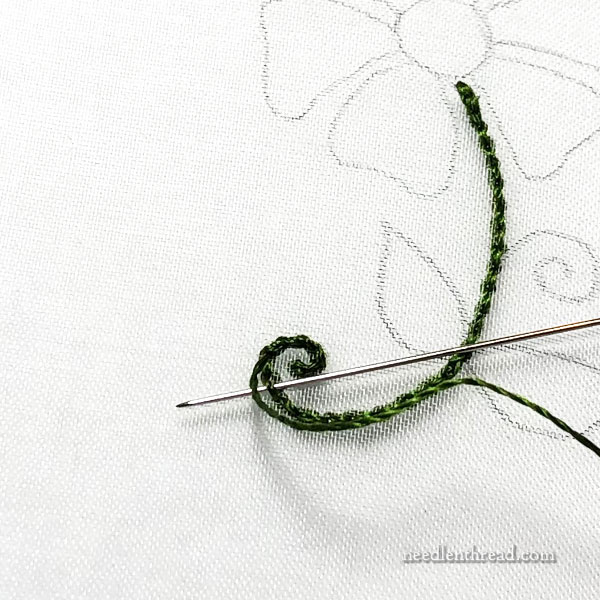
When you get to the end of your stitching line, and assuming there’s no other space directly adjacent to it where you’ll be embroidering, there are a couple approaches you can take to ending the thread, but right now, we’re going to cover the easiest one that we’re mostly familiar with.
Turn your work over and whip the working thread around the backs of the stitches, passing from the same direction under about five stitches.
If you’re working with a thread like the silk I’m using here, make sure you pull these whipped stitches a little snug, but not so snug as to pull the embroidery stitches on the front out of whack. You just want to make sure that the whipped backs of the stitches are not loose so that they don’t bulge out from beneath the embroidery on the front.
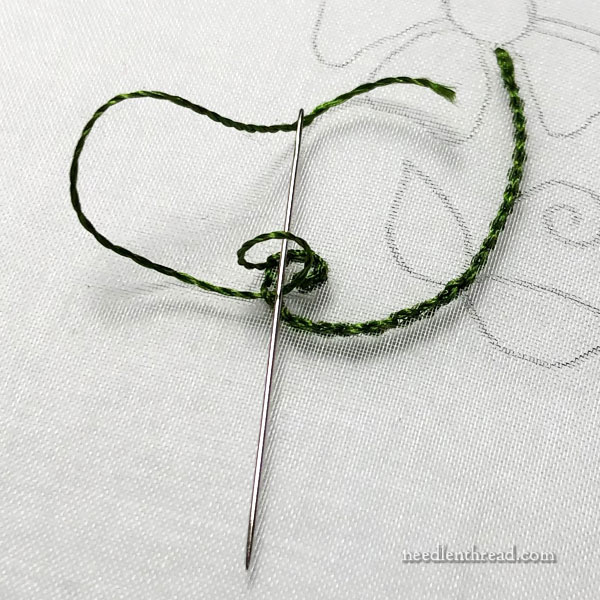
On the back of the last stitch that you whip, leave a small loop open and pass the needle and thread through the loop before hitching it. Pull this nice and snug to hitch the thread in a tiny, but tight knot, so that the end, once snipped, doesn’t jump out from the line.
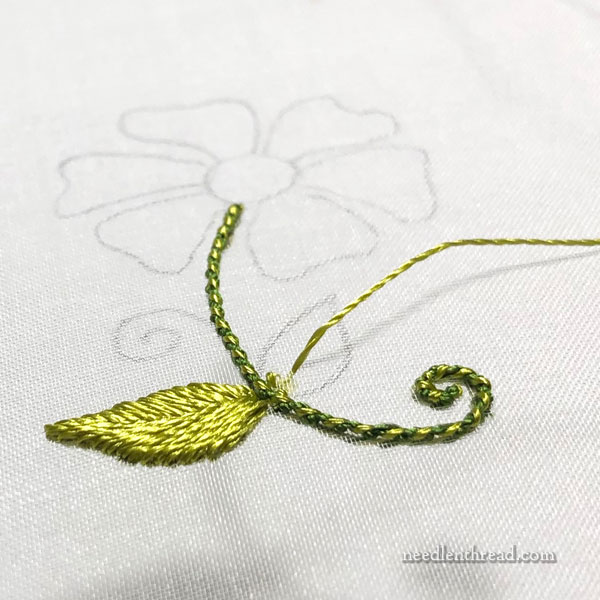
When you’re working in filled spaces like the leaves or the petals of the flower, start and stop your threads using the tiny anchor stitches mentioned above, clustered inside the area that will be filled with embroidery.
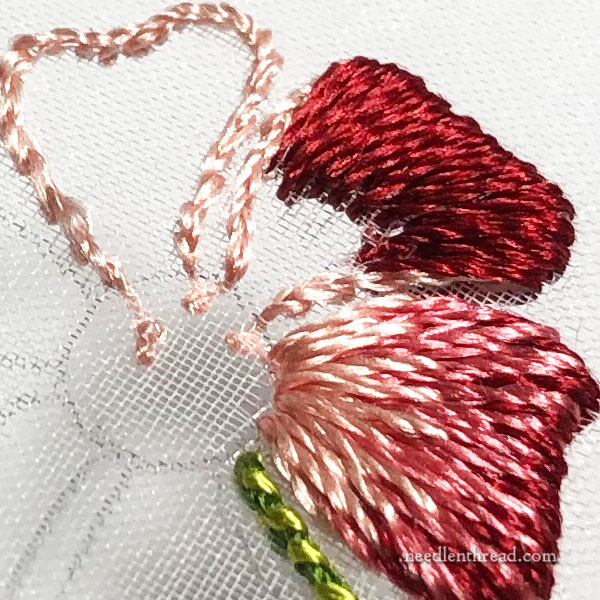
Zooming in very close on this area – so that we can easily see the flaws! – you can see, in the center of the flower and inside the petal underway, where I’ve worked anchor stitches either to start threads or to carry threads from one petal to the next, without crossing any area of the embroidery that won’t be filled.
You can also see that the organza has pulled a bit in the center. That’s ok. That will be taken care of when the center is embroidered.
When you’re working with sheer fabric and you’re not planning on playing the back of the embroidery into the front as part of the finished effect, just keep your mind in tune to ways you can work your threads without allowing anything from the back to show through to the front.
And any habit that you can develop in this regard will pay off on your regular surface embroidery (on regular fabric), anyway, because these habits will serve to help keep the back of your embroidery always neat and tidy.
Coming Up on Needle ‘n Thread!
Later this week, I’ll share a line up of little bits of news, information, and inspiration that I’ve been collecting for you.
We’ll finish off this little flower and talk about what you can do with embroidery on organza, as far as finishing goes.
I’ve started dabbling with a newly conceived Jacobean Blues project. I’ve adjusted the design One More Time and reconsidered the materials I’m using, so we’ll explore all the reasons behind that.
The Festive Fall ready-to-stitch towel sets are back in stock in a very limited quantity. You can find them in my shop here.
Those who have contacted me for the advanced notice for The Leafy Tree kit, keep an eye on your email!
Why do you never use a loop stitch to start a thread?
I do – I have a tutorial for loop starts on the website, too. But…I’m only stitching with one strand here, which makes it kind of hard to start with a loop that requires stitch with two strands (or one folded in half to make two). 🙂
I’m so relieved that you, too, use a loop stitch! I use one frequently, especially for a small number of stitches. For the longest time I actjually thought I had invented that way of beginning, until I started reading websites and learned that other people did it also. (I thought I invented railroading, also!) But then I discovered your site, which is the best, and it seemed that you did not, so I started feeling somewhat nonprofessional. But now I am vindicated and will continue using a loop stitch beginning without guilt or apologies!
I still do not understand how to finish a stitch when there is only one crosstitch and there will be no other stitches around it. (For example, a one stitch “snowflake” alone on the fabric with nothing surrounding it.)
Thank you for your help.
Hi, Tessa – Here are two articles that may help you: https://needlenthread.wpengine.com/2012/06/isolated-french-knots-part-1.html and https://needlenthread.wpengine.com/2012/06/isolated-french-knots-part-2.html
They’re written about French knots but you can take the concepts and put them to work for you with other stitches, too.
Mary, thank you VERY much for this tutorial – this is the most helpful and informative embroidery technique I’ve seen since I was learning to embroider from my grandmother nearly five decades ago. THANK YOU!
Dear Mary
I like the colour threads and the stitches you have chosen for the above petal. I would have been very upset if I had made a hole in the organza I really like the way you handle it and I’m looking forward to see how rectify this in future posts. I think the start and end thread is a really good idea and I’ve have seen you explain this before it’s a great way to use when you are working with something delicate like organza. Thank for sharing with us the tutorial on how to start and end stitches without them being seen and for the photos. I’m looking forward to the update on the Jacobean Blues Project and other news on embroidery.
Regards Anita Simmance
Muy bonito bordado!!!!!. Nunca he trabajado en organza, ni con hilos de seda….
El comienzo de la costura ya lo había leído en algún libro de bordado, y el final lo hago así siempre, más por ciencia infusa que por conocimiento.
Me alegra saber que no iba desencaminada!!
Muchas gracias por tu artículo!!