


Here in the States, we enjoyed a three-day holiday for Independence Day this past weekend, and I took advantage of the break to finish my organizational and cleaning projects. Whew! Done for now! It was a crazy, dirty, sweaty, labor-intensive week last week – I’m glad to be back to some sedate embroidery this week!
Last week, we looked at the first installment on the embroidered grapes project. Today, we’ll move forward, looking at three basic fillings for embroidering solidly-filled grapes. We’ll also talk about the order of work and why it’s important.
You’ll need to think of this version of the project more as The Grape Sampler. I’ll be presenting all kinds of ideas for embroidering grapes, all in one design. It will look a little bizarre, because it’s not what we’d expect to see in a coherent piece of embroidery. The idea is that we can then pick techniques that we like best, and work a coherent bunch of grapes using one or two effective techniques.
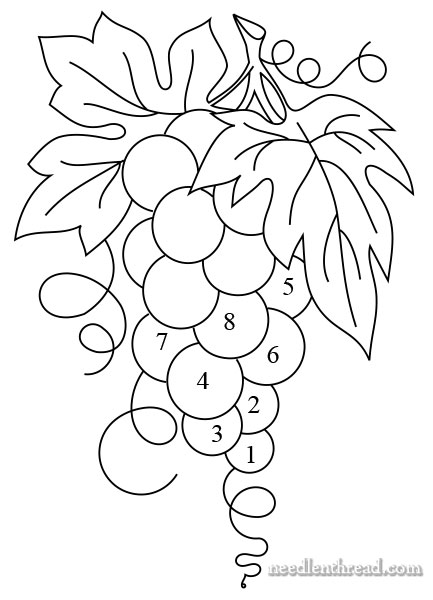
We’re going to start on the very last grapes at the very bottom of the bunch, marked 1, 2, and 3 in the design above.
When embroidering a design like this, work from the back of the design forward, so that those elements farthest back (which are overlapped by other elements) get stitched first. Then, work the next element forward, and then the next, leaving the foremost elements in the design to stitch last.
That’s the basic rule in order of work, and it makes sense because it allows the stitcher to overlap more easily, and it helps create a certain perceived depth in the finished design. In some styles of embroidery (particularly Eastern embroidery techniques), this order is reversed, and the resulting embroidery tends to look a little flatter.
I prefer the back to front order, mainly because it’s just easier. If the order were reversed (stitching front to back), the front-most elements get in the way when you’re trying to stitch the elements farther back in the design.
Despite these points, though, there may be moments of stitching this design where it made sense at the time to stray from the back-to-front approach. No “rule” is ever hard and fast in embroidery, after all! There are always several routes to achieving good results, not just one absolute way of doing things. Be flexible.

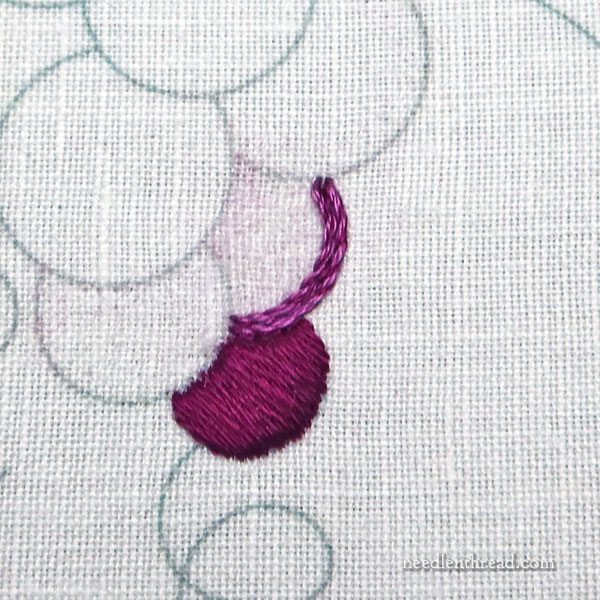
Grape 1 is embroidered with padded satin stitch, in color DMC #35.
Begin with one strand of floss and split stitch the outline of the grape, only where it is its own skin. Don’t split stitch the design lines belonging to the overlapping grapes.
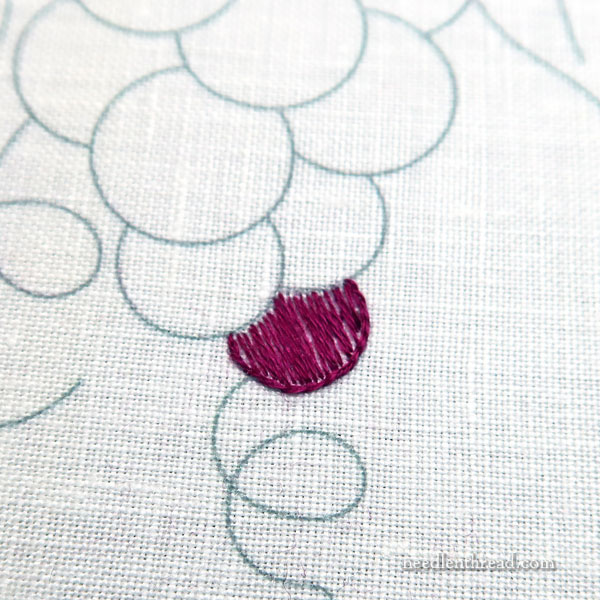
The padding will be worked in two layers, so the first layer is going to be in the same direction as the final satin stitch layer, as shown in the photo above.
When padding satin stitch, the final layer of padding (just before working the satin stitch over the top of everything) must be perpendicular to the final satin stitch.
To work the padding, switch to two strands of floss in the needle and fill the grape – inside the split stitch outline – with parallel lines of straight stitches. These should be “surface satin stitch” as opposed to regular satin stitch.
What’s a surface satin stitch? It’s a satin stitch that does not cross the back of the embroidery. Instead, the next stitch begins right next to where the previous stitch ended. You just step sideways to work the next long stitch on the front of the fabric.
This eliminates a build-up of bulk on the back of the embroidery that would result from multiple layers of regular satin stitch.
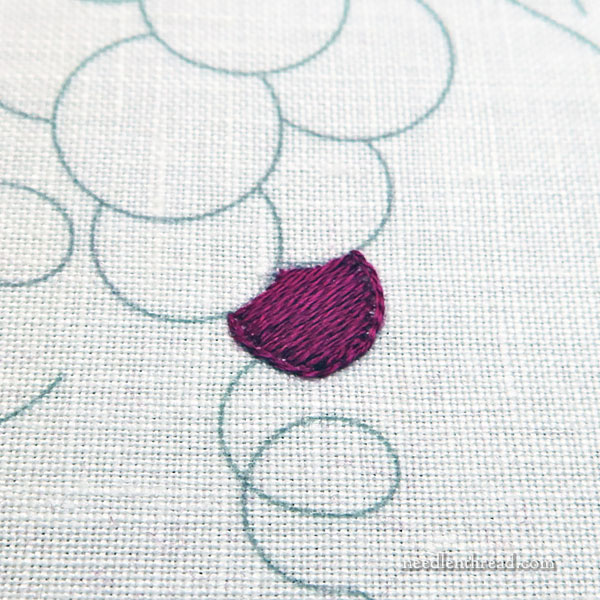
Work a second layer of surface satin stitch over the first, and perpendicular to it, inside the split stitch line, as shown above.
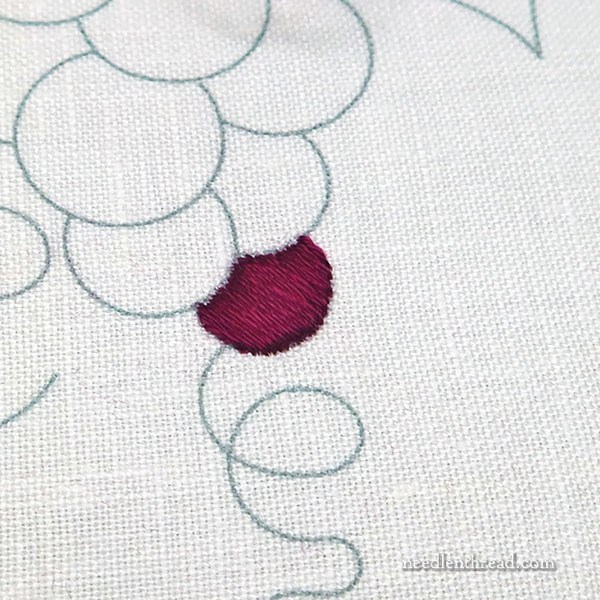
Finally, switch to new thread – even if you still have what looks like plenty of thread in your needle – and work the satin stitch over everything, perpendicular to the last layer of padding, and running vertically down the grape.
You can use two strands of floss for the satin stitch, as long as you can keep the two strands parallel to each other and not twisted together. When using two strands, use a laying tool to keep the two strands from twisting together.
Another key concern with satin stitch is not crowding the stitches – you want them to lie parallel to each other, but not crowd on top of each other. The padding underneath the stitches will help you achieve a nice, comfortable parallel placement, because, besides adding color behind the stitches (just in case there’s the slightest space between – though better that there isn’t), they add friction so that the satin stitches stay put better.
If you have trouble achieving a nice, smooth satin stitch with two strands of floss, use one strand.
You can find lots of good tips on working sensational satin stitch here.
Grape #2, which overlaps Grape #1, is worked in stem stitch using three strands of floss: two strands of #33 and one strand of #35.
Work the stem stitch rows close together, but not crowded. Give the stitches a little room to breathe, but make sure that they are covering the fabric.
Fill this partial grape following the shape set out by the design line, cupping each line inside the next, up the grape.
It is easiest to always work from left to right, in order to achieve a nicely spaced, consistent fill. Don’t carry the thread across the back of the grape, though – turn your work over and whip the working thread around some of the backs of the stitches to bring your thread back to the left side of the grape, until the space there is very short and you can then carry the thread.
Because the grape is so small, this doesn’t result in a huge waste of thread. It does make it easier to work a consistent stem stitch that is nicely spaced.
If you want to work back and forth with the stem stitch, pay attention to the placement of the needle in relation to the working thread when working the stem stitch from right to left.
You can learn more about changing the direction of stem stitch in my stem stitch video here. You can also refer to this article which discusses thread twist. If you are just becoming familiar with stem stitch, these stem stitch tips will come in handy.
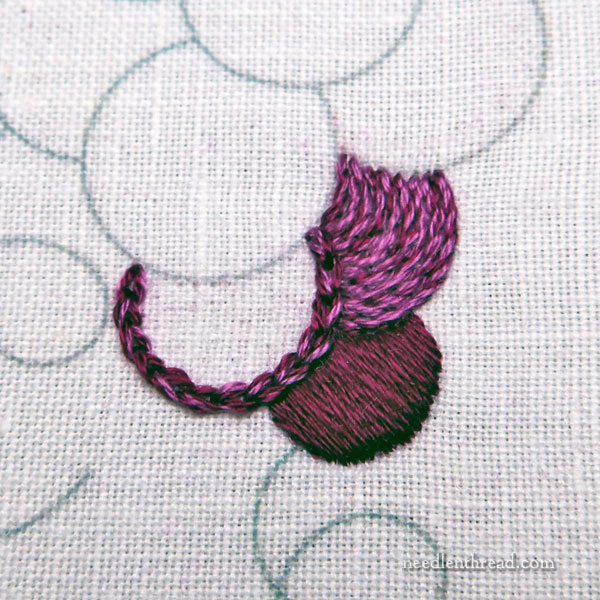
You can see the completed Grape #2 filled with stem stitch in the photo above.
Grape #3 is filled with chain stitch, using three strands: one strand of #33 and two strands of #35.
Work the chain stitch from left to right, overlapping the two previous grapes and following the cupped shape of the visible design line at the base of Grape #3.
You’ll achieve a much more uniform, uncrowded, and comfortable chain stitch if you stab your stitches rather than sew or scoop them. In many books, the chain stitch is demonstrated by scooping up the fabric with the needle (the “sewing” method), rather than taking the needle and thread to the back of the fabric while working the chain stitch (the “stab” method of stitching).
Stab the chain stitch in this small space – it will be much easier and the result will be so much neater and more consistent. You can read more about the stab method vs. the sewing method of stitches in this article.
Work each line in the same direction, returning to the other side of the grape to start each subsequent line of chain stitch. Don’t carry the thread across the back – turn your work over and whip the backs of a few stitches to return to the left side.
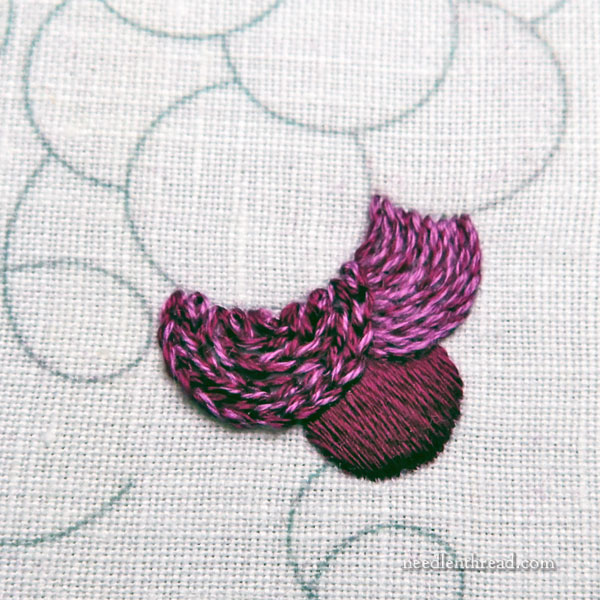
The final row on this grape will likely end up being just one or two chain stitches.
If Grapes 2 and 3 were full, round (or oval) grapes, not overlapped by other grapes, they could easily be stitched in the round, by starting on the outside and working in a spiral towards the center, filling the shape.
But since they are overlapped by other grapes, the filling looks best and makes more sense worked in rows like this.
On Colors
And that, my friends, is it. The first three grapes!
The color scheme on this bunch of grapes may seem a little unusual, if you’ve only been exposed to grapes off the vine in a grocery store or market.
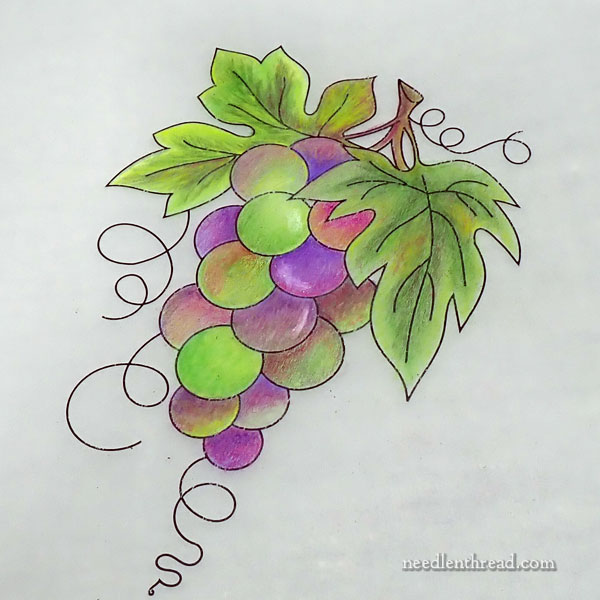
My grapes will not be one consistent color. They are a mixture of colors, including greens and golds. If you have ever had the pleasure of seeing ripening bunches of grapes on the vine on a golden, sunny day in a beautiful vineyard – especially grapes like pinot, which are wonderful, color-wise – you’ll understand the variation that you’ll see in colors on this project.
This variation doesn’t come across as smoothly in this particular “sampler” bunch, but we’re still going to stick with a variety of colors. You can read about my initial foray into colors for this project here.
Previous Articles in the Series
You’ll find all the articles in this series on grapes listed in this How to Embroider (Blank) project index. Scroll down to the grapes project! You’ll also find tutorials for other “How to Embroidery” projects in the same index, including wheat, strawberries, and daisies so far.
Members of my Needle ‘n Thread community on Patreon will receive each of these articles as a handy downloadable PDF, so that you can save the PDF to your computer for easy printing, if you want to follow along with any of the projects. You’ll find this tutorial available later today!
I’m just beginning my journey into surface/crewel embroidery, but I’ve found the opposite order of stitching to be helpful. I did a bunch of balloons in satin stitch with wool and found if I did the underneath balloon first, it crowded the top balloon, and it was hard to make the top balloon round. If the top balloon was done first, it was easier to work the stitches of the underneath balloon a teeny bit under the edges of the top balloon, leaving the nice round shape of the top one intact.
Maybe the wool thread makes a difference?
There’s been a few other places where that sequence has been helpful — again, with wool threads.
I really value your input, if you have time.
Thank you for your newsletter/website — it’s the reason I’m learning crewel/surface embroidery!
I don’t usually have that particular problem even with wool threads, so I’m not sure if it is the thread that makes a difference for you. You wouldn’t want to crowd the space, so that the topmost element doesn’t run into or get distorted by back elements that encroach on the space too closely.
Dear Mary
This is a very useful tutorial and I love the 3 stitches you have chosen for your first grapes. Thank you for the tip which you said to work from back to forward on a project. A very good tip for embroidering on different elements of a project and like you I always find it better to stitch from left to right on the stem stitch. I agree with on the chain stitch I like to stab rather than sew. Thank you for sharing with us the tutorial on the grape project and for the photos, I’m looking forward to further tutorials on this project, and that’s me caught up with all the blogs. xxx
Regards Anita Simmance
You inspire me to be more creative with my embroidery