


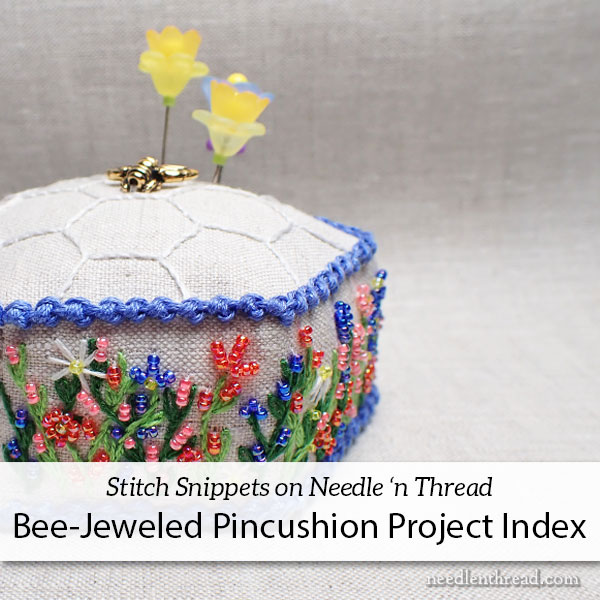
This is the official Project Index for the Bee-Jeweled Pincushion Project that developed step-by-step here on Needle ‘n Thread in the first part of 2022.
In this project, you’ll learn how to set up the embroidery project, how to stitch it (including some bead embroidery), the preliminary work of finishing an embroidery project into a useful item, how to construct a pincushion, and how to add a decorative edge on a finished pincushion.
For navigation purposes, when you’re on the website, you can go to Tips & Techniques in the main menu to find this page permanently linked.
Project Index
You can find all the articles relating to this project in the following list, which is arranged in the order of work:
Stitch Snippet Sneak Peek – the first hint of the pincushion project, with a little information about what you can expect with the series.
Introduction to the Bee-Jeweled Pincushion Project
Design Download for Bee-Jeweled Pincushion
The Official Supply List (non-chronological in order of publication)
Fabric & Set-Up for the Pincushion Project
Materials Information & Stitching the Top
Stitching the Greens on the Sides
Finishing Part 1: Preliminary Steps for Finishing, and Preparing the Base
Finishing: Sewing the Side to the Base
Finishing: Adding the Top & Stuffing
Finishing: The Final Step – Palestrina Stitch on the Base and the Top Edges
Kit Information
When the Bee-Jeweled Pincushion Materials Kit is in stock, you’ll find it here.
If it is not in stock, you can drop me a line to request notice when it is restocked.
Printable Lessons
For members over on my Patreon page, I’m currently publishing the lessons for these projects as PDF printables that you can download to your computer and save. This is a bonus for those who support the work of Needle ‘n Thread through my Patreon page.
I try to group the lessons into PDFs in a way that makes sense for ease of printing and following along with the project, and I often include extra tips and so forth along the way.
Members on Patreon will also receive advanced notification when the Stitch Snippet kits are first launched, so that they have an early opportunity to get the kits when they first come out.
Stitching Along
If you’re stitching along with the project, here are a few points to keep in mind:
1. Work at your own pace. You’re not obliged to keep up with each lesson. But just so you know, I don’t guarantee the lessons will always be available for free on the website. This project is part of a yearly series for 2022, so the lessons will be available for free at least through 2022.
2. If you have questions on the lessons, use the comment form on each published lesson on the website to ask your questions. That way, other folks involved in the project can learn from your questions, and they can often pitch in with answers and advice, too. Take advantage of the knowledgeable and talented wider community around Needle ‘n Thread.
3. You don’t need to purchase a kit in order to work this project. You can work from materials in your own stash. You can mix up the colors, mix up the supplies, etc. Feel free to substitute and experiment. Just remember that the outcome will be different if you are not using materials that are at least similar. This is especially true for the fabric and the beads.
4. Remember to enjoy the journey!
Thank you so much for this project. I enjoy being part of a community that creates something of common interest.
Hello Mary,
I didn’t receive any email from Patreon neither Friday nor today for Bee-Jeweled Pincushion PDF printable for downloading.
Thank you for great lessons.
Regards,
Sophia
It’s not ready yet. I’m rolling two lessons together – should have it out in the next day or so.
Hi Mary, thank you very much for this project and all its instructions. So lovely.
Thank you Mary ,
I am looking forward to receive the lessons. I appreciate all the lessons that I receive from you.
Hopefully, today! It’s a long one, rolling several parts of the project into one download.
I thought I put my name on the list for one of the Bejeweled Pincushions but did not get an email. Can I get on another list. Thanks you.
Jo Ann
Hi, Jo Ann – the advanced notice lists are email lists, so you’ll have to email me to be on the advanced notice list. Just drop me a line! Thanks!
I am Hoping that this time I am on the advanced notice list for the Bee Jeweled Pincushion kit. I thought I had responded before but have never heard back so would like to try again.
Thank you, Carol
Can you please drop me an email, Carol? You can do that by replying to this comment when it arrives in your inbox. The advanced notice lists are email lists and I need to have an email to reply to. Thanks!
Hi Mary, I am a bit behind but just finished the top and it looks sort of OK. I know where I’ll put a bee charm! I might need two of them!!! But the more I worked each line, the more comfortable it was to do even though my stitch lengths varied. On to the stems! Thanks for stretching my comfort zone!! Judi
Yay!! Oh, put as many bee charms as you like! LOL! I hope you enjoy the stems & beading!
Thank you so much for doing instructions this project! I plan to get started soon!
I have a question: have you ever made a pincushion magnetic? Nowadays there are some really awesome powerful magnets for pins… but pincushions are adorable. I just wonder if it would be possible to combine the two…
I’ve made one with a magnet in the base, so that it sticks to my stand. The problem with magnet like a magnetic pin holder is that everything gets pulled to the magnet in more or less a blob, so it’s hard to see and sort needles when they’re in a bunch like that. Needle minders are magnetic, and they’re handy to have for one or two needles while you’re working, but I think they’d get frustrating if you stuck too many needles on them. You’d have to pick them apart to get the one you want.
I finally finished stitching my greens! Yay! Other than one random sampler for practice this is my first embroidery project! Thank you for sharing the instructions and beautiful inspiration! So excited for the next step.
YAY!!!!
Have a small problem. I would like to stitch Autumn Fire. When I printed out what I thought was the pattern, what I got was a 2 inch drawing of Autumn Fire. Could you please either forward me the pattern or tell me where I can find it. I am an experienced needle worker and a retired needlework finisher. I think you design is lovely and would very much like to stitch it.
Thank you in advance
Arlene Harris
Hi, Arlene – Thanks for your question. Yep, that’s right! The tree is about 2” high. As you can see from the finishing instructions, the whole project fits in that arch mat in a 4” frame.
Please let me know if you have the bee-jeweled pin cushion kit back in stock.
Thank You