


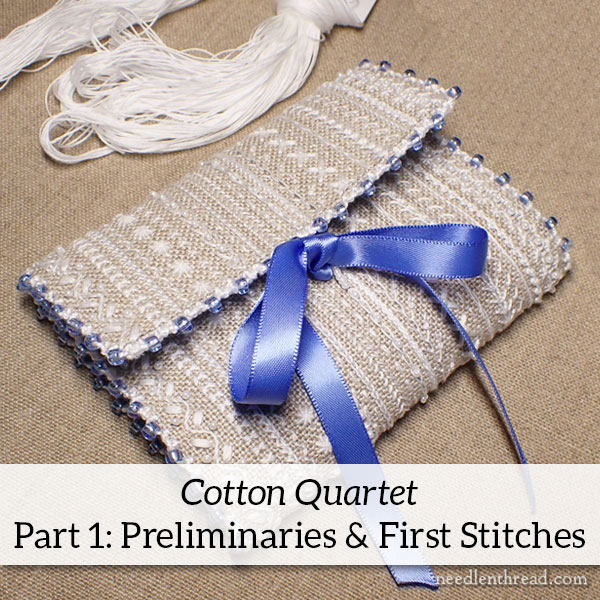
Welcome to the first installment of Cotton Quartet: A Sampler Tool Case! I’m excited to get going, and I hope you are, too!
This project is part of the Stitch Snippets Series for 2022 here on Needle ‘n Thread. In this series, we’ll explore several projects from start to finish, so that you can recreate the project at home, at your own pace. We’ve already completed one project – the Bee-Jeweled Pincushion – and we have more coming up!
When possible, Stitch Snippet kits or partial kits will be available to purchase, so that you don’t have to source supplies from all over the place. We’ll do that for you, and put them all together in a tidy package.
Even if you’re not stitching along with this project, you’ll find tips and techniques along the way that you can apply to your own needlework adventures, so please feel free to read along!
How does the whole thing work? Approximately every week, I will post one (sometimes two) installments for Cotton Quartet, taking you step by step through the process of creating the project.
As the project develops, I’ll create a Project Index where you will find a chronological list of all the articles, so that you can access them on Needle ‘n Thread during 2022.
If you happen to be a member of the Needle ‘n Thread Community on Patreon, you’ll receive the lessons in a very handy downloadable and printable PDF format, so that you can save them to your computer and print them if you want.
As we work through the project, I’ll discuss materials and possible substitutes for those who don’t have the materials kit.
If you are interested in the materials kit, when it is in stock, it will be available here in my shop. Right now, we are preparing more kits and they should be ready in about two weeks, maybe sooner. If you would like advanced notice via email once the kits are available, just drop me a line to request “cotton quartet advanced notice.” I’ll put you on the list!
Now… let’s get going!
For the ground fabric in this project, I’m using a hearty and beautiful even-weave natural colored linen called “Rain Barrel” here in the US. This is a 24 thread count linen, meaning that there are approximately 24 fabric threads in one inch of the fabric.
If you do not have access to the linen or you want to substitute, the count is not essential. You can even use a plain-weave fabric. I used the even-weave because I combined surface embroidery with some counted techniques for the “sampler” that makes up the embroidered exterior of the tool wallet.
You can use a plain-weave fabric if you want. You can use a higher count linen if you want. I prefer, when working this type of design, to use a fabric that has a distinct weave.
As we work through instructions, I’ll be talking about the count and the number of threads covered by stitches, based on a 24-count weave. If you are using a higher thread count, or you are using a plain-weave fabric, you will have to make adjustments and discretionary judgements concerning the size of your stitches.
You’ll need a piece of fabric about 9″ x 14″, which is the size of the fabric that comes in the kits.
Frame or Hoop
I used a 8″ x 11″ stretcher bar frame. You could use 8″ x 12″ as well, but I had the 11″ on hand, so that’s what I used. You can also use a scroll frame, a slate frame, Q-snaps, or any hoop that will allow you to have the whole 4.5″ x 9″ stitching area exposed.
You might have to add scrap fabric to the edge of your ground fabric, if you are planning on using a round hoop, in which case, you could probably get away with about a 10″ hoop. You can see how to “enlarge” your fabric to fit in a hoop in this article, here.
You can use a smaller hoop for all of the embroidery, except for the bead embroidery. If you leave all the bead work to the end of the project, you could use a smaller hoop for the thread embroidery. Then, you could add the beads with the thread out of the hoop. This is not my favorite way to do things, but it will work if you are mindful of your tension while working the bead embroidery.
Threads & Beads
I used four different types of cotton embroidery threads on Cotton Quartet: floss (6-stranded cotton), floche, coton a broder #25 (also called “cutwork thread”), and perle cotton (in sizes 8 and 5). They are all DMC threads, and they are either white (blanc) or B5200 – I used both.
I used size 11/0 seed beads in a pearly white for the beads that are mixed in with the sampler.
I used white Miyuki nylon beading thread to sew the beads on. You can also use regular floss, but it tends to look bulky after passing through the beads two or three times.
For needles, you can get away with two for the embroidered sampler part: a #7 or #8 crewel needle (for surface embroidery stitches and for sewing on beads), and a #26 tapestry needle for all counted stitches and for any whipped or laced stitches.
Design Layout
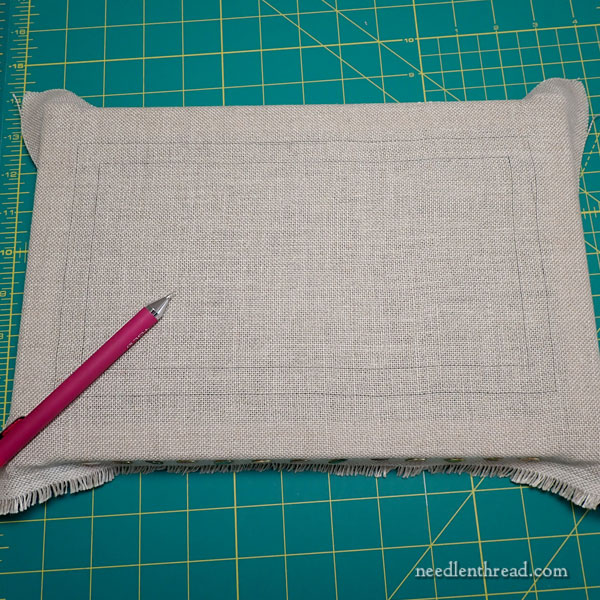
Before setting up my fabric on a stretcher bar frame, I drew the outline, seam allowance, and other markings for the layout of the wallet, according to the diagram below:
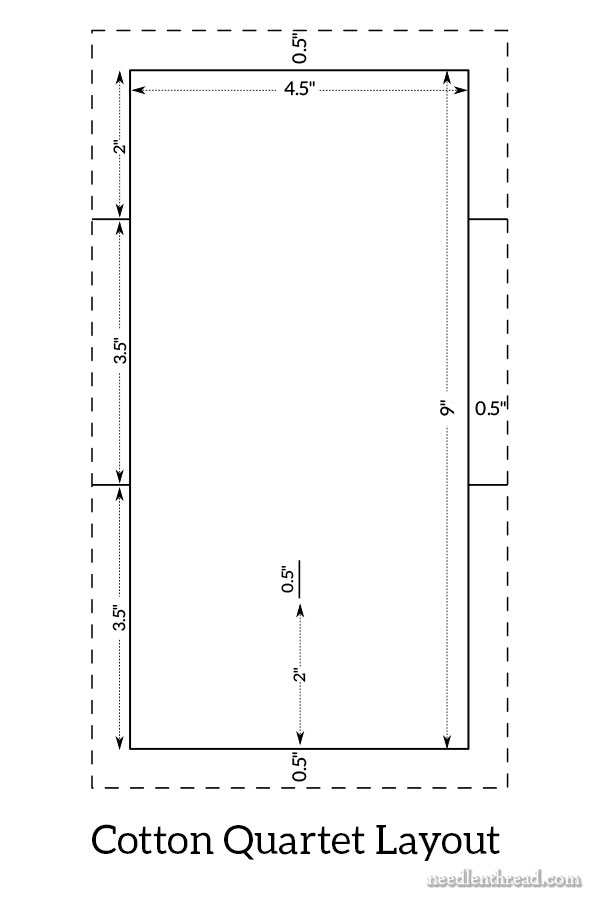
The solid rectangle marks the edge of the stitched area. It is 4.5″ wide and 9″ long. Using a mechanical pencil, and following the “ditch” between fabric threads, I marked out a 4.5″ x 9″ rectangle in the center of my linen corresponding to the solid line rectangle in the diagram above.
Then, I marked a 1/2″ (0.5″) perimeter outside the 4.5″ x 9″ rectangle (corresponding to the dashed line in the diagram above), to indicate the cutting line and seam allowance when it comes time to finish the wallet.
I divided the main rectangle into three sections, marking the sections with pencil lines within the seam allowance, but not across the main design area. You can see the short solid lines within the seam allowance in the diagram above.
Measuring from the top of main design line (solid line), measure down 2″ and mark a line within the seam allowance on one side of the fabric. Then, follow the thread of the fabric to the other side of the design, and mark another small line opposite that one.
Measure from that mark down 3.5″, and place two more marks within the seam allowance.
The 2″ space will be the flap of the finished wallet, while the 3.5″ spaces are the body of the wallet.
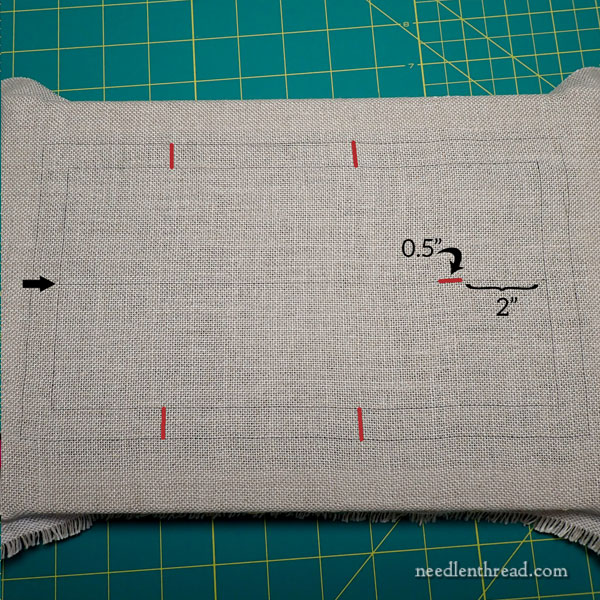
Using your pencil, mark a line down the center of the main design area (shown horizontally in the photo above). The center point is at 2.25″ (since the width of the wallet is 4.5″).
Looking at the diagram, notice that there is a 0.5″ long line marked in the bottom section, on the center line. The 1/2″ mark starts exactly 2″ up from the base line of the design.
If you’re looking at the design horizontally on the frame (in the photo above) you can see the 1/2″ red dash in the center of the right side of the design layout.
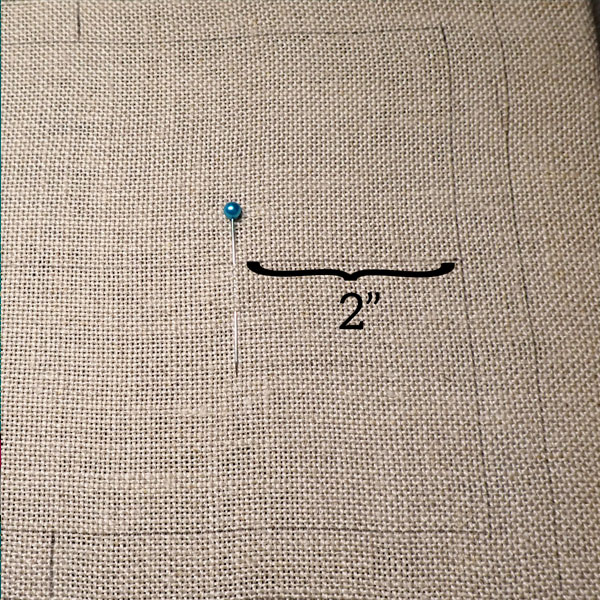
I just stuck a needle into the fabric, two inches from the right edge of the design layout, on the center line.
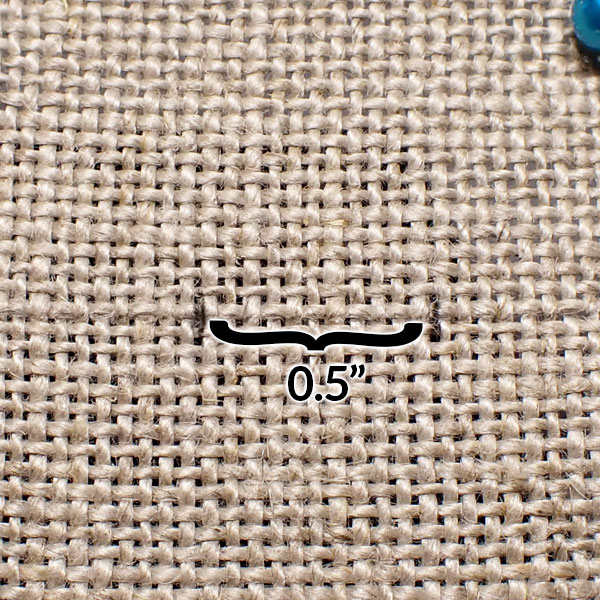
Then, I marked out a 1/2″ section of that center line.
This little 1/2″ section of the line is the first thing you will stitch. It’s important, because it is the “latch” of your wallet. I stitched it first so that I knew it was in the right place and I didn’t have to think about it again. Also, it’s part of the center stitched line, and I “built” the rest of the embroidery from the center line outwards to both long sides.
So, let’s stitch it.
First Stitches
Thread about 8″ of nylon beading thread onto the smallest crewel needle in the kit (finest needle with short eye – it’s a #8 crewel). Tie a knot in the end of the beading thread.
Almost all the thread starts in this project are worked by using a waste knot on the top of the fabric, and making tiny anchoring backstitches (that will be covered) towards the point where you plan to start stitching. You can find this method of beginning an embroidery thread demonstrated in this tutorial, here.
The whole point to starting your thread this way is to avoid knots. The waste knot is cut off once you cover the stitches. It is very secure.
Start in the middle of your 1/2″ mark, on the line, and make tiny anchoring backstitches into each other, working towards one end of the 1/2″ mark, where you will start your bead line. Once there, bring your needle and thread to the front of the fabric.
You can cut off the waste knot.
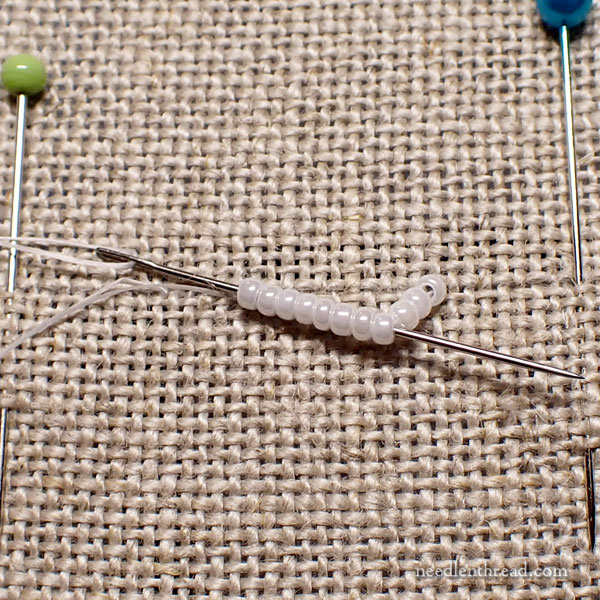
Thread 11 or 12 seed beads onto your needle and thread, and take the needle down into the fabric at the other end of the 1/2″ mark. The line of seed beads should arch up a bit from the fabric. The more beads you add, the more the line will arch up. It doesn’t need to arch up very much, so 11 or 12 beads should do the trick.
Take your needle and thread back to the end where you started the bead line and come back up into the fabric.
Pass the needle and thread through the beads again. You may have to pass through in batches, like in the photo above and below. I first passed through about eight beads and pulled the thread through those.
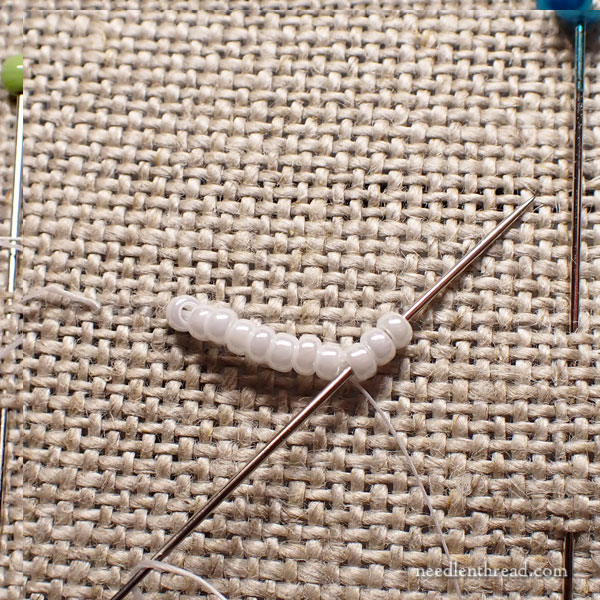
Then I turned the needle to pass through the last three, pulling the thread through. Take the needle and thread down into the fabric again at the end of the bead line, and come back up one more time at the beginning of the bead line. Pass through the beads again in the same manner, so that you’ve passed the nylon thread through the line of beads three times.
Then, take the needle and thread to the back of the fabric.
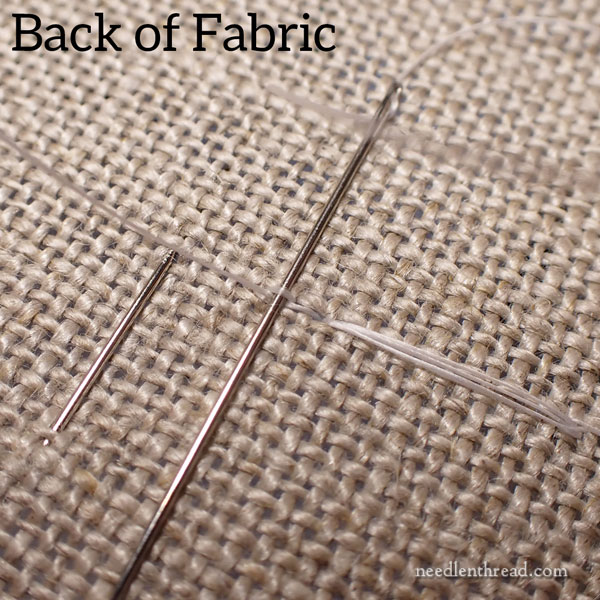
On the back of the fabric, whip around the backs of the stitches there, and then knot the nylon thread around them, using a regular hitch knot. Cut the thread.
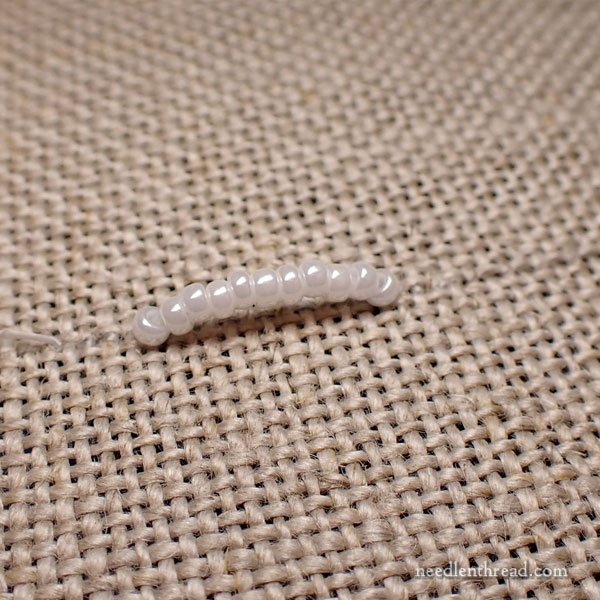
You should have a little half loop of beads on top of your fabric. It should arch up a little bit, as shown in the photo above.
Now, we’re ready to stitch that center line and cover it up completely.

Using coton a broder #25 and the tapestry needle, I began at the far end of the design area (away from the 1/2″ bead line), and I worked a large chain stitch towards that bead line, along the marked center line.
I started with a waste knot and three or four anchoring backstitches, about an inch away from the start of the line. You can see the knot in the photo above.
I worked the backstitches to my starting point at the beginning of the line, and chain stitched over four fabric threads towards the knot. I cut the knot, and kept going with the chain stitch.
The advantage of an even-weave fabric for this type of work is that you can count even your surface stitches and end up with very regular, even stitches!
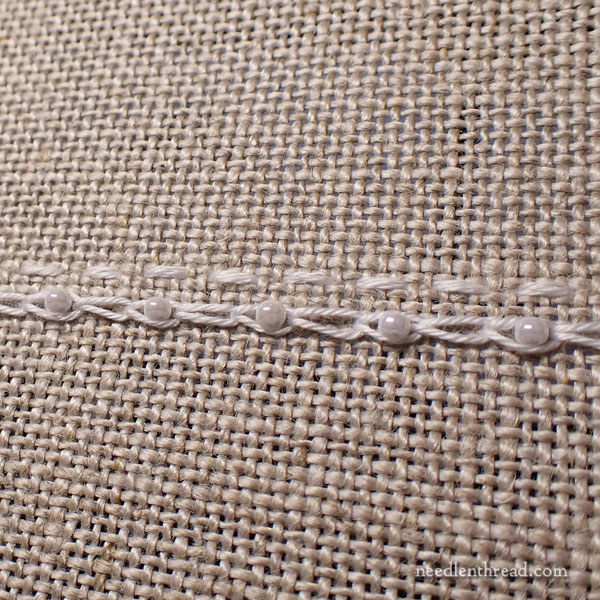
All my chain stitches were over four fabric threads, so they were about 1/6″ long. You don’t have to obsess over the length of the stitches. I made mine a bit longer, because I beaded between every other stitch and I wanted a longer space between the beaded stitches.
Chain stitch up to the 1/2″ beaded arch, and then pick up the chain stitch again on the other side of the 1/2″ beaded arch, to finish at the opposite edge of the design.

Then, thread up your nylon beading thread and smaller crewel needle, and sew a bead in the center of every other chain stitch.
The beads should sit up on the fabric like a tire.
Since these are 11/0 beads, they are large enough to pass through easily two or three with the thread. If you sew them on using a cross stitch, the bead will sit very securely like a tire on the fabric.
Here’s a diagram to explain how to do this:

For adding beads to the middle of a chain stitch, bring your needle and beading thread up inside the chain stitch, at the lower left of the larger part of the chains stitch loop, marked A in the diagram above. Thread a bead onto your needle, and take your needle down at B, in the upper right side of the inside of the chain stitch loop.
Then, come up at C, pass through the bead, and go down at D.
This cross stitch will hold your beads securely upward, like a tire.
If you want, you can also stitch e – f, a straight stitch across the center of the bead, for further security.
You can also start sewing on the bead with the e – f stitch, and then cross stitch for your second and third passes. This approach might be helpful if you have a hard time figuring out exactly where to situate the bead.
Bead & Thread Limitations
If you’re working with a materials kit, keep in mind that you are limited in the number of beads and the amount of beading thread, so you have to be somewhat judicious about your choices of where to bead on your sampler. Don’t plan to bead every line and every stitch!
On my sampler, I beaded every other stitch on the center line.
I beaded the lines right next to the two outside long edges.
And I beaded one line approximately halfway between the edge and the center line on each side of center. Altogether, then, I have only five beaded lines on my sampler (out of 24 stitched lines), and a couple of those lines are beaded approximately every other stitch.
If your sampler consists of as many lines as mine, and you try to bead every line and every stitch, you will run out of beads and beading thread.
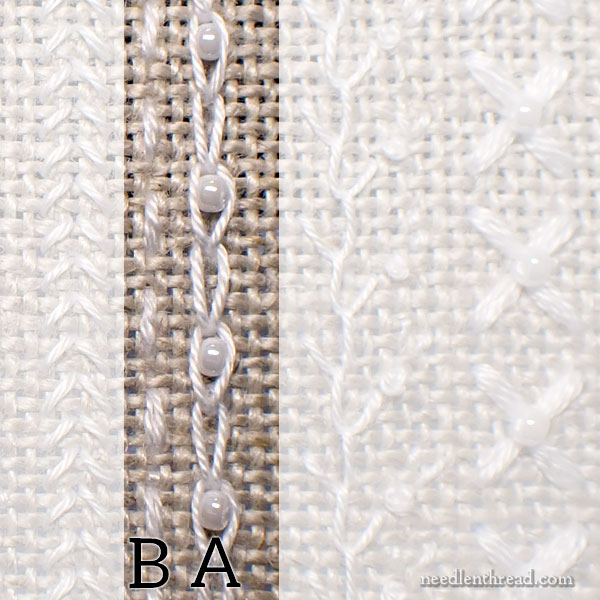
In the photo above, A is the center beaded chain stitch line, when the sampler is viewed vertically, with the beaded loop at the top of the sampler.
For the second line in the sampler (B), I used three strands of stranded embroidery floss and worked a simple running stitch over three threads, skipping two threads between each running stitch.
Try to keep the embroidery floss flat and untwisted while you work your running stitch. A laying tool or a large, thick needle is helpful for this. You can see how to use a laying tool here.
This running stitch line is approximately 3 threads away from the chain stitch line (about an 1/8″ away from it), so it’s fairly close.
More Ahead!
Whoa! That’s a lot in one lesson!
We will continue with this project next week!
I’ll be posting a PDF of the first lesson (which extends over a few more lines in the sampler) for Needle ‘n Thread members on Patreon a little later, before the weekend is out. It’s a bit longer than today’s blog post, but it’s formatted differently, so I can fit more in! (Great thing about PDFs!)
Keep an eye out next week for the second installment of Cotton Quartet!
I’m excited to start this! I’ll be using fabric, threads, and beads from my stash, which leads me to ask: what would be a good substitute for the coton a broder size 25? Perhaps size 12 perle cotton? I’ve never worked with coton a broder before, so I have no sense of it’s thickness.
Yes, that will work. Or just two strands of floss. The look will be different, but that’s ok.
Thanks for this beautiful little project.
I live a long way from anywhere in Australia, with no current access to an embroidery shop, so I’m just going to us what I can find in the cupboard and have a go. I’m sure I will end up with something lovely as your instructions and photos are just so clear.
Thanks, Denise! This is a great project for substitutions, really. You shouldn’t have any problem coming up with a beautiful needlebook working from what you have on hand! 🙂
Dear Mary
How exciting to be starting the instructions for the Cotton Quartet. It was a great reading with very clear concise instructions and very comprehensive clear diagrams. It’s also great that you give alternative fabric and threads that can be used for the project because it is always difficult to purchase different good quality embroidery fabrics in the UK. You could play a quartet while embroidering the Cotton needlecase. Thank you for sharing with us the very clear concise instruction for the newly started Cotton Quartet can’t wait to see further tutorials on this embroidery.
Regards Anita Simmance
Cotton Quartet advanced notice – Please include me on the list
Hi, Pat – can you please email me with your advanced notice request? The advanced notice lists are email lists, so I need to have an email from you to reply to. Thanks!
I bought your kit for Cotton Quartet. Would you recommend washing the linen before starting the project? Or should I jump right into with both feet!
Thanks,
Roberta L
I did not wash my linen. You can if you want, though!
“You can see how to “enlarge” your fabric to fit in a hoop in this article, here.”
FYI, the link is missing for this reference.
Sorry – that article is here: https://needlenthread.wpengine.com/2021/02/extending-fabric-to-fit-hoop.html
I’m excited to stitch this! I don’t have any coton a border, though, and I’ve never worked with it so I don’t know what it’s like. Would a size 12 perle cotton be a good substitute?
If you don’t have coton a broder, just use two strands of stranded cotton. You can also use #12 perle, but the look is completely different.
Hello Mary
Whist I managed to get most of the materials – here in UK floche is not an option. What would you recommend as a substitute?
You can use stranded cotton. The look will be slightly different, but it will work!
cotton quartet advanced notice please. I would like the kit. Thx.
Hi, Karen, please drop me an email to request advance notice for the kits. The advanced notice list is an email list, and I need to have an email to respond to. Thanks very much.