


In the previous installment of Cotton Quartet, we covered several sampler bands to the right of the center embroidered band on the sampler cover of the tool wallet.
Now we’re going to shift to the left side of center for a little bit, and I’ll tell you why. We’ll also talk about “filler” bands, spacing, and project orientation while you work.
First, let’s look at these bands so that you see where they are in the layout of things.
On the right, in parenthesis, are bands A and B. We’ve already stitched these in the first installment of the project. Band A is the beaded chain stitch line that extends straight up the center of the project, and is broken at the top by a beaded “arch” on the fabric that forms the closure loop for the tool wallet.
We’re moving over the left side of the center line now for a reason. As I worked through my sampler cover, I wanted to make sure that I kept some sense of balance across the whole piece, so that one side of center did not end up noticeably heavier or lighter than the other side.
So once I had a little bit of stitching done on the right side of the center band, I switched over the left side and worked in some bands to balance the sampler.
Orientation of Work
It was very difficult to photograph the project at this point as a whole, for any instructional purposes. Too much distance was required to fit the whole piece into one photo, and at that point, none of the bands are very recognizable – they just look like white stitched lines.
So, instead of full photos of the piece as we work through, keep in mind the orientation of the work in the directions. This doesn’t mean your work always has to be turned in the direction of the diagram below. Instead, the diagram will help you understand what I mean by indications like the “top” or the “flap.”
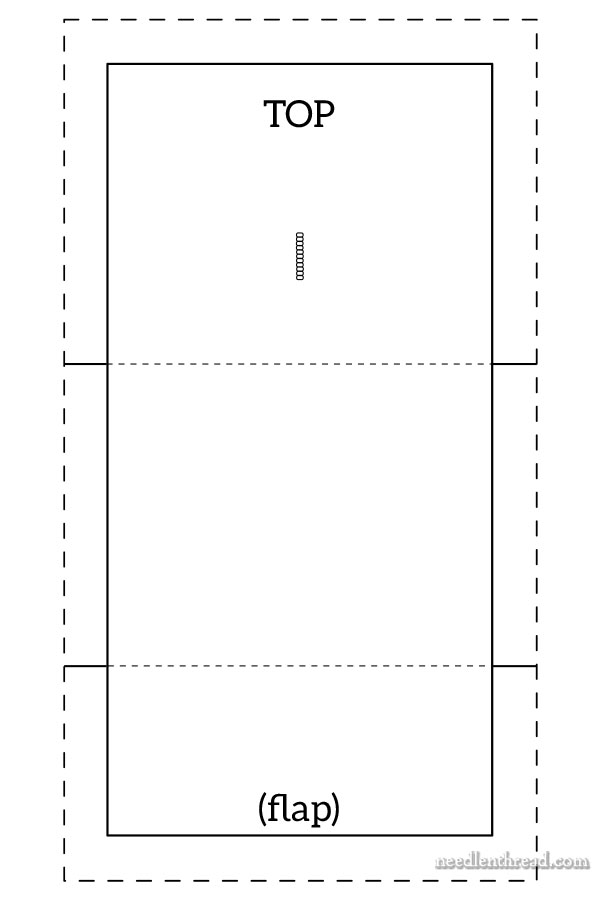
When I refer to the “top” of the sampler, I’m referring to the section of the sampler that has the beaded loop in it. If you hold your fabric in front of you so that the sampler layout is vertical, the section with the beaded loop should be at the top of the fabric.
At the “bottom” of the fabric when held in the same position, you’ll have the “flap” section, which is the cover flap that folds over the section with the beaded loop, once the tool wallet is assembled.
In most cases on the sampler, the stitching direction is going from bottom (flap) to top. The only time this changes is when it makes more sense for the stitches to be moving in a direction from top to bottom, and they can’t be stitched any other way. (Like the feather stitch in the last lesson.)
Why does it matter?
The flap portion (the “bottom” of the sampler) is the portion that will be prominent on the tool wallet. Because of this, we want the stitches that start on the edge of the flap to be complete. We don’t want them to be half of a stitch or half of a stitch combination.
At the top (loop section) edge of the sampler, that edge will be covered by the flap, so if our rows of stitches end up finishing with half a stitch, it’s ok. When the project is assembled, that edge will be covered by the flap.
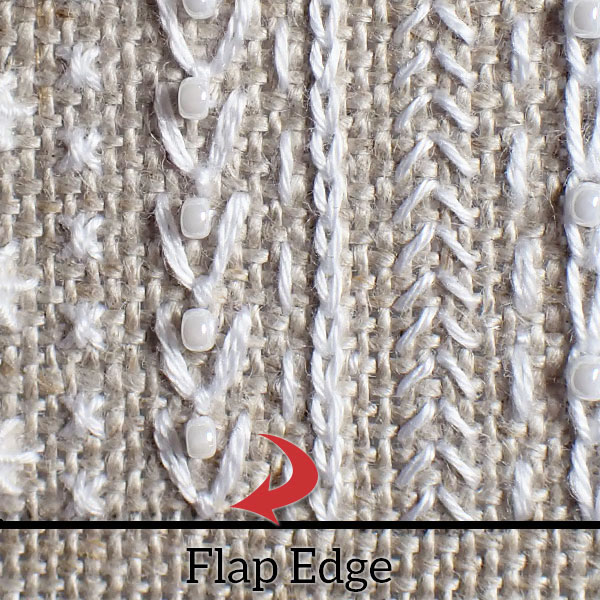
To show you what I mean, here’s the flap edge (bottom edge) of the sampler, with the sampler held vertically and the beaded loop section at the top, as shown by the diagram given above.
The black line is where the perimeter of the design is drawn on the fabric.
The red arrow points to the fly stitch there, to show you how the whole stitch is situated so that it ends right at that edge.
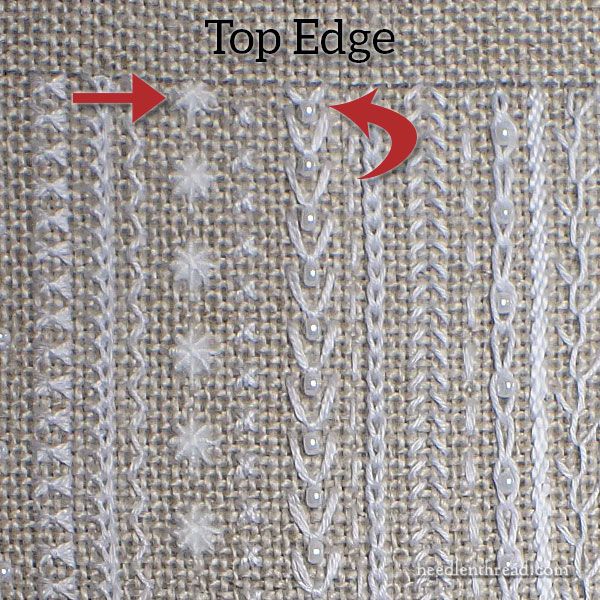
If we go up to the “top” of the sampler, right along the top edge you can see that the fly stitch line ends with only part of the fly stitch.
You can also see that the last little “star” to the left, where the straight arrow points, is also truncated at the edge.
This edge is covered with the flap edge, so it’s ok if the stitches are truncated.
Stitching Sequence & Spacing Between Bands
Let’s talk briefly about stitching sequences and the spacing of the bands on the sampler.
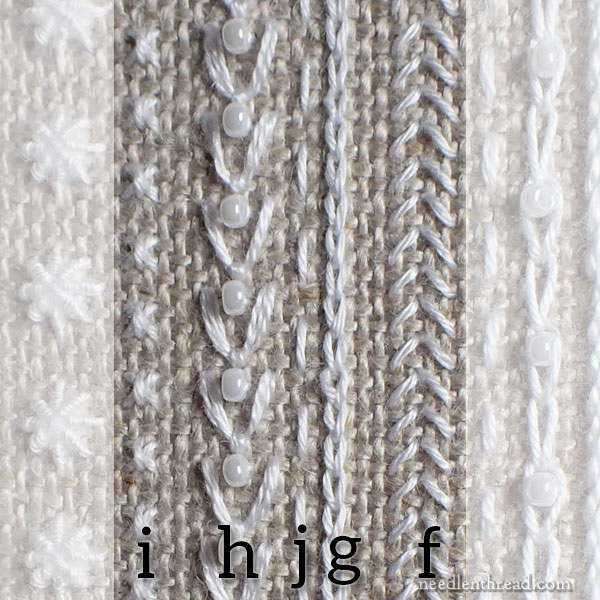
Alphabetically, you can see that the stitched bands are out of order, when moving right to left (remember, the center band is off to the right here).
The reason for this has to do with the sequence in which the bands were originally stitched. After stitching bands F, G, H, and I, the small gap between H and G gave me the opportunity to add a simple running stitch line that helped to add some weight to this area of the sampler. Adding J created a denser white area on the sampler, which balanced well with some of the heavier areas of stitching on the other side of the center line.
The point: as you stitch, you might find gaps that leave too much fabric showing, where you might want some more white. A simple stitch line running stitch or stem stitch worked between two other bands can fill the gap easily without too much crowding.
Part of the charm of this type of band sampler is the irregular spacing, with open and dense areas. So don’t crowd too much in! Try to keep some open light areas, too.
The Stitches
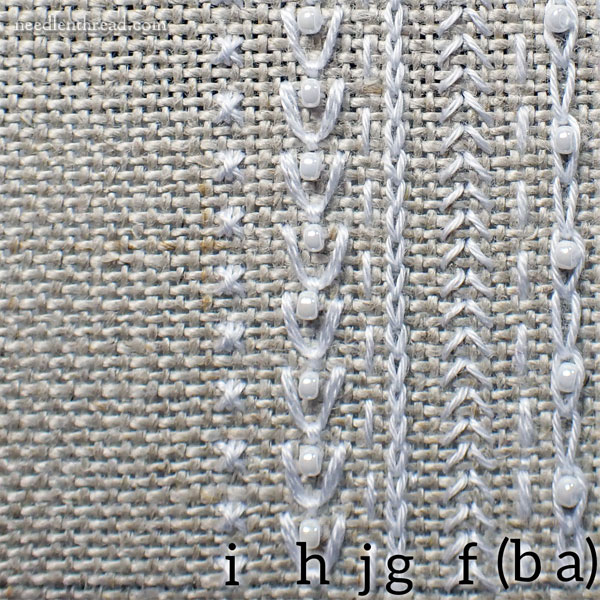
In today’s installment, we are working five bands in the sampler, to the left of the center beaded chain stitch band.
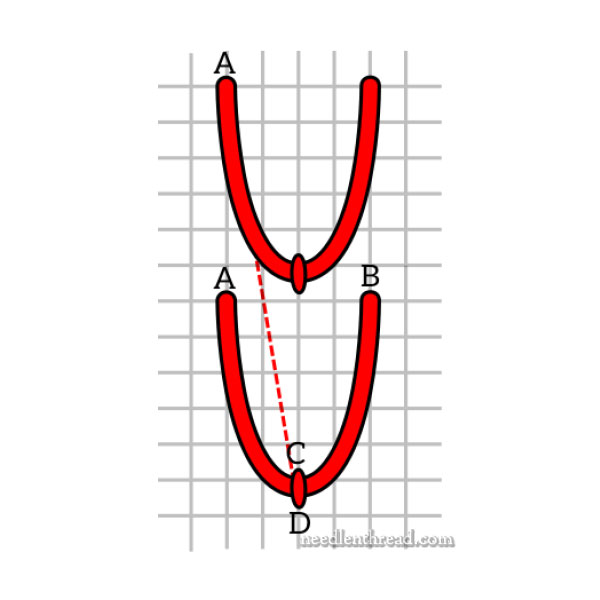
Band F: Coton a broder with a #26 tapestry needle. This band is an inverted straight stitch “V”, with each arm worked over two threads of fabric. The right side of the band is about two threads of fabric over to the left of Band B from the first installment.
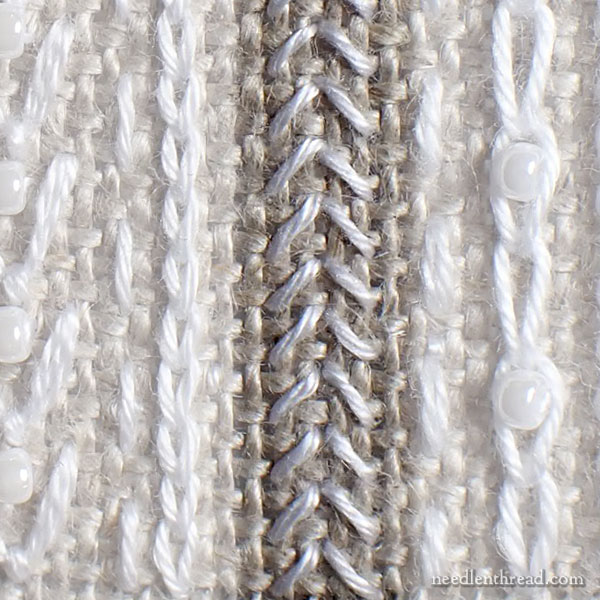
Close-up and hairy, that’s what the stitch looks like, above.
Here’s a diagram of the stitch:
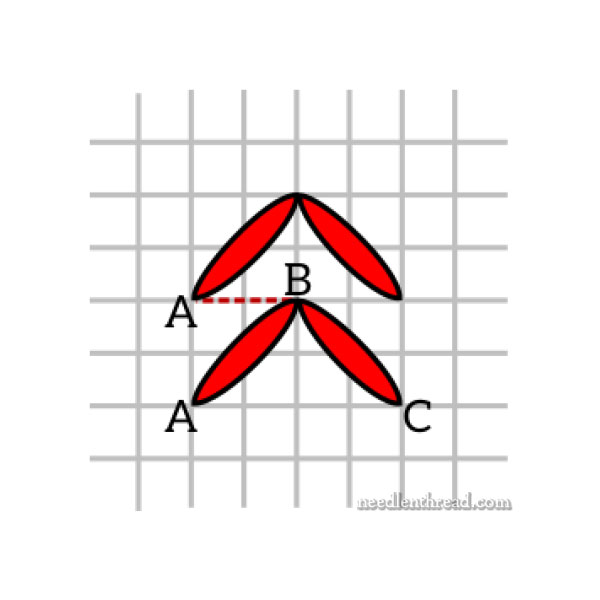
Up at A, down at B, up at C, down at B, cross to the left for the new A, and continue in that manner up the line to the top of the piece.
Band G is a chain stitch, working with coton a broder, from the bottom edge to the top. It is three threads of fabric to the left of the left side of Band F.
If you’re using the fabric thread for stitch length spacing, my chain stitches are over approximately two threads of fabric.
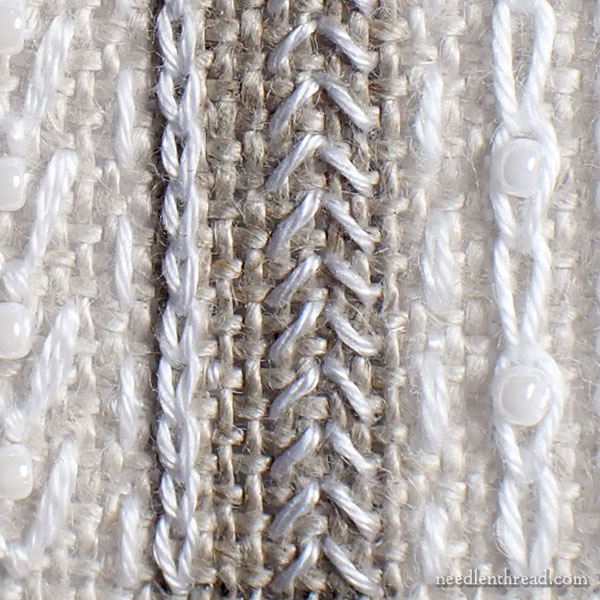
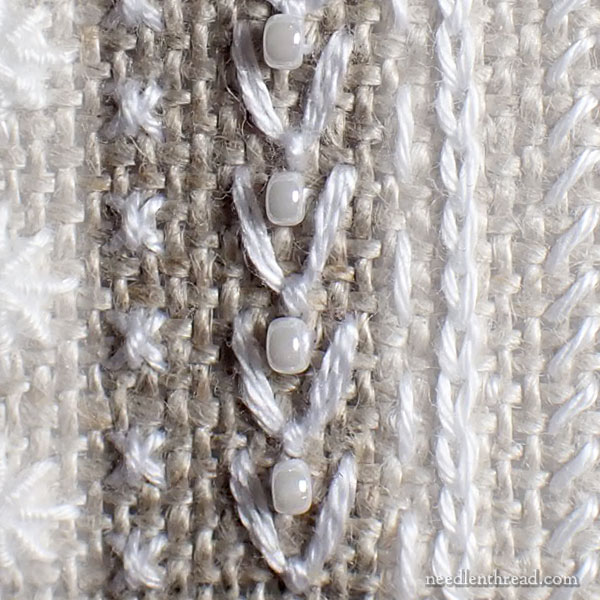
Band H is worked with three strands of floss. It is a fly stitch, but it is worked backwards up the line, from bottom to top, for the reasons mentioned earlier. The fly stitch is beaded in the center.

The center of the fly stitch (the holding stitch at the base of the V) is six threads of fabric to the left of Band G, or approximately 1/4″ away.
The diagram below explains how I worked the fly stitch backwards, up the band. It requires a little more thread this way, but it guarantees that the stitch is placed correctly on the flap of the finished tool wallet.
The diagram also demonstrates the spacing of the stitch on the fabric’s grid.
When you finish the fly stitch band, switch to beading thread and sew a bead inside each fly stitch, centered at the top between the two “arms,” using the method discussed for sewing on beads in the first installment of the project.
Band I is coton a broder again, and you’ll want to use a tapestry needle. It is a cross stitch with a vertical stitch over the center of the cross stitch.
The right side of Band I is approximately five threads of fabric to the left of the center holding stitch on the fly stitches in Band H.
Here’s the diagram for the stitch:
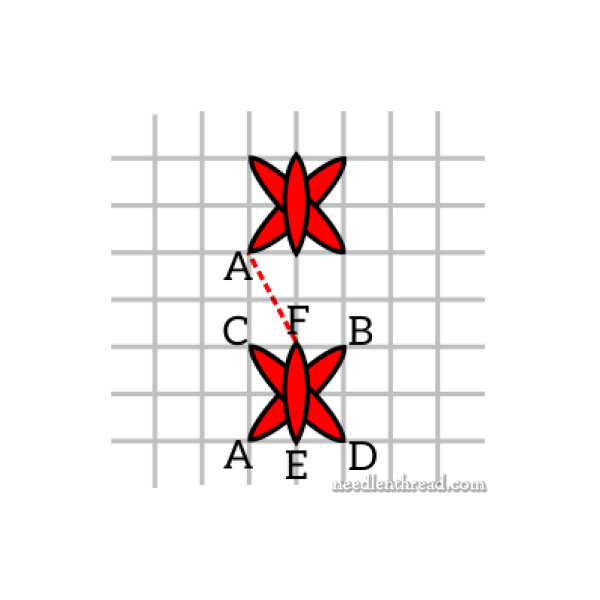
The cross stitch is worked over two threads of fabric, in the sequence noted in the diagram in order to reduce the length of thread on the back of the work. Start by coming up at A, down at B, etc., following the diagram.
From F, travel to A on the next cross stitch.
Band J was an afterthought, to add some density to the sampler in that area, by inserting a simple line of running stitch between Band G and Band H. The running stitch is worked in coton a broder, over three threads of fabric on the top of the fabric, skipping two threads of fabric between each stitch.
You don’t have to add Band J if you don’t want to. In fact, you can shift the bands, add other bands, work other stitches as you please! I’m just mapping out how I created my sampler, but feel free to explore other methods and stitches.
If you’re looking for previous lessons on this project, you will find them all listed chronologically here, in the Cotton Quartet project index.
Members of the Needle ‘n Thread community on Patreon will find today’s lesson plus the next lesson in one PDF published on Patreon a little later this weekend. This will be the second PDF on Patreon, since more than one lesson is combined in each PDF. So you’ll get a little bit more over there this weekend! Keep an eye out for it!
Cotton Quartet Kits
We’ve been notifying the advanced notice list about kits as we’ve prepared them. We have a new batch of materials coming in next week, and once the next batch of kits is prepared, we will continue to notify anyone who has asked for advanced notice in the order your requests were received.
Drop me an email if you want to be on the advanced notice list for the kits!
Have a great weekend!
Thank you for the orientation image and explaining how things go together. That’s really useful to helping me make sure I’m doing my stitches in the correct direction 🙂
I had another question – this time about the kit. One of the stitches today says to use three strands of floss for it, and once I stitch that I think I’m going to be out of floss from the kit. Are there other stitches coming up that use floss? I’m trying to be careful and not leave the ends too long so I don’t have a lot of waste, and combining strands carefully. I can pick some up this weekend hopefully if we’re going to have more need for it (or maybe I’ve got some in my embroidery floss stash) Thanks!
There are only a couple rows with floss. You should not run out of floss! I made sure we included extra. Keep the strands that are separated out as you work with the floss. In fact, this might be the last row with floss (??) I’m not in the vicinity of my work right now, so I can’t double check that, but I think it is the last row with floss. I’ll let you know!
I was very tight on the floss as well and barely finished the rows that I worked with it. I literally had nothing to spare.
Thanks for letting me know, ladies! I will look into this. I’m not sure why it’s the case, as I included 20″ more than I used. I always make sure there’s a buffer in the kits. I’ll definitely look into the quantity!
Hi Mary,
I’m enjoying this project so much. One thing that’s bothering me though is having to end a thread in the middle of one of the bands. Is there any way to gauge the length of thread needed to begin and end a band without running out of thread? I don’t want to waste any thread but just finished band F and used 3 pieces to get to the end.
Thank you, Barbara
It’s normal to have to change threads in the middle of a band. You’d be cutting off too much thread or using too long a piece, if you were trying to do anything beyond a running stitch on any of the bands. The longer your thread, the more likely it will become dull and even fuzzy by the time you’d end the band. So shorter lengths (I usually never cut beyond 18″ lengths on most threads, though I might go to 20″ on floss) are always better, because your finished stitches will look fresher.
Dear Mary
The Cotton Quartet stitches above are so lovely it makes me want to stitch along and be involved in the project. I’m thinking of doing a sampler as I’m coming to the end of the projects I’ve been involved in these past few months. So I’m thinking of following on with these stitches just to get my hand back into embroidery. Thank you for sharing the latest Cotton Quartet embroidery project with us and for the photos and very detailed instructions, It looks lovely.
Regards Anita Simmance