


It’s happening again!
I’m getting lots of emails lately about embroidered writing – which has me thinking that there’s either a big project going on out there somewhere involving embroidered text, or embroidering hand-written text is becoming trendy again on the social media waves.
I always know Something is Up out there somewhere, when I get an influx of email asking basically the same questions. Sometimes, it happens with particular stitches that are featured in sped-up reels that are hard to follow; sometimes, it’s a technique that’s being used in a kit that’s gone viral. Or sometimes, it’s just something that’s become trendy again.
In this case, I’ve had quite a few questions about embroidering hand writing.
I wrote this series of tutorials for embroidering lettering and handwriting eons ago, but that series doesn’t include my now-favorite stitch for this type of embroidery, so if you’re interested in embroidering handwriting or text, I’ll point you to some tutorials below.
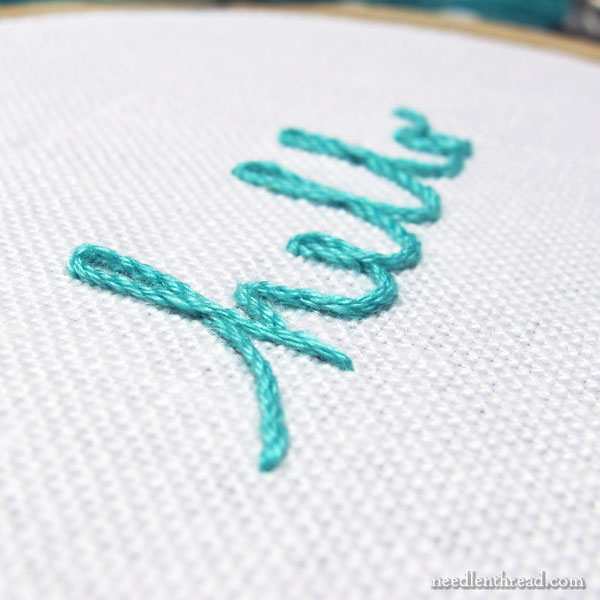
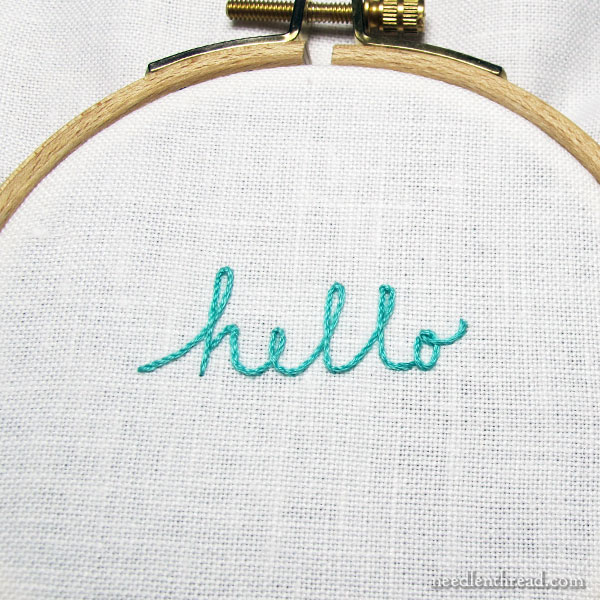
My absolute favorite stitch for embroidered handwriting is Quaker stitch. I’ve written a step-by-step tutorial for Quaker stitch here.
You can see Quaker stitch used on handwriting in the photo above. I like it because it creates a slightly raised, very clear, fine line, which works great for handwriting. The slightly raised aspect gives the text a little dimension and really makes it stand out crisply.
Quaker stitch is very much like stem stitch, but it adds an element of split stitch to it, which sort of “tightens up” the line. It’s a great stitch for handwriting, so if you haven’t seen that tutorial yet, check it out!
Otherwise…
If you’re looking for something besides Quaker stitch – maybe something even more delicate, for example – you can achieve a very delicate line using split stitch with a single strand, or you can use a whipped backstitch with single strands of floss for the foundation and for the whipped part.
If you use backstitch for handwriting and you’re trying to achieve a nice, smooth handwriting, I recommend whipping the backstitch. Otherwise, your handwritten lettering will look a little boxy and juvenile. If you’re going for that chunky, rigid look, though, you wouldn’t need to whip the backstitch. It just depends on the look you want!
For heavier, bold handwriting, you can always increase the weight of your thread (use all six strands of floss instead of just three, for example, or use a heavier perle cotton or other type of thread), or you can switch to a heavier stitch. For smooth, heavy, compact lines, try a whipped chain stitch or a heavy chain stitch.
Remember, you can also experiment with any line stitches, for embroidering handwriting. You can thicken up lines by adding extra rows of the line stitch right next to each other. And you can control how heavy or fine you want your lines by increasing or decreasing the weight (thickness) of the thread you’re using.
I hope this helps answer the recent influx of questions about stitches for handwriting!
If you’re looking for embroidery stitches to peruse, feel free to visit this collection of how-to videos, as well as the alphabetical index of stitches further down that same page.
Have a great weekend!

Hi Mary,
Which Au Ver a Soie threads would be best suited to Quaker Stitch/Split Stitch?
Thank you!
I think you could use any of them – the perlee might be a good one to try out first. It depends on how fine you’re planning to go. Soie de Paris would be exceptionally fine. Of course, you can increase the weight by adding strands, but this produces a whole different look in the split part of the stitch.
Hi Mary, as always, you are an inspiration. A few days ago it was “National Handwriting Day” so that may have been one reason you received requests. You taught me embroidery here many years ago and it has helped me so much to cope with chronic pain. When I get too anxious to do anything else, I stitch. It helps to have a project that someone else designed so I can just stitch and not worry about anything. I’m so happy you decided to jump in and do this full time. I love hearing about your expansion in the new space. Keep on Stitching! We are all so thankful for your gifts.
Recently, an image of an antique sampler with embroidered writing was displayed online. It garnered significant interest in the sampler community!
I have used your tutorial on Quaker stitch many times when stitching letters. It has become my go to stitch for words. If it has been a while since I have used it, I just search your site and review the instructions. I went to do that a few minutes ago and thought something was wrong. Why was it coming up as today?! Then I was excited when I realized the topic has come around again. I have not tried the whipped backstitch on lettering. After reading this I want to. Thank you for sharing your knowledge!
I have started a crewel embroidery which tells me to outline flower petals with split stitch which I have done and then fill in the petal with long and short stitch which I have also done going over the split stitch. Now I am supposed to outline the petal with buttonhole stitch but of course can’t see the split stitch to catch for the buttonhole stitch and if I start my buttonhole stitch in the long and short stitch it spoils it. What am I doing wrong please. I feel so stupid.
Hi, Christine, I really think the instructor means that you work the buttonhole into the long and short stitch. I can’t imagine how else you could work the buttonhole, if that is the sequence of work that you’re given in the instructions. The edge of the buttonhole (the part that forms that sort of stem stitch edge) would be towards the outside of the flower petals – even beyond the edge, I imagine, and the “spoke” would therefore have to go down into the long and short stitches. That’s the only way I could see it happening, given the sequence in the instructions. I agree that it could very likely mess up your long and short stitch, because going down into it will cause a definite ridge. Now, I could see doing the split stitch first, then doing the buttonhole over the split stitch, treating the “spokes” of the buttonhole like the first layer of long and short stitch, even spaced a little bit, and then working the long and short stitch into and between the spokes of the buttonhole, to make a full layer of long and short stitch. But I can’t see doing the long and short stitch filling on the flower petals first, and then going back and doing a buttonhole that requires you to pass down into your long and short stitch. Have you reached out to the designer of the kit? That might help!
Mary, I’m here to say THANK YOU THANK YOU THANK YOU!! Thank you for sharing and detailing this stitch with us. I do a lot of embroidery and when it comes to lettering I’ve tried every stitch (or so I thought) and in my heart am never truly satisfied – until now! I am absolutely hooked on the Quaker stitch. The control it gives around curves and calligraphy script is life changing! Just proof there is always room to keep learning and growing in the world of embroidery and or needlework.
Also FYI after trial and error I am really happy the results using 2 threads of DMC embroidery cotton floss. Thank you again xxx Dell
I am glad you found the tutorial for Quaker stitch – I think it’s a terrific stitch for handwriting, too!!