


The first step in a crewel project, once you’ve selected your design, is to get the project ready for stitching.
The set-up of any embroidery project may seem ho-hum, but it is in these initial steps of setting up that the finish (good or bad) is often determined. If you take the time to set up an embroidery project correctly, then despite other mishaps along the way, the finished product can still come out very well.
If you skimp on the setting up, though, you may very well doom your project from the start.
Here, I’m showing you my set-up process for the Crewel Rooster. This process can pretty much be applied to any surface embroidery project, so even if you aren’t working a crewel embroidery project, you can apply the process to your own projects.
I’m working the Crewel Rooster on Legacy Linen Twill. Crewel embroidery is traditionally done on a medium-weight plain weave linen or on linen twill.
I like linen twill, and I find I really like Legacy’s linen twill, now that I’ve been working with it. It’s a nice crisp medium-weight twill, made specifically for hand embroidery. Unlike other twills that are woven for upholstery, this twill is finely woven and tight. The weave does not loosen and separate as you stitch, which is often what happens with inferior twills that are great for upholstery and regular sewing applications, but are not made to support hand embroidery stitches.
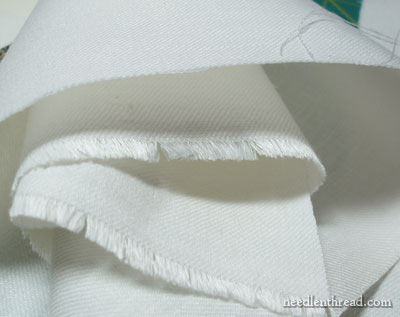
Legacy’s linen twill is an egg-shell white (not quite white, not quite cream), and it has a beautiful “hand” – that is, the surface feels smooth and … well, just really nice. I like it a lot. In the US, if your local needlework shop carries any items from Access Commodities (Au Ver a Soie threads, Trebizond, Hardwicke Manor hoops, etc.), then chances are, they can special order Legacy’s linen twill.
If you don’t have linen twill and you’re planning on joining me in exploring crewel stitches, let’s talk a bit about alternatives.
Second choice: a plain-weave medium-weight linen, which you can line with muslin. The muslin behind the plain-weave helps support the stitches between the weave of the linen.
Third choice: cotton twill, or even a satin jean fabric (cotton sateen) – like the kind used for Mountmellick embroidery.
Fourth choice: you could use a heavier cotton, such as the type used to make pillow cases or sheets, but probably you don’t want to use this type of fabric with wool threads. If you’re just following along for the sake of the stitching, you might just skip the whole “crewel” part, think in terms of regular surface embroidery, and use embroidery cotton (DMC or Anchor stranded cotton).
The very first thing to do with your fabric is to iron it to ensure that there aren’t any wrinkles or creases in it. If you have bought a cut of linen or other fabric that has been folded and that has a crease in it from the fold, you might have to wet the linen first.
In fact, I soaked mine in hot and then cold water twice, then left it to rest in hot water until the water was lukewarm. This shrinks the fabric. On some embroidery, it might not be desirable to pre-shrink your fabric (it is not recommended, for example, for Schwalm embroidery). But since I do not plan to wash this after I stitch it, I went ahead and pre-shrunk it.
The good soaking ensured that all the creases were gone. Then, I ironed the linen while it was still damp, which gave me a perfect wrinkle-free surface.
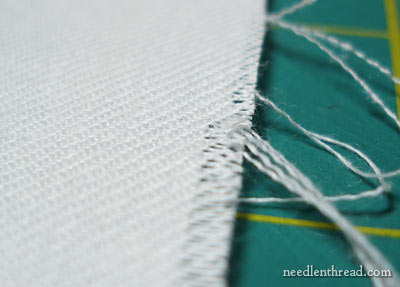
Next, “square up” your cut of fabric. When setting up an embroidery project, it’s important that your fabric is “square.” To achieve this with linen – whether twill or plain weave – pull out threads from the sides of your cut, until you have a straight edge.
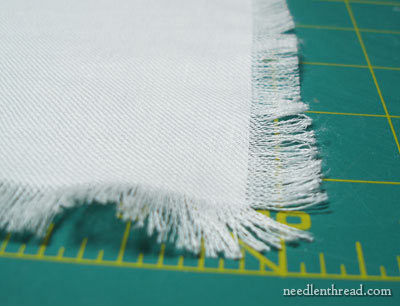
Do this on all four sides of your cut. See the remaining threads in the photo above? Just trim along the straight edge, removing this extra fringe, and you’ll have a perfectly squared up piece of fabric.
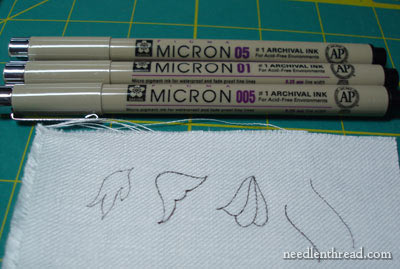
After cutting your fabric, you’ll transfer the design. For this project, I traced my pattern on a light box, using Micron art pens. I chose the 05 size, as the 005 (which is tiny!) snagged a bit on the linen as I wrote with it. You might test the pen or pencil you are going to use on scrap of fabric, to see how well it draws on the fabric you have chosen.
Update: A reader since suggested using sepia colored art pens, and she is correct – the line is much easier to cover for every color with the exception of white. It’s MUCH better than using black. The difficulty is that the sepia colored micron pens are difficulty to find at local art / craft stores. You can find them online, however, for an excellent price through Dick Blick Art Materials. Just do a search for “micron pen” and they’ll come right up.
Besides the micron pen, Prismacolors also makes a permanent fine drawing pen in sepia.
After transferring a design with this type of pen, I normally will iron the fabric again, to make sure that the ink is set. This isn’t always necessary, but, after experimenting with different projects, I’ve found that it helps ensure there will be no running of the ink, should I have to wet the fabric for any reason.
Tip: Always test embroidery design transfer methods that use different types of ink that aren’t necessarily meant for fabric.
At the end of this article, I’ve linked to a few different ideas for transferring embroidery patterns to fabric.
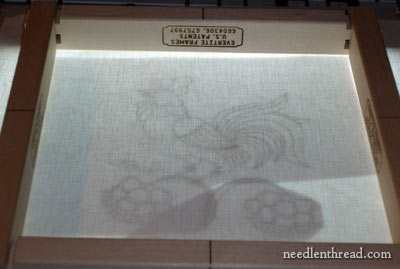
I placed my design on the light box and taped it down. Then I laid the linen over the design, and I taped it on the sides, too, to keep it from moving.
I centered my 10″ Evertite frame over the design just to make certain that the 10″ frame would work without a problem – and it is perfect!
So, now it’s time to move the frame and trace the design.
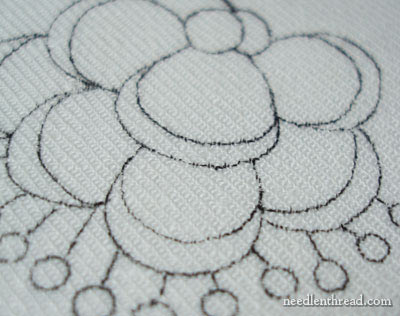
When you trace a design onto fabric this way, it’s important to draw in long, smooth strokes, rather than short, sketchy strokes. Don’t sketch! You want a continuous smooth line. When you have to stop in the middle of a curve or something to adjust your hand position, lift the pen off the fabric completely.
If you leave it on the fabric, you risk either jarring it and getting a warble in your line, or you risk a pen blot from the ink soaking into the fabric while it rests on it.
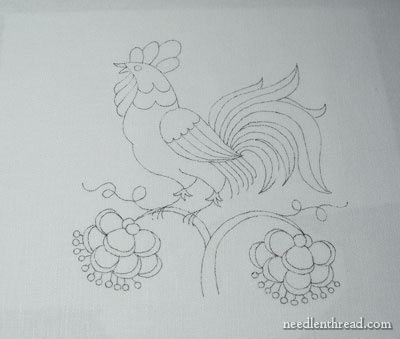
Here’s the traced design, ready to go. The next step is to center up the design with the center marks on your frame, and to tack the fabric onto your stretcher bar frames. I have a whole tutorial on setting up stretcher bar frames, if you are unsure of how to go about doing this.
For crewel embroidery, it’s important that your fabric is kept taut during stitching. There are several ways to achieve this, and I’ll list them here in order of preference (with a few noted conditions!):
1. Slate Frame – slate frames are ideal for larger crewel work projects. If you have one, and are working on a large project, it is worth the time it takes to dress a slate frame. For a smaller project like this, though, I prefer Evertite Stretcher Bar Frames.
2. Evertite Stretcher Bar Frames – These are ideal for smaller projects. They are quicker to set up than a slate frame, yet they still give you the option of tightening your work further, after you’ve set up the project. You can achieve excellent, drum-tight tension with Evertite frames.
3. Regular stretcher bar frames – these don’t have the screw mechanism set into the bars, like on the Evertite frames, but they are still quite suitable for small to medium sized projects. Just make sure when you tack on the fabric that you are pulling it enough to achieve a tight tension, without warping the fabric.
4. Hoop – for crewel work, you’ll want a good, sturdy embroidery hoop that is somewhat thick. Because of the weight of the fabric, a thin plastic hoop doesn’t really cut it as well. On the other hand, if this is all you have on hand, it’s better than nothing! Just make sure that you remove your work from the hoop every time you finish a stitching session. Hoops make marks, so the shorter the time the fabric is in the hoop, the better. Additionally, if you’re using a good wooden hoop (like Hardwicke Manor hoops), you can bind the inside ring of the hoop to protect your fabric and also to provide better tension.
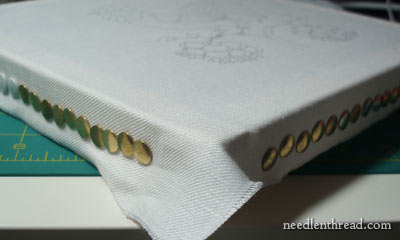
Here’s my rooster, set up and ready to go. The next step will be sorting out the threads I’m going to use. I am using only threads that I have on hand – not buying anything new right now! – so I’ll be sifting through my stash to see what wool threads I can come up with. I know I have a heap of Appleton wools, plus some leftovers from the crewel smalls I’ve been working on, plus the Fine D’Aubusson, made for Au Ver a Soie and distributed by Access Commodities.
I’ll show you all these in an upcoming post!
More Information on Transferring Embroidery Designs to Fabric
If you’d like more information on different methods of transferring embroidery designs to fabric, check out the following articles:
Favorite Methods of Embroidery Design Transfer
Prick and Pounce Embroidery Design Transfer – a tutorial
Beginner’s Most Frequently Asked Questions – Transferring Embroidery Patterns to Fabric – check out the comments on this article, too, as there are lots of good tips!
Thanks for all the great photo's, it really helps this visual learner 🙂
Why do you use a permanent pen, instead of a washable marker?
Aaaaaagh! 🙂 I just walked in the door from visiting Needle in a Haystack this morning to get my Evertight Frames. Guess I'll need to go back for cloth tomorrow. Do you know what colors you're planning for the rooster? Might as well pick up some thread while I'm at it!
BTW, they also have a few of the little crewel kits that you wrote about the other day.
Dear Mary
WOW beautiful! I like crewel embroidery!!
I think the fabric is gorgeous. I know it in natural color. Thanks so much for your explanation about ironing, because this is my problem with linen twill fabric, cost me ironing for remove wrinkles from being folded. And as I said on my blog yesterday, this year I'll ironing this type of material often!
I hope you had have a Happy New Year you and yours!
Hugs and love
Maria del Valle
Hi, All –
Thanks for your comments!
I use a permanent pen because the lines will be covered, anyway. The piece won't be washed after it's stitched, so there's no point in using the washable markers. Besides, I find, with the water-soluble pens, that they tend to feather quite a bit when you write with them on fabric. They don't make a crisp, fine line.
I'm not quite sure what colors I'll be using, really. I haven't "quite" mapped it out. Unlike a piece designed for a kit, this piece is more of a sampler, to try different wool threads. The threads I'll be using: Appleton, Fine D'Aubusson, Heathway, Gumnut Poppies (I have a couple strands leftover from the kits I've been using), possibly Paternayan crewel wool (I have one hank), and possible Renaissance Wool (crewel weight) from Renaissance dying, if the colors work, and possibly Bella Lusso (I have one bright red skein that might work on the rooster's chin and crown). I don't want the piece to end up a whole mishmash of opposing colors, but I admit that I didn't take color into great consideration, because I'm working entirely from my stash.
If you're stitching along and concerned about color, I'd suggest sticking with a four to five color scheme, with a couple shades within the color ranges. So, golds / yellows; reds; blues; greens – something like that. That's about what I have mapped out, but I do have a couple purply hues in there, too (which I don't really like much for this). I have already discovered that my blues (I selected a brighter French blue – like a deep, autumn sky blue), but the greens are much more muted and earthy. But I don't have any brighter greens, without going to kelly or grass greens, which just won't do it for me! I want colorful, but not shockingly so, if you know what I mean!
Hope that helps!
MC
Hi Mary
I have a basic question: how do you line the linen? Are the borders sewn?
Excuse my ignorance…:)
Hi, Meri –
The twill isn't lined. It's heavy enough, and a solid weave, that it doesn't need lining. Plain weave linen would be lined with muslin, because the openness of the weave requires something behind it to hold the types of stitches used in crewel work. To line the plain weave linen with muslin, you can see my post here:
Crewel Kit set up
You can bind the edges of the linen twill or regular plain weave linen with a whip stitch if you want, or run it through your sewing machine on a zig-zag stitch. I didn't bother. There won't be enough raveling to bother me, or to take away from the fabric. I generally only bind the fabric edge when I'm working on a looser weave of linen.
Hope that helps!
MC
Thistle Needleworks also carries linen twill.
I had a painter suggest using the sepia (brown) color permanent pen when tracing a design onto linen (or other cloth), as all but a white thread would cover the sepia color so that the pen lines would not show after all stitching was completed. I have used the sepia colored pen since and found her to be correct.
Ahh – I agree – a sepia pen would be ideal! I've had a hard time finding them, though – none of the craft stores hereabouts sell the micron pens in brown. *Sigh* I wish I had ordered some online. And I suppose they don't have to be micron pens – though I prefer those because they come in such fine tips.
Thanks for the tip on Thistle Needleworks!
MC
Hedgehog Handworks chiming in! We do have the linen twill fabric in stock. I was just slow about getting it onto the site. Please check again on our embroidery fabrics page. Thanks!
This looks like it will be a very interesting project. If you want to share a photo of this when it's done, or another favorite piece you've made, I'm looking for submissions on my website. http://www.embroidery-methods.com/crewel-embroidery.html
I'd be happy to exchange a link back to your blog!
Whoops… I left you a comment and missed this earlier post. I see you answered the question about the edges.
I had never thought about shrinking the fabric before like you describe. Thanks for the tips.
Hi Mary,
I know I’m making this comment on an old post but I think you get notifications…right? My question isn’t related to what’s going on in your blog at the moment, so I figured I’d just post back here. 🙂
I’m planning a special project for my Mom…actually for my Mom to stitch. She hasn’t done any embroidery since I was a child, but I confessed to her on Mother’s Day that I became obsessed with all things thread-related after watching her work on embroidered table linens she made as gifts for my grandparents. She said she’d actually love to pick it up again but didn’t think you could buy kits like that anymore (that she would like). So I volunteered to create a kit for her.
I’ve picked out the tablecloth & napkins I will eventually buy for her (the Dijon colored ones at AllAboutBlanks.com) and am working out a nice pattern of lemons and lemon blossoms… My major sticking point in the planning is figuring out how I will mark the fabric, and that brings me to the question. I know that Mom is likely to pick up and put away this project many times over the next couple years, so I can’t choose anything that might rub out or fade with handling or time. I live a long way away from her, so I can’t choose anything that might be unclear for her to follow without my guidance (like tacking stitches… I tried them for a project I’m working and I can see where not being intimately familiar with the intended design, the little dashes could be misleading. Plus putting them on would take me nearly the amount of time she’d take to stitch the whole thing!). And then of course, they’re table linens, so they will likely be washed repeatedly.
I think Mom is expecting a pattern that will wash out of the fabric when she’s done stitching. However, since it’s not a factory pre-printed kit, I’m afraid that “washable” or temporary markings will not stay on the fabric as well over the length of time involved. I like the idea in this post about using a fine art pen to mark… as long as I am careful to lay out the design so that the intended stitches will cover the line completely, then it won’t matter if the pattern doesn’t disappear. BUT will a Micron or Prismacolor pen bleed in the wash? You also mentioned in another (much older) post about the Papermate Flair pen in green, which you said would wash out. Or I think you said that someone else said that, and that you would be testing it… working through the archives I haven’t found another mention of it since.
Sorry to ramble, but as you can see I’ve been going back and forth over all the variables in this dilemma MANY times, because when it comes time to actually put it all together I want it to be exactly right. Can you give me any input? Is there another method or marking implement I’m overlooking that would be better for this?
Thanks in advance for your guidance & sorry to take so much of your reading time! *grin*
Meagan C in Ohio
(and P.S. – I have started a rather over-ambitious project involving surface embroidery stitches adapted to a Temari – and it’s giving me fits – but I think eventually I’ll work out the kinks. S-L-O-W-L-Y. I also completed a couple really cute patches using stitches I learned from your videos – I’ll have to send photos to you if I can figure out where to send them!) 🙂
Hi, Meagan!
Wow – your kit for your mom sounds like a great idea! The question of transferring is a tough one. I think what I would do in the circumstances is make the design up on heavy tracing paper (sold in art stores as “vellum” – it’s just a thicker tracing paper) and turn it into a prick-and-pounce transfer (I talk about it here: https://needlenthread.wpengine.com/2011/05/prick-pounce-embroidery-design-transfer.html) and then use the micron pen (in a sepia, in size .005 if you can get it) to do the line drawing. Make sure you pre-wash and iron the linens (they usually shrink a bit) before doing your transfer, and after you’ve done the pen lines and flicked or brushed away the pounce powder, then iron the linens one more time to make sure the ink is really set. I haven’t had any trouble with sepia or black ink from these pens on linen or cotton, but I have heard from others who have had problems with the blue micron ink. I think if you iron the linen after transferring you’ll get a permanent fine line. Now, the reason I’d use prick-and-pounce is because you’re doing a repeated design (same thing) on several items. It really is the most accurate way of getting the transfer on the items, and especially when working with colored fabrics, tracing with a light box or a sunny window isn’t easy. Also, when working with larger linens, shifting can take place during tracing. So I’d go with prick and pounce.
The other thing to be careful of is making sure the line is fine enough that she will be able to cover it with stitching. I don’t think any “wash out” options are the way to go, because – especially over time – they can’t be guaranteed. Also the flair pen seems to become more difficult to remove over time, so I wouldn’t go with that, either.
I’d love to see your photos of your project! The Temari sounds neat! You can send them in reply to this e-mail (you should receive this comment via e-mail, I think, since I’m replying directly to your comment), but if it doesn’t come through, send them to mary (at) needlenthread (dot) com.
~MC
Zweigart Linen Evenweave
32 Count DMC Linen
32 count Permin Linen
Permin – Nora Corbett
35ct Weeks Dye Works Linen
Hi Marie,
Do this finds you well and enjoying embroidering. I want to start doing some crewel work. As usual the linens you get in the US are not available here in the UK. Do any of the above linens compare to the one you mention on your linen fabric tutorial. Despite living near London, there are no needlecraft stores, so everything has to be bought online. Many thanks for all your help
Ilana
Hi, Ilana – If you’re planning on doing some crewel work, you might consider looking for linen twill. The Crewel Work company (located in the UK) offers linen twill, here: http://www.crewelwork.com/shop/products/twill.htm#.VZ00jGBm30c You can order it by the half cut, too. But if you want to use the linens listed above, they will work. You’d probably want to back any of those listed with a cotton muslin (or calico), to give your threads extra support. Most even-weave linens like the ones you’ve listed are made for counted cross stitch, so there’s quite a bit of space between the fabric threads (the threads of the fabric don’t fill the weave), so you’ll need something behind the linen for your embroidery threads to really hold onto. Generally, if you’re doing surface embroidery (like crewel) the higher count fabrics will be more satisfactory.
Hi Mary, wondering about the second choice of fabric listed, the midweight linen. Is this something would be found on a bolt at Joann or is it a Wichelt type fabric? Thanks for any specific you can provide.
What dimensions do you recommend for the Legacy Linen Trill ‘Crewel Rooster Project?
Here are the dimensions offered by Tristan Books:
TW-1 one yard 62” x 36”‡ $84
TW-2 Stitcher’s half 31” x 36”‡ $43
TW-3 Stitcher’s quarter 15” x 36″‡ $22
TW-4 Stitcher’s eighth 15” x 18”‡ $12
‡ indicates the location of the selvedge.
Hi, Morgan – you won’t need more than a 15″ square, so the 15″ x 18″ should be fine!