


Here’s a little more progress on my current goldwork embroidery project! After outlining the turn-overs on the top petals with pearl purl, I turned my attention to the “bowl” underneath the body of the fruit, which I planned to fill with smooth passing thread. Since I’ve already covered stitching with smooth passing thread in a previous post, I’ll not go into deep detail here on couching, but instead, I’ll just show you how I went about filling the shape.
If you haven’t read my earlier article on using smooth passing thread in goldwork projects, you may want to read that post before delving into this one. The techniques for couching and plunging threads are discussed in the earlier post.

To measure out the passing threads, I just took a good length of smooth passing thread and doubled it, knowing that I had plenty to cover the space. I should have measured it, but I didn’t think of that until it was too late! The “bowl” at the base of the fruit is going to be filled from the outside in with the smooth passing thread, so I started on the left tip of the bowl, leaving a one-inch tail on my pair of threads. I began with my first couching stitch right inside where I would plunge the tails, and then…
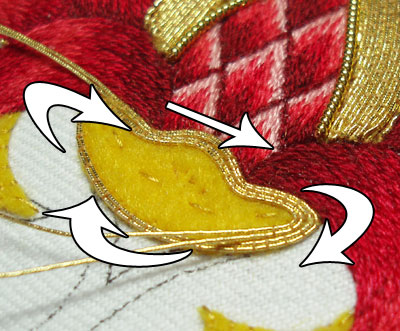
… I couched the pair all the way around the bowl, following the contour of the shape. When I got back around to the start point, I moved inside the first pair of threads, to continue around the shape, filling it in.
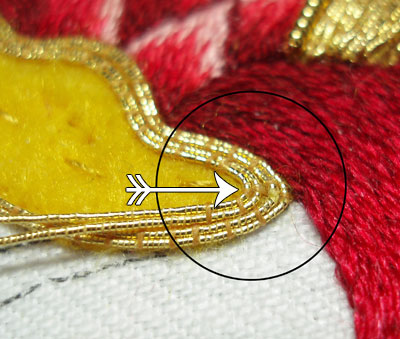
In the “corners” of the shape (the area inside the circle in the photo above, where the arrow is pointing), I always stitched a couching stitch, pulling the passing thread into the corner to fill it. I pinched the threads with tweezers, and I couched them singly – that is, the outermost thread first (after pinching it) and then the innermost one (towards the inside of the bowl) next, pulling it in next to the first one.
As the shape narrowed, the pair of passing threads wouldn’t fit into the corner, and so I plunged one and continued couching the other, folded to fit into the corner.
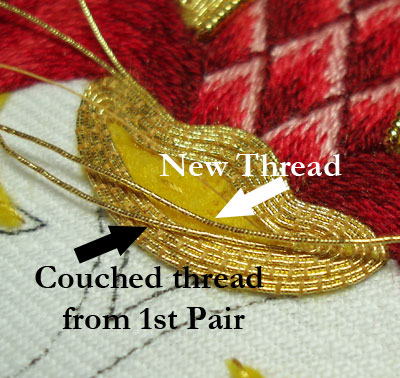
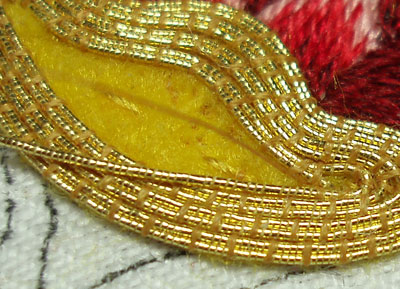
After passing the corner with the one remaining thread, I added a new passing thread to it, to make a pair again. For the new thread, I left a tail that had to be plunged. I plunged it after taking the first couple stitches over the new pair of threads, so that the tail was worked into the corner to make the layout of the threads as clear as possible for the next time I approached the corner. As the shape filled and the center area became smaller and smaller, it was more difficult to fit the threads in, but as much as possible, I kept on filling, plunging a thread when I needed to, and picking up a new thread.

The pinch of the passing threads in the corner, and the couching threads in the corners, and the plunging of the threads in the center as things narrowed – these all created a line in the center of the “bowl” – and you might be tempted to say that it looks as if the darned thing is smiling.
I can’t look at it in certain light without bringing to mind a pair of lips.
But it depends on how the light catches it – sometimes, the center crease is not as obvious. I suppose you’ll have to take my word for it – the photo above certainly doesn’t make that claim too clear!
If you don’t like the line in the bowl area, there are other ways you can couch the passing threads in – you can go vertically, and plunge on each end around the shape, or you can start in the middle and work outwards in an oblong, or you can couch pairs of threads horizontally and plunge them on each end around the shape.
I’ll be leaving this the way it is, though. It does not look quite as “odd” in person, and hopefully, future photos will bear witness to this!
For all the posts in this series, please visit the following links, which are arranged in the order of the project’s development:
Stylized Pomegranate Pattern used for this project
Setting up the Project on a Frame
Preparing the Ground Fabric with Felt Padding
Selecting Colors of Silk for the Project
The Stitching Begins – SIlk Shading
Continuing the silk shading – the left side
Finishing the silk shading
The Goldwork Begins: Smooth Passing Thread
Check Thread for Outlining
Chip Work Filling with Check Purl
Outlining with Stretched Pearl Purl
Filling the Bowl with Passing Thread
Finishing the Tips with Passing Thread
Finishing the Fruit
Beginning the Stem
Continuing with the Green on the Stem
Almost finished! Chip work on the Stem
The Finished Goldwork Pomegranate
G'day Mary,
I've been looking a little at other goldwork pictures and projects. I'm beginning to realise why other goldwork hasn't appealed to me in the past. It's just not like yours.
I'll have to do a bit more looking into it before I can put the differences into words, but there it is.
Cheers, Kath
Hi-Mary,
That area is really pretty. It gives off an optical illusion, though, I don't see lips. I think the top part of it looks padded. This gives the appearance of a bowl, or cup-like shape holding the fruit. Was that area raised or padded more?
It looks good. The lower stems should balance the look as you go along.
Hi, Kath – Hi, Laura – Thanks for your "early morning" comments!
Kath, I'm not sure. Is this a good thing, or a bad thing?!
Laura – the top is not padded any more than the bottom of that area – the whole thing is just one piece of felt padding. It's funny how the direction and type of lighting plays off the gold. There are angles of light that make the lower half of that area look as if it almost sits above the upper area. What I was trying to achieve was a "continuous" look from the top edges of the fruit (the sides that move down from the tip) to right below the fruit, so you're kind of right, about the cup shape holding the fruit. I'm still deliberating about making that a bit more obvious by adding another gold line down the center part with pearl purl. It would accentuate that curved look, but … I'm not sure I would like it in the long run.
I'll move on and come back to it later, after working the other areas. This is the only spot on the whole design that I hesitated on, so I'm sure I'll go back and revisit it!
Thanks again for your comments!
MC
Laura – I think the darker shading on the petal things is what makes it look 3D. It really does look like they're dipping down into a cup. I like it.
Hi Mary, It is exquisite. The upper half does appear raised but that adds to the dimensional effect of the work.
Hi Mary, It is exquisite. The upper half does appear raised but that adds to the dimensional effect of the work.
Dear Mary, I"m following you intently on this piece since I"m doing a religious thing with a "chalice" done in metallic gold and your tips on couching, working the cord in diminishing rows toward the center, and hiding the gold cord which I'm using are really a great help. Thanks a bunch. Judy in Pittsburgh.,
Hi Mary, I think it's beautiful, lips or not! Do you plan what you are going to do in each area before you start your project, or does it come to you as you progress? Your ideas are very inspiring!
Danielle K.
Hi, all – thanks again for your comments! I'm glad you're liking it so far!
Danielle – I did plan this one out in advance, actually. The only parts I didn't plan with certainty were which threads I would use to outline various elements – I wasn't sure, for example, if the check thread around the body wold "work" or if the couched pearl purl around the larger turnovers would appear too thick. So I had those ideas in the back of my mind, but not really set in stone. The rest of the stitching, though, was planned in advance. On some projects, it's not that way; some projects, I make up as I go, but usually on goldwork, I'll plan ahead, since I don't want to waste supplies by doing things several times over!
Hope that helps!
MC
G'day Mary,
Definitely a good thing. It's helped me appreciate an art form that I'd previously looked at through the eyes of ignorance.
I'm not a 'glittery' person so have just passed it off as a 'don't like'. Even though I've seen and read other projects. You have shown and explained to me the beauty in goldwork that no other embroiderer has been able to do.
I'm an earthy person, and just as gold comes from the earth, in it's natural form it's more appealing to me.
But, you have refined and polished the subject in such staight forward but intriguing way that my ignorance of the whole thing has well and truely had the rough edges knocked off and polished up nicely.
Your thought process being so openly revealed, the design, and the placement of the different types of gold thread has unlocked a goldmine of possibilities for me.
Thank you, Kath.
This is really a successful goldwork, Mary. Thanks for the beautiful photos.
vince
Hi Mary,
I wondered if you could do a continuous line of couching starting at one side and working across the bottom of the shape, then taking a tight turn and coming back along again next to the first line, and so on in rows up to the top of the shape? Or would such a tight turn make too much of a hump in the line?
Alison in Aus
Mary –
Your work is as usual beautiful. I bought some Krenik Jap #7 to do a small first piece. I opened the skein, dropped it, and now have a lovely, sparkly, tangled mess. Do you have any hints (other than not dropping it) for handling and storing this type of thread?
KMK
Hey, Mary, Beautiful work. I thought about doing the gold to and fro if you didn't want the inside "line" but the effect as you did it is very good. On circles you can start either on the inside center or outside, but I think it would be tricky to find the exact center. You could do a circle in the center and fill either side when you got there, too.
Also, Mary, if you don't mind if I respond to KMK. I hate when that happens! I've gotten a couple of skeins of Japanese gold tangled in the years I've been doing JE. Can I suggest: I use 2 wood working clamps, the kind that have a long stick coming out the bottom. I put them the approximate width of the skein and wind them onto a koma, a Japanese wooden spool, used in pairs, to keep the threads twisted and so you can couch tightly. I would pick it up and put it onto those clamps, straightening and untangling carefully as you want to keep the twist. #7 is a little hard to handle. Hope that helps, AnneG in NC
Also, Mary, do you know how to make a sinking needle for gold work like we use in JE? AnneG