


I’ve finished the color on the arms of my goldwork embroidery project. “Arms” is probably the wrong word, but “leaves” don’t really work, either. What the heck are those things?!
This project has been really fun to work on so far, and I hope to make Great Progress on it this weekend. I was going to make a switch back to the blackwork fish for the weekend (I’m eager to make noticeable progress on him!), but I’m afraid he’ll have to wait until next week….
In the meantime – it’s goldwork for me, and here’s my progress on the Colored Tendril Thingies that stick out of the sides of the Stylized Pomegranate-Artichoke-Flower Thing. (I think I need to come up with specific words for these design elements.)
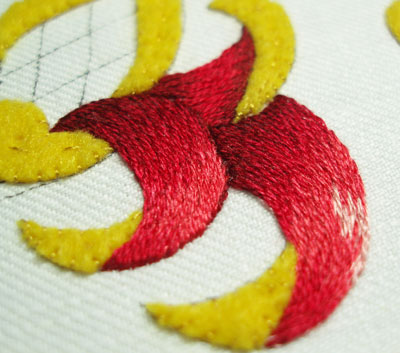
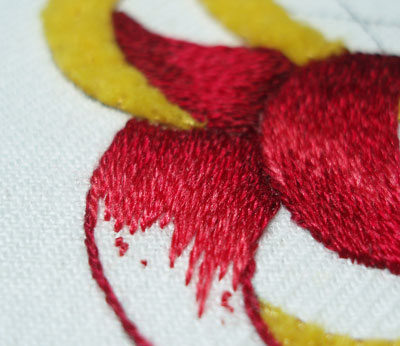
Before I go further, though, I want to show you two photos. The first is the last photo on yesterday’s article discussing the beginning of the stitching:
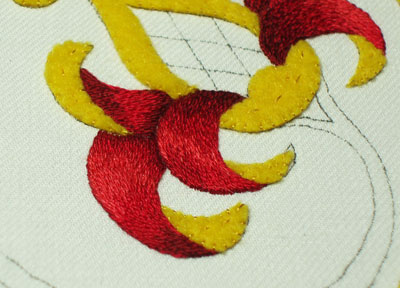
And this photos is the same area of stitching, taken from a different angle:
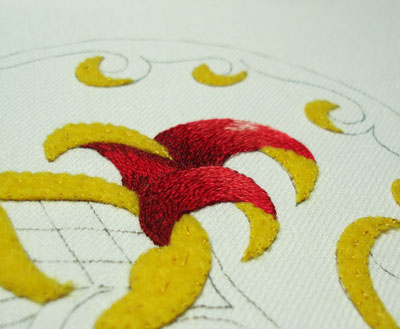
I always find it interesting how needlework changes, when viewed from another angle. When viewed from the second angle, I think the shading becomes much more obvious, and that movement out from the center – the curving of the arms – becomes even more noticeable. At the same time, it makes the lack of depth in the shading on the top (small) leaf more obvious. This view is one of the reasons I thought I should pick that area out. I’m still debating that point!
Ok, on with it!
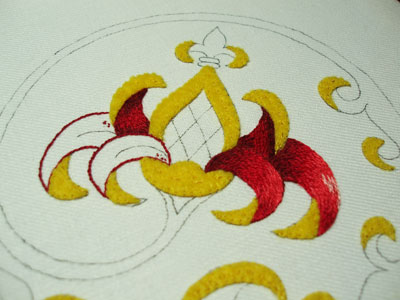
Moving over to the left side of the design, I managed to add one more shade in that top curl. I think it looks better than the first one on the right. I also changed my stitch direction on that, beginning at the base of the curl (next to the body of the fruit) and working towards the turn-over, which is the same stitch direction I’ve used on the other curls, but not on the first small one. On that first one on the right, I started at the turn over and stitched down to the source – and this is probably part of the reason it doesn’t quite look right. Maybe not. Anyway – I’ll get back to that!
I also outlined the curls with one of the darker reds, using split stitch.
Again, if you’re not familiar with long and short stitch shading, but you want to give this design a try using the same techniques, then do visit my Long and Short Stitch Shading lessons, and take a look specifically at Lesson 5, which addresses embroidering this type of shape.
I’m following pretty much the same shading pattern as I did in the right half of the design, with the exception of adding the little light pink tint on the longer curl.
Notice that my long and short stitches are not uniformly long and short! This is a point that I go over in the long and short stitch shading lessons, but I thought I’d re-emphasize here. If you go with a uniform long-short pattern, keeping the stitches the same length, worked in uniform rows, the shading doesn’t end up looking as natural, smooth, and “painted.”
And there it is – the left side finished. It’s a bit darker than the right side of the design, and this was done on purpose, by using less of the lighter shade of red at the curves. The point here is that, when the flower is tipped in the correct direction of the design, this side (the left side) is pointing downwards, while the right side is closer to the imagined light source. That was my idea, anyway. Whether or not it will actually matter that much in the finished design is another question.
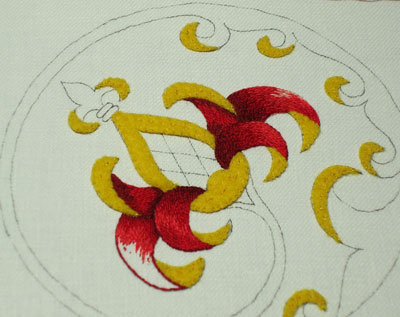
The next part I’ll tackle is the center of the fruit, where the lattice area is. This is actually going to be stitched with color. I may add some tiny gold lines after the color is in. We shall see!
Once that part is done, then it’s on to the gold threads!
Have a perfect weekend – and get some stitching in!
For all the posts in this series, please visit the following links, which are arranged in the order of the project’s development:
Stylized Pomegranate Pattern used for this project
Setting up the Project on a Frame
Preparing the Ground Fabric with Felt Padding
Selecting Colors of Silk for the Project
The Stitching Begins – SIlk Shading
Continuing the silk shading – the left side
Finishing the silk shading
The Goldwork Begins: Smooth Passing Thread
Check Thread for Outlining
Chip Work Filling with Check Purl
Outlining with Stretched Pearl Purl
Filling the Bowl with Passing Thread
Finishing the Tips with Passing Thread
Finishing the Fruit
Beginning the Stem
Continuing with the Green on the Stem
Almost finished! Chip work on the Stem
The Finished Goldwork Pomegranate
Mary, now that the lighting direction has become evident, that first curl looks much more appropriate–it SHOULD be a bit darker than the rest and looks really quite good to me.
But I can't quite get past the 'ew! Wierd yellow Fritos' thing with the felt… 🙂
Mary,
I have been working on learning the thread painting technique and I have questions. Looking at the pomegranate that you are working on, the threads look twisted and thicker than the dmc threads I have been using on another pomegranate design you had posted. Also my threads after I have stitched them look heavy and it seems to take a long time to get even a little bit done. I can't seem to get the shading that you achieve. what am I doing wrong?
Any advice you can give would be appreciated. You are my inspiration.
Kathleen Whatley
Mary,
I think I'd call those "things" on the sides "bracts." They're specialized colorful petals that help to attract pollinators. They're not green, so they're not sepals. They might be just petals, but they look more like bracts to me. But since these are stylized imaginary flowers… who knows?
Tess
Such good lessons!
I'm collecting them. Thanks, Mary!
Let's call 'em what they are: Peelings! Or to be fancier, Curved and Recurved Peelings. Or how about Concave and Convex Peelings.
Hi, all –
Thanks for your comments!
Kathleen – I'm using one strand of Soie d'Alger, which may be slightly fatter looking than a strand of DMC, but they are about the same size. The silk, I think, is a bit softer with more "spring" so it might look slightly fatter, but it stitches about the same, as far as size goes. Keep in mind that my photos are pretty close up here, so the threads look larger than they are. My guess is that you're probably making your stitches too short. Take longer stitches, and then work the next shade deeply into the previous shade, extending the second shade well beyond the first. The difficulty is the curving, and in some cases, the stitches, as you work around the curve, are going to slant into each other in some points, to accommodate the curve.
"Peelings" – I like that!
"Bracts" – I see what you mean. I think the scalloped bowl shape at the base of the flower thing would fit that explanation better. In fact, with that in mind, I'm thinking about a little green in there.
Oh, the frito felt! Yes. That's what it looks like! The gold will hopefully eliminate that!!!
MC
G'day Mary,
I'm just loving this.
Amazing how the felt on the lower 'peelings' looks tucked under already. Well, I shouldn't be surprised really 'cos that's what your correct clever shading is supposed to do. All the same it's beautiful to actually see it happening.
The same with the light source explainations coming to life.
Have been visiting the long and short stitch lessons incl videos. Am very happy to have them. Thank you again.
Cheers, Kath
Oh, Mary, I meant to comment on that beaut little box in Country Bumpkin's newsletter that came in this a.m.
I think you'd get their email newsletter.
It's a delightful little treasure chest of a box.
Bye, Kath
Mary, I am starting on a bit smaller project using these techniques. Thank you so much for your lessons, they are very helpful and truly inspiring! Beautiful work!
Danielle K.
oh, reading this I neeeeeed to do some long and short stitching …. but with the Thistle Thread stuff coming up, and my own Elizabethan sampler to work on, I won't be doing a solid project in it for ages! Argh! Dribble!
Your thread painting is so beautiful. I cannot wait to begin but first I need to get all the supplies together. Thanks Mary.
It looks very promising. Love your long and short stitch 😉
I should have asked this on your first goldwork post. Anyway when you use felt on your projects have you ever had the color on the felt run when you washed it? Thank you Karol
friend3951atcharterdotnet
Hi, All – I appreciate your comments!
Kath, I did see the box when I got the newsletter this morning – I love the fact that the lady stitched the little watercolor people designs that pepper the inside of Inspirations – a clever idea!
Daniel – I'm glad you like the lessons! I'd love to see pictures of your work, if you ever feel like e-mailing any!
Megan – sounds like you'll be a bit too busy for long and short stitch! But your projects are fun, and I'm sure they'll keep you entertained!
Hi, Jayashree – Thanks very much! I'll post a more complete list as I work with the different supplies and make some final decisions. One thread that I'm definitely making use of, besides #5 smooth passing, is called "check thread" – it looks like a very fine roccocco, but it's not as soft – it's more like a wire. I like it a lot. I only have three yards of it on hand, though, so I don't think I'll be using it for all the edges of everything – but it does make a very nice edging! I would imagine it would look great couched as a filling, too.
Karol – I don't wash projects like this, where I've used felt. And in projects that aren't goldwork that use felt, I probably wouldn't wash them, either. Lots of felt on the market today sold for handwork is overdyed (weeks dye works, for example, makes quite a bit of overdyed wool felt), so I wouldn't really plan on washing that at all after stitching on it. If I thought I were going to have to wash it after stitching, I'd wash it first, before stitching, and make sure there's no dye run-off. The felt I'm using in this project is your basic (cheap) acrylic craft felt sold at the craft store. I prefer using felt with a bit more body, but I didn't have any yellow wool felt, so I stuck with this, and it's working out ok. I've never washed craft felt before, either, so I don't know if it would run. But, since this is goldwork, it won't be washed, so I suppose I'm safe!
Well, back to work!
MC
How about calling them "Curlicues" or "Baroqueries"?
Regardless, they're looking great!
I just discovered your blog and wanted to let you know your blog is such a gift. Thank you so much for sharing– the work that goes into producing a blog of this caliber is spectacular! Seeing you work these complex projects step by step is amazing. I am completely self taught and this is really helpful, I have played around with gold work using instructions in older books but have always fudged it, I am going to start playing again!
Please let me know how to use flat silk or easy method to twist it
Hi, Rakhee – there’s a video tutorial on twisting flat in this article: https://needlenthread.wpengine.com/2012/03/twisting-flat-silk-video-tutorial.html
Thank you for reply but is there any easy way too
Well, you can cut a piece and fold it in half, with the fold around your finger or a pencil and twist it, until the thread twists tight enough to twist up on itself when you fold it in half again. But the way described in the video produces a more consistent result.
I am about to try my first design by hand embroidery and have learned sooo much studying your text and photos with regard to shading and directions of satin stitches when going around corners, etc. Thank you for your brilliant website. I’ve never seen embroidery so intricate and intense! God bless you.