


If you’re following along in this series on developing your own spot sampler, and you’re sticking pretty much to what I did on mine and my students are doing on theirs, then the next step after adding a little Quaker motif is adding a bit of blackwork.
We’re getting close to the end of the counted thread work on this series on the embroidered spot sampler. In fact, everything after this section on blackwork belongs to both surface and counted embroidery, depending on your fabric. So if you’re hankering for surface stitches, they’re a-comin’!
 Student’s Sampler
In class, we really didn’t get into blackwork fillings. If I have a little bit of time this week, we might go back and visit them, because we’re finishing up with other basic fillings right now. The blackwork we worked is of the linear type – it makes nice edges, corners, squares, and so forth, and I suppose some of it could be used to fill spaces, but we didn’t work on Blackwork Fillings Proper. There’s just too much to cover and not much time in a year, so I figure it’s better to be selective and spend adequate time on the selected topics, rather than to try to cram in so much that none of it sticks!
So, on to blackwork of the linear type.
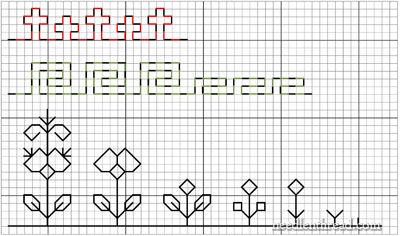
For instruction in Holbein stitch (or reverse running stitch), it’s not the stitch itself that really needs teaching. Running stitch is the Most Basic Stitch Ever. The difficulty with Holbein stitch is the Side Trip. To get my students accustomed to the “reversing” part in Holbein stitch and then to show them how the Side Trip works, I gave them the little sample chart above, which you’re welcome to use as well. In fact, here’s a PDF version, if you want it:
Holbein Stitch Practice Samples (PDF)
The little samples are worked from right to left, since that’s the initial direction of the running stitch for right-handed stitchers. (Lefties might want to work from left to right…) In the first line (black and red), the black stitches represent the first journey of regular running stitches. The red stitches represent the reverse journey. The same holds true with the next line (black and green) – black is the first journey, and green is the reverse.
By working the samples, you get a sense of spacing and figuring stitch placement on the first journey and of following the reverse journey correctly. They’re very simple samples.
The third line – the “sprouting” flower – was my way of instructing on the Side Trip, which is anything that comes off the main line in blackwork, or that comes off another Side Trip (there are often side trips on side trips on side trips on…. well, you get the point!). A piece, depending on its complexity, can have a LOT of side journeys. With the sprouting flower, each grown spurt presented new types of Side Trips, and this gradual increasing of Side Trips made learning linear blackwork a bit easier for the kids.
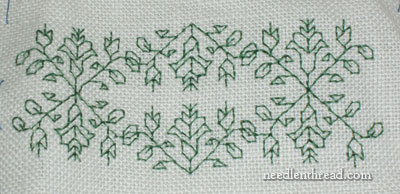
 Student’s Sampler
As long as you realize that all side journeys are worked back on themselves before returning to the previous “main line,” then this type of linear blackwork becomes pretty simple. They key is finding your “main line” and sticking with it, especially on pieces that don’t have a clear horizontal main line. Some of the simplest and clearest instruction on linear blackwork can be found in the Blackwork Archives online, where you’ll find this article on the basics of the reverse running stitch. You might also find this information on Medieval Egyptian Blackwork Embroidery helpful.
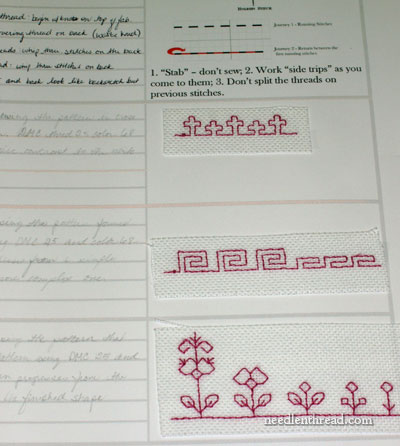 Student’s Stitch Journal
My students worked through the samples above and put them in their stitch journals. Once they got the hang of the Side Trip, they worked up the blackwork pretty quickly.
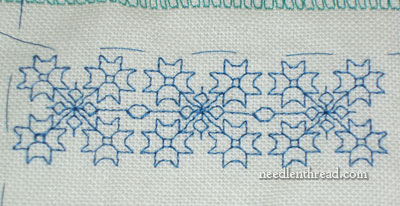
 Student’s Sampler
The designs we used in class were a combination of my own “doodles” – I’ll post some of those later – and patterns I printed from the Blackwork Archives, where you’ll find a very nice selection of a whole variety of patterns that can be put together in different ways. The students were able to pick from a selection of about 10 designs, and work their pattern wherever they wanted to on their samplers. I also gave them a list of online resources, including Blackwork Archives and A Blackwork Embroidery Primer, in case they wanted to go farther with exploring blackwork.
As you can see, our look at blackwork was very brief and very basic. If you’re following along with this sampler series and want to add some more complex blackwork to your sampler and maybe go a bit deeper, do take a look at those resources.
If you’d like, you can visit the rest of this series on Developing a Spot Sampler, if you’re just joining us. This isn’t necessarily meant to be a “stitch-a-long,” (maybe some folks are, I don’t know?), but perhaps in the individual articles, you’ll find some tips and techniques that will help you with your own embroidery! That’s my hope, anyway.
If you have any particular resources for blackwork that you’d like to share, or you have any specific questions, feel free to leave a comment below!
Have a terrific Monday!
This is a kind of embroidery I’ve never tried but I would like to try.
I have this link as favourite for ages:
http://www.embroiderersguild.com/stitch/projects/blackwork/index.html
I’ve no idea how I found it… rather probably through you Mary!;)
There’s also some free blackwork patterns and instruction at http://string-or-nothing.com
thank you Mary. I have wanted to try blackwork for sometime, the problem was knowing HOW to do it correctly. Following patterns is good, but getting the correct technical can sometimes be a bit of a mission for me. Which is why I read your posts everyday.
Some folks ARE doing a stitch-a-long with you and your students, Mary…well, at least I am! I needed a jump start project to remotivate on some existing projects and this was just the thing! You and your students are much faster than I am, but I’ll keep working. Currently, I am on my first initial of the sampler and it is coming out beautifully!
There are a number of freebies on my site Blackwork Journey for anyone who wants to try blackwork out first before buying charts and kits.
Happy stitching!
Liz
And is a. “Side Trip ” when you change from the original direction you were going? Maybe I missed that while reading the article.
And each stitch is a stab stitch, right?
Hi, Jackie – yes, a side trip is when you branch off whatever line you’re on and then come back to that line. I stab stitch – it just looks neater. But you can sew or “scoop” the fabric.