


For me, the question of the Ultimate Design Transfer Technique for embroiderers is an ever-present one. I’ve discussed in-depth the various hand embroidery design transfer options that are available and often used, but you know, I’ve never found the Absolutely Perfect Design Transfer Method, and I don’t think I ever will.
That being said, I did manage transferring a couple of designs this week, and one of them is this one from the “Royal Persian Blossom” collection from Talliaferro designs.
During the transfer process (I used the prick-and-pounce method), I learned a couple little lessons that I thought I’d share with you.
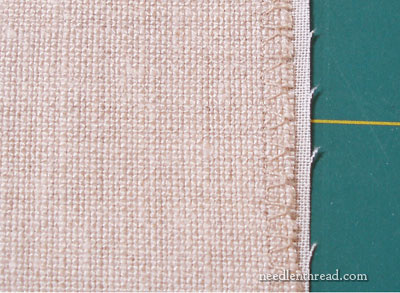
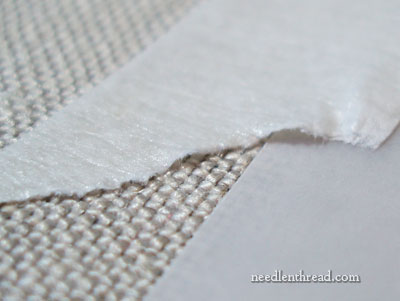
The ground fabric I’m using is Strathaven linen, in natural, and I’ve backed the linen with muslin.
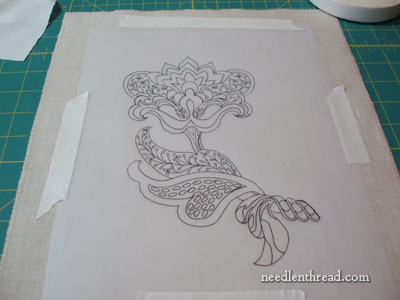
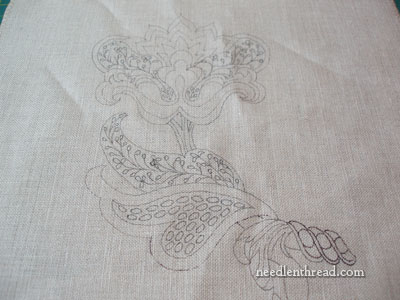
Here’s the design, traced onto a rather thickish tracing paper (it’s sold as “vellum”). The design I’m doing is the “sprig” from the Royal Persian Blossom collection, so it’s not the whole big design. The sprig fits well on a 9″ x 11″ Evertite frame.
I used a low-tack masking tape to hold the design in place on the fabric. This tape is sold usually with drafting supplies, and it’s called “drafting tape” – it’s not as sticky as regular masking tape, and it releases easily from paper and other stuff. Normally, with smaller designs that I’m going to use pounce powder on, I just use my fingers to hold the design in place. The “texture” on the back of the paper (from pricking the paper) also helps keep the design in place. But on this larger design, I wanted a little more security, so I used the low-tack masking tape.
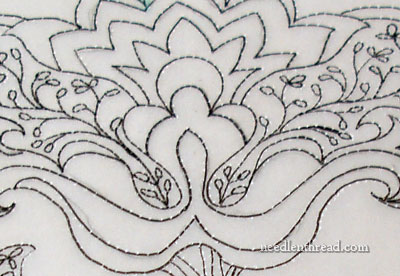
One thing that I did with the design when I traced it (before pricking it) was to draw in the lines that indicate a change of shade in the stitching. Sometimes, I draw these guidelines on my fabric as I go, if I need them. But for this, I thought I’d go ahead and transfer them onto the fabric with the rest of the design.
Lesson: Lots of lines like this, crowded into a smaller space, can become confusing when you’re transferring your pattern. It’s probably better to transfer the design outline without them, and then draw them in if you want them. In any case, if you do transfer the guidelines in when you do your design transfer, keep your pattern close at hand while connecting the pounce dots, so that you can refer to it if the dotted lines of pounce become confusing.

To connect the pounce dots, my intention was to use the Martha Stewart “moonstone” colored permanent ink drawing pen (in size 0.5). I had several pens sitting on my drafting table, among all my supplies, and honestly, if you must know, I was surrounded by a variety of clutter – from pens, to threads, to scissors, pins, needles, you name it. (Sound familiar?)
Lesson: adopting the “mise en place” rule from cooking (everything in its place!) is a good idea, before you begin working on something in particular like a design transfer. I picked up the pen that I thought was the pen I wanted and started drawing in the lines. Though I thought to myself, “Wow. This is really coming out dark,” it was a while before I realized I was using the wrong pen!
You can see the difference in the color of the lines on the right of the photo (much darker) compared to the ones on the left (much finer and lighter).
I would say “Live and Learn” at this point, but golly, I can’t tell you how many times I do stupid things like this! You’d think I’d already lived and learned something!
But – Live and Learn!
I think I should embroider a sign that says “mise en place” and hang it in my workroom…
(It probably won’t make a difference…)
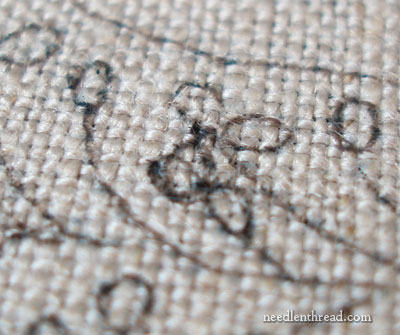
When pricking the tracing of the design, I pricked all the teeeeeeny tiny ovals that make up the petals of all the teeny tiny buds and flowers that are crammed into a few of the elements. Now, I love these little buds and flowers – I suspect I will enjoy stitching them – but you can see that I made a blurble of a mistake when connecting the pounce dots. I couldn’t quite figure out which oval was which.
Lesson: When doing tiny elements like this that are very simple (they’re just tiny ovals at the tips of curved stem lines) prick in the stem lines, but don’t bother pricking in the ovals. These can be drawn easily enough on top of the stem lines without the aid of pounce, once the stem lines are drawn in.
The design transferred ok in the end, and I’m ready to start stitching on this piece. I’ll be posting regular updates of stitching progress on this over in the Ask & Share section, under Royal Persian Blossom SAL. If you’re stitching any of the Royal Persian Blossom designs, you’re welcome to join me! We can commiserate – or just support each other enthusiastically as we make progress!
Well. It was fun. It’s always fun to learn little lessons along the way, isn’t it?
Dear Mary
Finally received the pattern and like you I’ve decided to do part of the design A1 to D1 I am going to try the prick & pounce method. I’ve decided to use red colours instead of blues and maybe use Floche Coton a Broder as I already have some and use Alba Maxima Linen as I like the feel of the fabric. I shall follow your tips on transferring patterns.
Regards Anita
Hi Mary,
Can I ask a really silly question?
I’ve noticed experienced embroiderers mention elsewhere about backing linen with muslin. However, what sort of muslin are you using? Why do you do this backing of the linen? Finally, how exactly do you do this backing?
And that was 3 questions, but hopefully you’ll let me off 🙂
But thank you for sharing the details of how you do the prick and pounce.
Hi, Elaine – I use muslin behind linen depending on circumstances: 1. if I’m doing a lot of goldwork on the linen, and I want the extra support of an additional layer of fabric; 2. if I’m doing crewel work or something with heavier threads (and dense stitching) on linen, and I want the extra support of another layer of fabric, as well as fabric to “grab” the threads and hold them (sometimes, with some linens, if they are not densely woven – if the threads aren’t close and plumb – then the extra fabric provides support for close stitches like satin stitch, etc.) The muslin I use is a good quilter’s muslin with a high thread count that’s tightly woven – it’s a “crisp” ish muslin, not a flimsy loosely woven muslin. Any fabric store will stock a range of qualities of muslin – I always look for muslin that’s similar to a nice cotton sheet in feel, smooth, with a little body and a smooth surface, and I normally will have a little bit of white and of natural on hand, for backing different projects.
The trick is to make sure your muslin is cut on the grain (I tear mine) and that both the linen and the muslin are lined up on the grain as you frame them up. I frame mine up at the same time (I generally use stretcher bars) and make sure that I’m mounting them with equal tension, so that there’s no wrinkling in the muslin underneath the linen. You can use a hoop, too: just lay the inner ring of your hoop down, place the muslin over it, then the linen, making sure that they’re aligned as far as their fabric grain goes, and then hoop up with the outer ring. Alternately, to make sure there’s no shifting of muslin or linen, you can line the grain of your fabrics up and baste loosely around the outer perimeter of your design area, then hoop them up.
Hope that helps!
~MC
I recently transferred a couple designs using prick and pounce… but they were patterns I knew I would want to re-use later, and the vellum piece I tried on my earlier learning project got warped and curly right away. So I went to Blick Art Supply and purchased a large sheet of clear acetate (which I cut to size for the multiple patterns I had planned – you can also buy pads of smaller sheets). Because it’s perfectly clear it’s REALLY easy to trace your designs… it takes Sharpie well… as long as you’re precise in pricking it’s very sturdy (I did have one spot in my first design where I pricked a few holes too close together and it ripped a bit, but I think that’s just as possible with vellum; I fixed the problem with Scotch tape) – and placing it exactly where I wanted on the fabric was SO easy. Masking tape comes off without a mark, and the whole acetate sheet can simply be wiped off after pouncing, and stored away for the next time I want to use the pattern!
They don’t seem to make the Sepia Micron pens in .005 anymore, so I used Brown – does anyone know if it’s going to run or fade in a way that the Sepia wouldn’t have? My stitching is coming along nicely, but I’m slightly concerned that the brown ink will cause unforeseen problems.
Happy Stitching!
Meagan C in Ohio
Hi, Megan – I’ve not had any trouble with any of the micron pens, but most of my projects are not the type that I would submerge in water to wash. I’d suggest testing anything you’re unsure of before using it, just to give yourself peace of mind. Another option, too, is to iron over the area after transferring to set the ink. This might make a difference, too. Micron pens are guaranteed permanent, but only on paper, so it’s always a good idea to test first if you’re unsure. ~MC
Hi – I have more or less the same question as Elaine – why muslin under the design? Do you sew through it [I know, silly question but I really don’t know!]?
I’ve just done a load of simple iron on tranfers to continue practising my stitches on but I’d like to start using the prick & pounce method, although it s tad tricky to find pounce in NYC! If there are any stores that stock it in NYC let me know before I have to order online. I like seeing things the first time I buy them!
Thank you – Audrey W
Thanks for the pounce transfer lesson! Another question – when doing the pounce part, did you put anything under the fabric in the frame? Or is it tight enough that when you are doing the dabbing that the fabric doesn’t move? Or don’t press very hard? I’m just wondering if the fabric and pattern move, is that the makings for disaster?
Hi, Gail – Unless I’m using a slate frame, I normally transfer my design before framing up – OR – I frame up and then I put some hard books or a hard tin box or something hard directly under the surface of the fabric, so that the fabric rests on it during the pouncing process. Remember that pounce isn’t “bounced” onto the fabric, not really – although it can be lightly tapped, I suppose. I prefer to rub the pounce on, holding the pattern in place or with the paper taped to the fabric, to keep it from moving. You don’t need a lot of pressure to rub it on. But I prefer rubbing to tapping or to pouncing hard on the pattern, because I don’t like the pattern to lift away from the fabric at all. “Boinging” on the fabric can also cause the powder to poof a bit, which makes dots that are not quite as clear. ~MC
Hi Mary,
Thank you so much for your lessons.
Hi Mary – can you please explain how to work out the grain of the fabric?? You’ve discussed this quite a bit recently and i’m just not sure what you mean!! Thanks! Zara
Hi, Zara – it’s the same concept as when sewing. The bias is the diagonal that goes across the grain (it tends to have “stretch” to it), while the grain is “on the weave” of the fabric – it lines up with both the warp and the weft of the weave. When you line something up on the grain, you’re lining it up parallel to either the warp or the weft (the perpendicular) lines of the weave of the fabric. ~MC
I have never done “prick and pounce” before. When I see you all talking about it I sometimes wonder, could someone use baby powder? I have just realized though that most works are usually Dane on a white or light colored ground, so I guess the baby powder wouldn’t be something you could actually see. But hey, if someone was trying to transfer a design onto a darkish ground, I wonder if they could use baby powder as the pounce. Now this has got me thinking even more bizarre ideas. Forgive me if I am straying way off into the twilight zone!
Now I wonder if someone could use makeup, like eyeshadow or blusher for pounce on light colored fabric. I mean hey, I have read your descriptions of it and it sounds like it is kindof a ground up coal powder type deal. Well it makes me think that the colored makeup powders might actually be a good kind of alternative for something which would be easily accessible, and even in lots of colors too.
Of course my ideas here are purely theoretical, but what do you think? If it worked maybe we could even use the little makeup applicator quetip things to apply it.
Let me know please if I sound absolutely insane and I won’t post my crazy wonderings 🙂
Let me know what you think:-)
Best wishes for successful stitches (ok that was pretty lame sounding,boo),
Mindi Hammerstone
Hi, Mindi – Talc, baby powder, make-up, etc., have oils, etc. in them that can leave residue that will discolor your fabric and that also can make the powder cling with more tenacity to the fabric. Of all of those, straight talcum powder with no additives would be the best choice. The charcoal releases easily from the fabric and doesn’t risk sinking any added oils, etc., to the fabric. For dark fabrics, the traditional ingredient for light colored pounce is cuttlefish bone. You can buy a cuttlefish at a pet store, smash it up, and then (in a “spare blender” – I wouldn’t use your good one!) you can make your own. You can even make your own pounce that way, using wood charcoal left over from wood fires (when the logs have burned themselves down to coal and cooled off). You can use chalk, but I’ve found that regular classroom chalk doesn’t work all that well. In just about any sewing store, you can find dressmaker’s chalk either in a stick, or sometimes in a refill contain (for devices that use a powdered refill) that works ok for a light pounce.
That’s what I think! 🙂
MC
An old calligrapher’s trick – rather than getting Drafter’s Tape, use Scotch tape, and stick it down to the couch or something once or twice to remove some of the ‘stickiness’.
Hi Mary –
Thanks so much for sharing your experiences with the transfer process on this project. Very much appreciated!
-Sharon in France
Hi Mary,
I just saw something that made me think of you. I was browsing around and saw that someone used a washable ink pad and rubber stamps to transfer a “pattern”, but really just a simple stamp, to her fabric for embroidery. I know it wouldn’t work for fine embroidery, but the possibilities are endless.
Sarah in Fleetville
Thanks, Sarah! Wouldn’t it be “fun” to take an embroidery pattern and make it into a stamp by hand, to use for repeat designs?! Well, might be a bit of work, but I can see how it would be useful! ~MC
Mary, in tidying up my craft collection and putting similar bits & bobs together, I have come across an embroidery pattern iron transfer. I have no idea where I collected it from but as it is not in a packet and without a colour chart, my sister may have picked it up from a garage sale for me.
My question is, are there any details I should be aware of in using this type of transfer – the pen ‘bleeding’ or any particular stick I should avoid? Thanks
Try putting a piece of colored tape on the pen you should use. This will remind you when you go to grab it which one to pick-up!