


Last time we looked at embroidered eggs, we explored a simple stitch that works well for lines and swirls.
With that stitch alone (which is really just a series of straight stitches worked in a given order – or you could think of it as an elongated kind of stem stitch), you can drum up some really pretty embroidered eggs using random swirly patterns or spiral patterns.
If you want to start adding different elements to your embroidered eggs, though, you might want to try a few other stitches.
Today, we’ll look at raised, woven stitches for embroidering on eggs. In the scheme of things, I find these types of stitches – which include ribbed spider web, woven wheel stitch, stitches like raised chain bands or raised stem stitch or the simple woven filling – the easiest and quickest stitches to work on eggs. And not only are the quicker and easier than other stitches, but they have a good “wow” value, too.
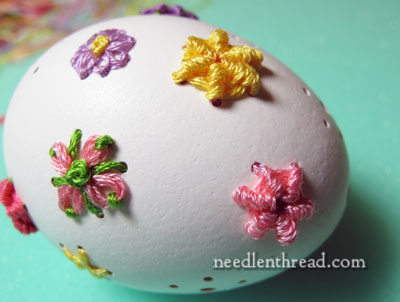
On the egg in the photo above, I’ve used a combination of detached chain stitch flowers with French knot centers and ribbed spider web stitch flowers, scattered all over the egg in random, bright colors.
This was a Really Cute egg – I liked the way it came out, and it looked great in grass. Unfortunately, it’s also the egg that imploded when I tried to drill it again after embroidering it! I’m making another one.
The ribbed spider web and woven wheel stitches create nice little raised flowers, and they are easy to work on the shells.
First you work a spoked foundation. Your spokes should radiate from one larger central hole. As you stitch, you move back and forth across the egg as discussed in the tutorial on lines and swirls (exiting on the other side through a hole and re-entering through the same hole to take the next stitch).
Then you bring your “weaving thread” up into the center hole. This is why the center hole has to be larger – you have at least five spokes converging there, plus you need to bring the weaving thread out of the center hole. Then, you begin the over-under sequence required to work the stitch you want to work. You can find videos here on Needle ‘n Thread for woven wheel stitch and for ribbed spider web stitch, if you need a little help on those.
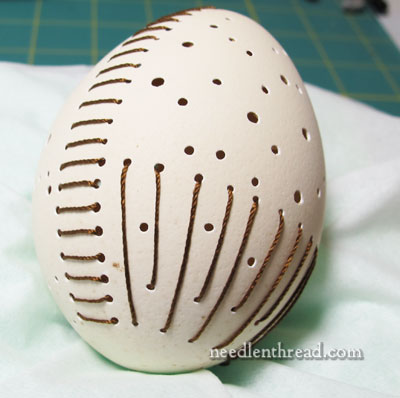
On this duck egg, I’m embroidering a basket of flowers. The basket wraps around the base of the egg (where the vertical stitches are), and is cut in half by the handle, which is the strip of horizontal stitches running down each side of the egg.
To end these long vertical stitches, I worked some backstitches just along the base of the design area. This area will be covered up with the woven filling for the basket, so the backstitches won’t show.
When ending a thread, it’s a matter of thinking out a way to securely end the thread so that it won’t show in the final embroidered egg. Sometimes, you have to get a little creative, but as long as you can cover it up, do what will work.
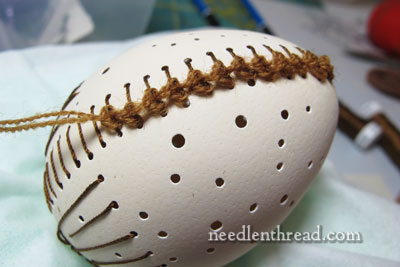
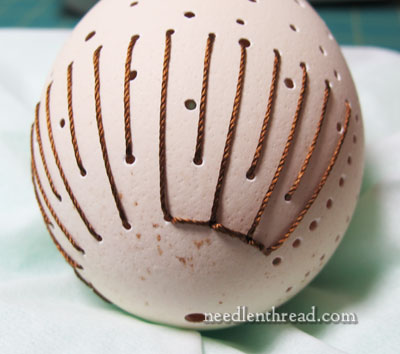
For the handle, I stitched a raised chain stitch band, working two lines of raised chain stitch down the ladder of horizontal stitches there.
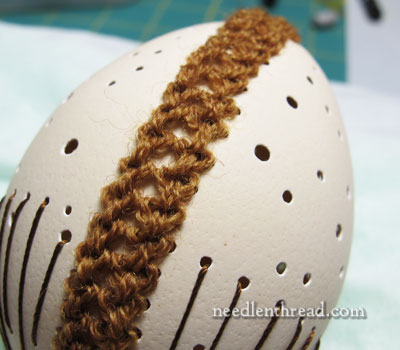
Here are the two lines of raised chain stitch. Golly, these stitched up so quickly!
The horizontal foundation stitches didn’t take a lot of time, because there are so many holes on this egg, and many of them are large, so it was easy to see when passing the needle in and out of the egg. Once the foundation was finished, the rest of the handle is all stitched on top of the foundation, so I didn’t have to go back into the egg, except right at the beginning and end of each long line of raised chain stitch. Fast! And it looks pretty good!
I used Soie Perlee for the foundation and Fine d’Aubusson wool for the chain stitching. For the chain stitching, I used two strands in the needle. If I had a #12 perle cotton in a dark brown, I would have used that instead of silk, but I didn’t, so I used the silk. And it was a nice experience – the silk slips in and out of the holes so easily compared to cotton!
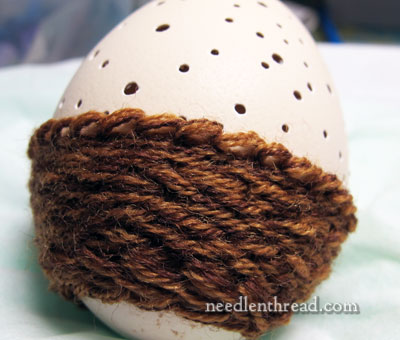
For the woven basket, I used woven filling. Then I added a line of raised stem stitch (stem stitch over the vertical foundation stitches) at the top and at the base of the basket, to create a kind of ropey edge.
For the basket, I used three strands of Fine d’Aubusson in the needle – two lighter brown and one darker brown.
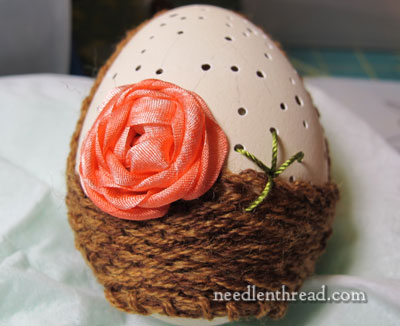
And finally, what’s a basket of flowers without flowers? This is a woven ribbon rose. It is simply the woven wheel stitch over five spokes, using a 7mm ribbon for the “weaving” thread, rather than floss. When you work this type of rose, it helps to keep the ribbon somewhat twisted, so that it rolls and folds as it weaves in and out.
I’ll do something in the middle of that rose – perhaps a bead, or a bead with a folded ribbon behind it.
You can see the foundation for the next rose next to it – a smaller rose this time. Notice that the lower of the five foundation spokes are over the edge of the basket.
Incidentally, the design on the other side of the egg is similar, but not quite the same. I realized after stitching the roses that I had stitched myself into a corner, so I’ve removed the roses (being careful not to waste the ribbon) and now I’m working all the smaller stitched elements that are not “raised” stitches first, leaving the roses for the end.
Why? Because the roses afford me some very large holes to pass in and out of easily on each side of the egg. Without those holes, it is more difficult to stitch the smaller flowers farther up in the design. My point: Think out your order of stitching first, not just in terms of what’s located where in the design, but also in terms of what leaves you easy entry and exit holes on the egg.
Raised stitches are an easy way to add different elements to your embroidered eggs. In the scheme of all things egg-embroidered, they’re relatively quick and they add nice impact to the egg. Try them!
If you’d like to try your hand at embroidering eggs, feel free to check out the Embroidered Eggs Index, where you’ll find all the articles in this series, including supply information and stitching tips.
Dear Mary
What a beautiful rose basket and thanks for showing us how it’s done. I will definitely be trying this next, I’ve just stitched my first roses on egg using the spider web stitch and they have turned out quite well, next I going to try ribboned Iris’s which I have seen on ytube which fits well with egg embroidery and you so right about thinking your holes before you stitch because if you haven’t got sufficient holes it’s makes embroidering almost impossible as I’ve experienced. Thanks for this wonderful blog. In anticipation for the next instalment of eggembroidery
Regards Anita Simmance
Hi mary,
Lovely basket and rose.
Beautiful! These are the prettiest Easter decorations I have ever seen. I’ve ordered the special needle, gotten my dremel out, and am now searching for eggs. Can’t wait to try it out.
Adorable design!! Our Mary is so creative!!
Thank ‘s Mary
It is very splendid, good evening
QUE HERMOSURA DE HUEVOS BORDADOS FELICITACIONES SOY ADICTA AL BORDADO GRACIAS POR COMPARTIR
Thank you so much for such a great series! So much to try now .