


I’ve been using chain stitch a lot lately!
And there’s good reason for that. First of all, chain stitch is a versatile stitch, great for outlining. But chains stitch also makes a wonderful filling stitch.
Besides its versatility, there’s the whole Easy Thing going on. It’s one of the basic embroidery stitches, easy to work for any level of embroiderer.
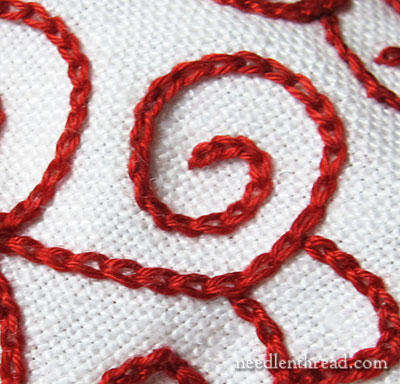
Besides exploring chain stitch in tambour embroidery, I’ve been using the regular surface embroidery stitch called chain stitch (with a needle) on the Hungarian redwork runner that I started eons ago. There’s a lot of chain stitch on that piece – mostly in the form of squiggly or curly lines.
Did you know that you can speed up chain stitch a little bit – especially when working curls and swirls on line patterns – by switching to reverse chain stitch?
Reverse chain stitch looks exactly like chain stitch, but it works up in reverse. Let me show you how:
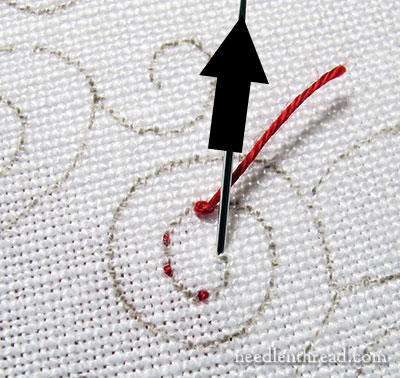
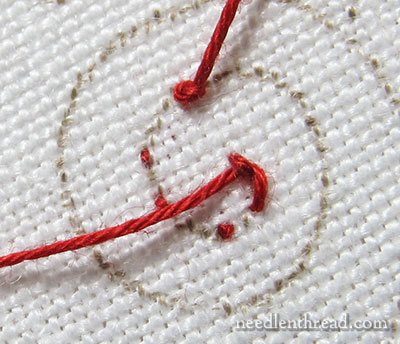
Here, I’m working a curly section on the Hungarian redwork runner, using coton a broder #25.
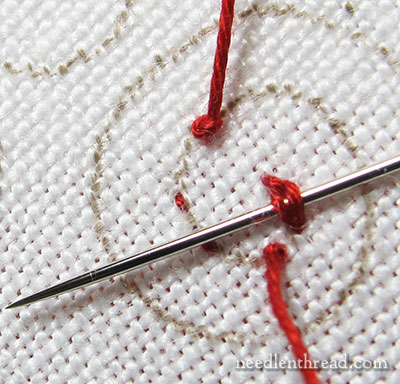
I started with a waste knot a little way into the curl – you can see it in the photo, just behind the needle.
I wanted my “starting point” for the reverse chain stitch (which would actually be the ending point in regular chain stitch) to be the inside end of that curly section.
So, from my waste knot, I took three tiny, separated backstitches in the fabric towards my starting point. This anchors the thread thoroughly.
I brought my needle up to the front of the fabric to start the reverse chain stitch right where the end of the inside of the curl.
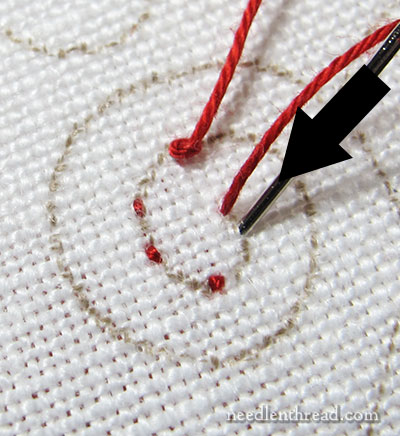
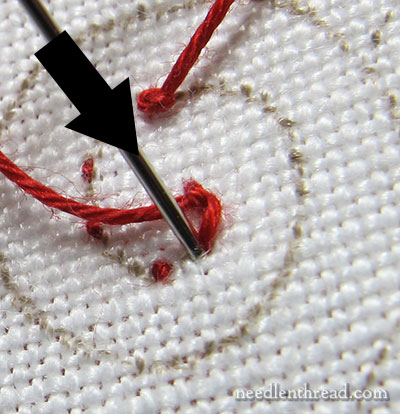
Then, the needle goes down into the fabric a short stitch length away from the starting point, to create a tiny anchor stitch.
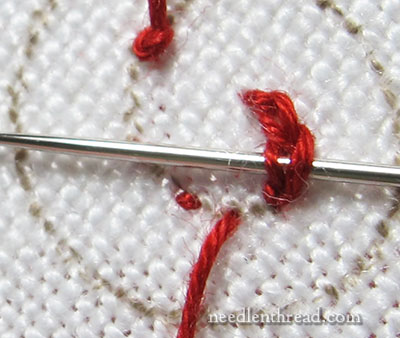
The needle comes back up into the fabric a stitch length away from the end of that first little stitch. The stitch length is the length you want the chain stitch to be.
After the working thread is pulled through to the front of the fabric, run the needle underneath that little first anchor stitch, without picking up any fabric.
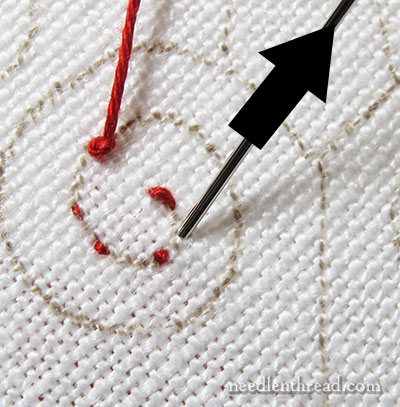
Pull the thread through, and you can see that you have half of a chain stitch!
Take the needle down into the same hole where you emerged to begin this stitch.
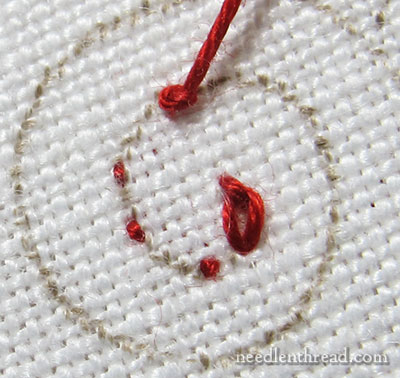
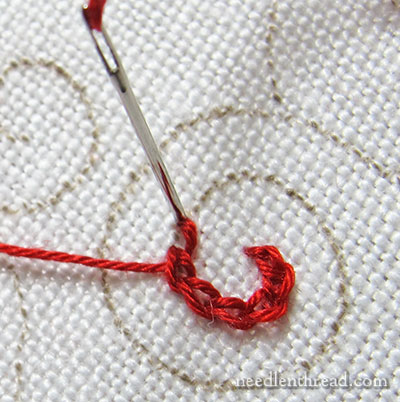
And there’s the chain stitch, already anchored. Now it’s just a matter of continuing along the line…
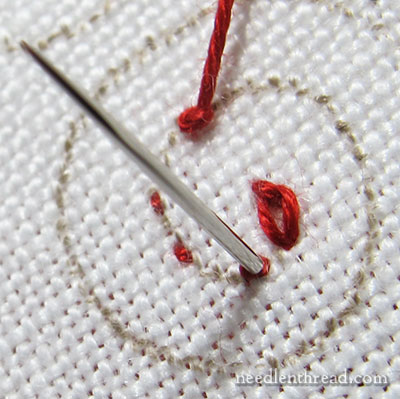
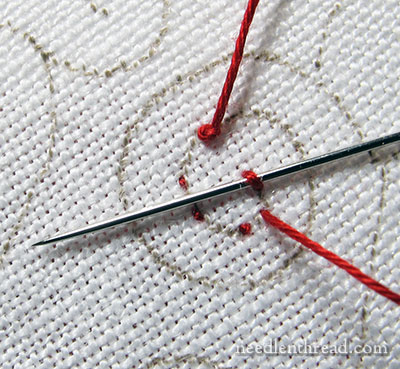
For the next stitch, bring your needle up a stitch length away from the end of the last chain stitch.
In this case, I ended up coming up right through one of the backstitches used to start the thread, and that’s quite ok! Just pretend those little backstitches aren’t there – you can stitch over them or through them, it doesn’t matter.
Pull the working thread to the front of the fabric, then take the needle behind the previously worked chain stitch without picking up any fabric, and then head back down into the same hole where this stitch started.
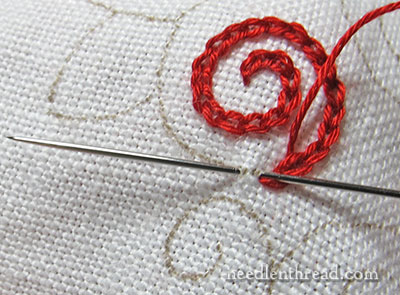
And now we’re working on the third chain stitch here. Notice that I am passing the needle only under one chain stitch – the one previous to the stitch being worked.
Don’t confuse reverse chain stitch with heavy chain stitch, which passes under the last two previous stitches.
As you approach the waste knot, just clip it off and keep going.
With reverse chain stitch, you can also use the “sewing method” of stitching, where your needle never passes all the way to the back of the fabric. Instead, you scoop up a tiny bit of the fabric when moving to the beginning of the next stitch.
This “sewing method” of stitching (as opposed to the “stab” method, where you take your needle and thread all the way to the back of the fabric) is especially quick and easy when working embroidery in the hand, without a hoop or frame.
With the reverse chain stitch, it’s very easy to control the tension of the stitch. I have no problem switching from regular chain stitch to reverse chain stitch in the middle of the Hungarian redwork runner, because I can easily control the tension and create a chain stitch line that looks like a line embroidered with regular chain stitch.
I find the reverse chain stitch works around curves – especially these tighter curly curves in the runner project – much more quickly than regular chain stitch does.
If you’re working a project that involves a lot of chain stitched lines (not filling), give the reverse chain stitch a try! Once you get used to it, you might find it speeds things up a bit!
Thanks for the great tip. This stitch will come in very handy when embroidering those tight curls.
PS I love reading your blog.
G’day Mary,
No, I didn’t know. Thank you.
Cheers, Kath
This is brilliant!
Reverse chain is my preferred method of chain stitch. I am doing a blackwork project that is all reverse chain.
Mrs. Corbet,
Thanks! This will come in very handy. I’ll be sure to give it a try sometime! Regular Chain Stitch is what I embroidered the letters with in Holly and Joy, if you remember those pictures that I sent you a little while ago. I’m not currently working on any hand-embroidery project, but a paper quilling project. Yes, I like paper quilling, too! lol
Sarah 🙂
Nice tip! Thanks, Mary.
Dear Mary
Great photo tutorial above for reverse chain stitch. What a great technique for applying the chain stitch and very easy to follow and it will come in useful when embroidering curls and swirls. Thanks Mary for sharing this I will certainly use it on future chain stitch embroidery.
Regards Anita Simmance
I love this!! Who knew. I love that in your tutorials you don’t stop with the first stitch. I need to know how to begin, end, curves, angles and starting a new thread. Your instructions are the best! Can’t wait for you stitch play to ”
publish”. Thank you.
How funny. I had to look up your video on regular chain stitch to find out what’s different between that and “reverse” chain stitch.
I’ve never worked a chain stitch any other way. I’ve always done the ‘regular’ chain stitch method for a lazy daisy, but never for a line of stitches. Maybe I’ll give it a try.
Absolutely brilliant! As easy as chain stitch is, for whatever reasons, I seem to struggle with it. Reverse chain stitch seems much more intuitive for some reason. Looking forward to trying it out.
Hi Mary, thanks for the great tip. Maybe I missed something in the article, but why can’t it be used for filling?
Well, it’s not as easy to use for filling, because once you have two rows next to each other, passing under the stitch is more difficult since you’re “squeezed up” next to another row of chain stitch. Even if you’re passing under the previous stitch with the point of the needle towards empty space (but the other side of the line has a chain stitch line next to it), when you manipulate underneath the previous stitch, you have to contend with the neighboring line of chain stitch, which can slow you down significantly. You don’t want to snag the stitches in the previous line, etc. Normally, when filling a shape with chain stitch – except for long narrow shapes like stems and so forth – but rather shapes like petals, circles, etc.), you work “around”, not in rows, so you would pretty much always end up with previously worked chain stitching to run into when passing the needle under the previous stitch.
Now that’s an interesting post, Mary, because when I was working my big silk picture all in normal chain stitch – outlines and dense filling – I didn’t use a frame specifically so that I could generally sew rather than stab. I always prefer to do normal chain stitch in the hand if the fabric is flexible enough, and with sewing not stabbing. Normal chain worked fine as a filling, with only a few stab stitches where I needed to make very short stitches at the end of lines or to get into corners.
But reverse chain is a useful method to know – especially when you suddenly decide to extend a chain line in the ‘wrong’ direction, or need a circle of stitches to join up invisibly. Or just fancy a change of direction. Needless to say, I make reverse chains by stabbing not sewing…
This is one of my favorite “tips” — and I find myself doing the chain stitch backwards almost all the time now (except when “filling”). It is so much easier to control and make nice even, small stitches.
How wonderful! What a great series of photos to show the “how to” of this stitch! How easy! This is terrific! I am going to try it out right now! Thanks…
Wow Mary, I’m sure you must be telepathic! On a number of occasions your daily newsletter has answered a pressing question that I’ve had while working on a project, but today’s really hit the spot. I am currently working on a piece that has lots of “leaf” shapes (sort of paisley style)and I’ve been finishing off my row of chain stitch at the “leaf” tip and then restarting at the base to keep a constant stitch direction. Today I’m going to give the reverse chain stitch a try when I get to the tip and work back towards the base. I think this will work a treat! Many thanks.
Aloha Mary,
Ok, that was a WOW moment. Never thought to do it backwards. Thank you so much!
ji
Someone showed me how to do that when I was first interested in learning chain stitch, and it’s the only way I do it now. So much faster, and it looks nice too. 🙂
I find this post interesting, in that so many comments are saying how they prefer the reverse chain (whether they knew they were dong it or not), while I really can’t stand it 😀 I’ve been using it in a goldwork coif simply because the gold thread resists forming a nice loop with the regular chain, but breaking it down into the steps of reverse chain lets the thread curve on itself more easily as you pass beneath the previous stitch. For forming tight curves in any other thread, I will always take regular chain. I have far more control over the tension that way; I wonder if it’s because I only recently started using a frame, and still prefer in-the-hand embroidery, which favors the sewing method over the stabbing method.
Which just goes to prove, I’m so glad there is always more than one “right” way to work. That way we can *all* be happy 🙂
Very interesting way of stitching chain stitch
Thank you Mary
what a wonderful women you are. I’ve been delighted to find interesting stitches on your site I’m a bit over using the same old back stitch Heart felt thanks. Keep up the good work
Sincerely
Robyn
Hola, mil gracias por compartir y recordar de estos bordados, aunque cadeneta inversa no se.
Deseo aprender a bordar bien, lo mismo punto de cruz.
Gracias.
Belo bordado.
Obrigada,
Maria Carvalho
Recife -Pernambuco
Brasil
Very clear and helpful. Thank you.
I am learning reverse chain stitch from your post, and I really like it. I notice that you caution against using reverse chain stitch if you are filling a shape. Is that because it’s more difficult to slide under the previous chain when the rows are packed together or is there a different reason. As always, I really enjoy your teaching.
Thanks, Judy
That’s exactly why, Judy!
Thankyou Mary! I have just now stitched this out and it is so much easier, faster and neater that “ordinary” chain stitch for me, and the start and finish look so much better.
You have reworked your how-to videos and listing (which is great!), but I was disappointed that Reverse Chain Stitch didn’t show up in the list (or in Stitch Fun, or in your Tips & Techniques lists). A couple years ago, I had the hardest time re-finding this article, which I then bookmarked so I would be able to review it when needed. I hope sometime you’ll be able to add this to your lists!
Hi, Holly – The current structure of my video page and my whole website has been in place for some 4 or so years now, so perhaps you’re confusing it with another website? I’ve never actually had a video for reverse chain stitch. I have a video for heavy chain stitch, which is similar, but a bit heavier than reverse chain. You can find it here: https://needlenthread.wpengine.com/2006/11/heavy-chain-stitch-video-tutorial.html
I wrote about reverse chain stitch in a project that I was doing a while ago, which involved a lot of chain stitch. That article is here: https://needlenthread.wpengine.com/2014/01/reverse-chain-stitch-speeds-things-up.html
Also, I have a search feature on the website – you can access it by clicking “search” in the main menu – and if you search reverse chain stitch, the article mentioned immediately above should show up at the top of the website results.
Hope that helps!
You are a super teacher! I love reading your how-to instructions and examining your accompanying clear pictures. Recently retired, I’m gathering materials to begin a cream and white quilt with small squares and embroidery. Excitement is building!
Thank you again,
Irene