


Seems rather shoddy of me to pretend this is something special for St. Patrick’s Day. After all, I’ve been working with green thread for the past several weeks, and it really has nothing to do with March 17th. But happy St. Patrick’s Day, anyway!
The Secret Garden Project, in my mind, is awash with green. My plan for the piece has always been very green and lush. And with all those leaves in the design, it’s no wonder. The leaves beg for green.
Now, I know there are so very many shades of green out there, but I’m quite taken with these bright greens I’ve been working with so far on the project. I think it’s the springy green-ness of them that gets me. They’re just chipper, and they make me happy.
Green is a color that tends to put people in a good mood. That’s one of the reasons grocery stores put vegetables and flowers right near the front of the store, so you see them when you enter. It lifts the spirits.
On that note, here’s some green to lift your spirits, and a couple mistakes, too, to keep us all from getting too green-giddy.
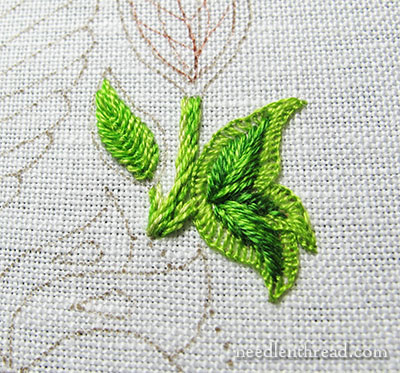
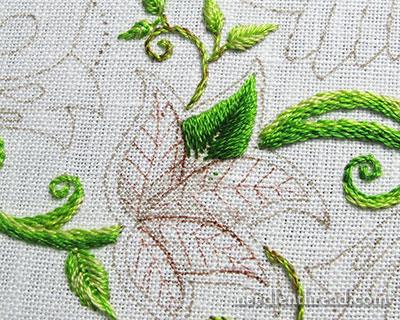
On the middle outer edges of the design, on both sides, there’s a little triple-cluster of leaves with an outline.
I thought, Why not try something different with this outline area?
I fiddled with the idea of a contrasting color around the leaves, because several readers suggested that approach, and I wanted to make sure that it wasn’t just a pre-conceived notion that encouraged me to avoid that route.
Alas, I took no photos of that attempt – and I didn’t get far with it, anyway. Maybe ten stitches, and I knew it was a mistake. For me, for the piece to come out according to my notion of it, the outlines need to be green.
It’s not that I’m going for an absolutely realistic look for this project. I’m not – I can’t. The hummingbirds, while they are obviously hummingbirds, are quite stylized, and so are the flowers and the vines. So it’s not realism I’m after. Even so, a contrasting color in the outline area wasn’t going to do it for me.
This doesn’t mean it won’t work for you – try it and see if you like it. Go wild and crazy! Have fun trying different ways of tackling the outlines. Don’t be inhibited! You might like it! I just know I didn’t like it on my version.
Then I thought maybe the stitch could be addressed. Maybe something a little less solid, but still green, would do it. And so I attempted the buttonhole stitch around the cluster, which is what you see in the photo above.
And I concluded:
Ick.
It could be the lack of contrast.
It could be the choice of the buttonhole stitch.
It could be the fact that it’s sloppy, quick stitching, because I knew it was just a test.
But whatever the case, I didn’t like it.
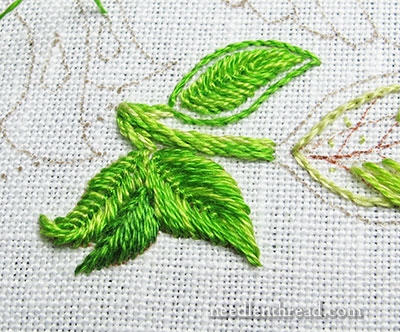
So I discarded the outline on the triple cluster of leaves altogether, and I extended the leaves out to the outline. I worked them in fly stitch in the medium and medium-light greens, except for the middle one, which is fishbone stitch, in the medium and medium-dark green.
I liked that better.
I outlined the other leaf on the other side of the stalk in the medium (bright) green, using one strand of floss and stem stitch. And I liked it, too – at least for now. So I left that outline…

Then, I stitched the big single leaf on the center side of the design in long & short stitch, following the same approach with the long & short stitch that I used on the large leaf that we talked about last week.
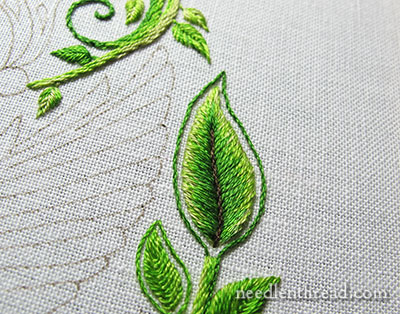
I decided to outline that leaf in the medium dark green.
Guess what?
I didn’t like that, either.
At this point, I concluded that I seem to have a problem with the outlines.
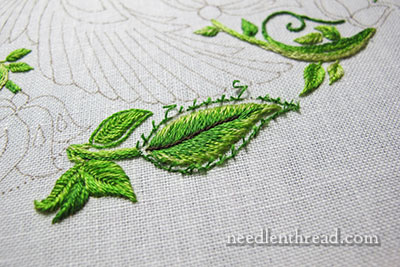
So I left the outline and moved on to a different cluster of leaves, the five-leaf cluster on the lower outsides of the design. And I started that in long & short stitch, too.
The more leaves I do in long & short stitch, the more I see the project unfolding as I pictured it, with lush, brilliant greens.
But after a bit of sporadic stitching, I decided it was time for a new perspective.
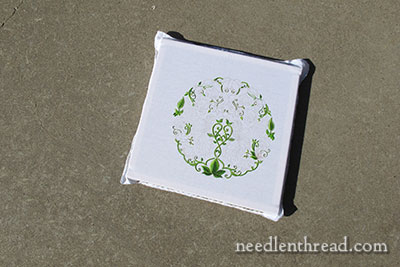
So I took the frame outside on the patio and dropped it on the ground in the sunlight. I wanted a bird’s eye view from far away (or at least 5 feet away, up at my eye).
The photo above is pretty much what I saw.
When I’m working up on top of the piece and taking photos close up, it looks very full – as if I’ve done a lot of stitching on it. I also see little piddly things that bug me.
When I look at the frame from farther away (just standing over it on the patio), it doesn’t look very full. And the little piddly things that bug me? In the scheme of the whole piece, they aren’t noticeable.
That doesn’t mean I won’t change the piddly things that bug me.
But I think it’s a good idea to step back and take the whole into perspective now and then. Working right on top of it every day, it’s hard to see the whole picture.
There are many more leaves to go. And that means more green to work through. So even when the calendar changes and green loses its yearly St. Paddy’s Day popularity, brace yourself for a lot more of it on this project!
Good thing I like green, eh?
If you’d like to follow along with the Secret Garden Hummingbirds project, which features a design from “Secret Garden: an Inky Treasure Hunt & Coloring Book” by Johanna Basford, you can find all the articles relating to this project arranged in chronological order in the Secret Garden Project Index. Among the articles, you’ll find plenty of tips and techniques that will help you with your own embroidery projects.
Ha, Mary
I really admire that you keep working on those green bits, I think I’d be so exhausted and bored of the same-old, same-old after a few days… Aren’t you itching to start on the birds so you can get out of the green rut?
Maybe when you finish a bird, the leaf outlines will suddenly fit in?
I love the persective photo, love the curves in the design!
xx Natalia
You posted this just at the right time for me. I’ve spent the weekend looking at my version – the green’s I’ve used are more muted than yours, my aim was to go for something quite quiet – and this weekend I decided it just looked dull. I attempted the long and short stitch on the big group of leaves at the bottom and made a complete mess of it. Which resulted in me buying a ball of wool and deciding to take up crochet! But following your post I’ll go home and look at it from a distance and try to get a little perspective and hopefully battle on. Thank you, without your timely post it might have gone in the bin tonight.
I think they ALL looked lovely, even the buttonhole stitch one – but we’re always our own harshest critics, aren’t we?
Your desire to stick with green reminded me of a workshop I was on where we were doing a very stylized crewel-work picture, just to learn the stitches etc. and the tutor suggested a contrasting color on the leaves. One lady, a retired scientist, couldn’t bring herself to do it, even on this incredibly stylized picture, because it wasn’t ‘real’ enough. THen I said ‘poinsettia bracts’ to her and she said ‘Oh yes … they’re red!’ and cheered up and did her contrast in red … which looked terrific. 🙂
In my mind, the problem with the 3 leaf clusters, outlined in green, is that there is little contrast between the leaves. They tend to look like a green blob rather than separate leaves.
I think the greens need to be more different. I am looking at my plants, and some of the leaves are very dark and others light, because of the way the light hits them. Since you are blending colors which are all fairly close in color anyway, the groups of leaves don’t stand out from each other enough. I recommend that you incorporate some darker greens or other families of greens to make the groups look different – a darker or more shaded leaf between the 2 lighter leaves would help. Then try outlining them again.
Good morning, Mrs. Corbet. I have to say I completely agree about that buttonhole stitch, I just don’t think it’s elegant enough for this piece. Come to think of it, I don’t think I’m too keen on open stitching as a whole, but I admit to being a very odd person.
I love the way you fill the leaves, such gorgeous stitching is what I one day aspire too. However, I also share your issues with the outlines, they are a puzzlement. So, I’m going to stick my neck out over the chopping block and tell you the idea that popped into my head…
Why not do the outlines in black?
Go ahead, laugh, I think I’m insane for even mentioning it. But the set of stamped pillowcases I’m stitching up for a friend is a stylized garden theme where everything is outlined in black; and because my friend thought it would make things easy on me, she told me to flow the manufacturer’s color scheme.
She obviously doesn’t understand that, that takes 80 percent of the fun away, but it’s what she wants.
To my utter chagrin, the black looks pretty great! So, when I look at the outlines of the Secret Garden I imagine the outlines in black and then I don’t find them odd. You know, the dark brown you use for the large leaf stems could work too.
Anyway, I’m snowed in, in Virginia so THANK YOU for all the green!
Obviously I need an edit button. I meant my friend told me to *go* with the manufacturer’s color scheme not “flow.” First blond moment of the day!
Oh dear. Snow. That just gives me the chills right now. I love snow from November through February – it seems “right” – but now that the Kansas climate has teased us with some 70+ degree weather! this morning’s sub freezing temps just don’t do it for me! So you have my sympathy – but just think how much more you’ll appreciate spring when it finally does come!
Hold the thought on the black …. That’s coming up on the silk version. I plan to make use of black in that version quite a bit.
Another reader wrote with a suggestion for a different color that I’m going to test this week …maybe even today, if I get a chance.
Yes, I do remember you mentioning doing the silk version with a lot of black. I’m so over-awed by this version I don’t even want to think about the other wonders to come, I may have a stroke. The darkest brown could work too, but it’s YOURS and your choices will be the right ones! I just think that since reality isn’t the objective then breaking away from the green might be the answer!
Frankly I start getting cranky if I use the same color for more than three days. I must learn better patience.
Mrs. Corbet,
Happy St. Patrick’s Day! Take time today to remember St. Patrick and the other saints and their expressive adoration for Jesus Christ.
The project looks so Teeny Tiny from that far away! But you can still see all the progress you’ve made on it. I hope you’re able to decide what to do with the “piddly things” that bug you. Good luck!
Sarah 🙂
“Piddly” is a great word, isn’t it? 🙂
Yes, the project does look strangely small when photographed from “afar”, doesn’t it?
Happy St. Patrick’s Day, Sarah!
Thanks for the “bird’s eye” photo of the piece, as you say it really puts the whole into perspective.
I am so pleased you took out the filling stitch of the outlined leaf, it was not nice at all! I quite like the little leaf with its outline though.
What about trying white dots for an outline shape?
I am following your project and I am tempted to join in.
Today, though, I do not agree with what you are saying. I quote you: “It’s not that I’m going for an absolutely realistic look for this project. I’m not”. And you say that the lighter edge is does not look good.
I must say that nature offers lots of different shades and lots of variagated folliage that I enjoy a lot. So I would go for variagated folliage, mixing different shades on the same leaf with contrasts.
Good morning Mary, Your reminder to step back and look at the whole project is a great one. In the quilting world we always use “the 5 foot rule”! LOL
Really, once the project is done “we” are the only ones who will examine our work so closely. Of course yours will stand up to that type of inspection; mine, not so much. I love what you are doing on this project.
Dear Mary
I love the photo of the project from afar you really get a picture of the overall design and colour scheme lovely. It’s a dilemma of what to use in a project at the moment I designing a vintage beaded handbag I have the silk red fabric that I want to use and I’ve bought the silk organza for the tambour needlework and I have a colour scheme in mind but it’s the design and beadwork that I keep contemplating and deliberating over that I’m not sure about I’ve looked at all different types of beadwork and Haute couture beading and I’m still not sure what type of beading to use. So I do understand about colour and contrast it’s difficult. But I know you will find the right contrast and stitches to use in this project. Thanks for sharing this with us.
Regards Anita Simmance
Hello Mary,
first, let me say that I love this project. I bought the Secret Garden Book and some time in the future I plan to work a project from one of it’s gorgeous drawings (for the moment, I am busy doing something else – in puncetto – and then I will be doing a month of travelling, so I will need a project that doesn’t require me to be carrying a lot of materials around with me, like Blackwork… but after that, it will have to be a Secret Garden Project!)
Anyways, I was wondering wether there is a special reason for your doing all the leaves first? I think I would get sick and tired with all the green – so I might do a flower or part of a humming bird in between the leaves. Or is there a reason I am not thinking of why this might cause a problem?
Thanks already for your answer AND for all your great posts! I am always looking forward to them, and they are my first source of reference, when I am having stitching problems 😉
Hang in there as spring is bound to arrive – here in western Europe the seaon is 5 weeks ahead, and I am really enjoying it.
Tina
Marie,
Why not a french knots ?
I was given the wonderful book, Elizabethan Stitches by Jacqui Carey . Is there a U.S. company that has kits that will help me practice these stitches?
Thanks!
I think it’s not so much the outline itself that’s the problem, I think it’s more the style of the design as opposed to the method of stitching. The design is graphic, needing flat one dimensional colors. You’re using shading and achieving a more ‘realistic’ effect. I think this is creating the dissonance that is causing you frustration.
You know what? I love the buttonhole outline!
I’m waiting for my book to come in (it’s shipped! But, when it does, I think I might do my outlines some in buttonhole! Haha!
Dear Mary, I haven’t seen (heard)the word “piddling” since my mother said it many moons ago. It was one of her favourite words! She used it a lot to describe “Mrs so-and-so’s piddling opinion”. She was quite a fiesty lady, my Mum. I love the development of your Secret Garden piece and can’t wait for the silk version. You have already given me much food for thought with your stitch selections. Have a lovely St Patrick’s Day and the weather can only get better.
Hi Mary,
I’m enjoying your experiments with outlining. And I think you’re right: most of it is unappealing for some reason. Part of it is, I think, that while the piece is stylized, it’s *not* extremely stylized. So the outlining jars a bit. The other issue is the width and evenness of the outline- it’s wide and it’s even all the way around the leaf. Natural leaf borders aren’t usually even all the way around. They usually taper at stem and tip; they often undulate (e.g. http://carolynsshadegardensdotcom.files.wordpress.com/2011/05/dscn4062.jpg). With the wide outline, it’s very plain that these leaves have artificially even borders.
I think I would either interpret the outline as underlay for the leaf and fill it with a near-black, which would make the leaf really pop. Or I would vary the edge of the inner leaf a bit so that the border would appear more natural. Hard to say. I look forward to seeing more experiments!
Cheers,
Jen
I love the yellow choice outlining the leaves, brilliant suggestion!
I’m very (very!) happy to see something green these days and to think that something as wonderful as leaves actually do still exist. Woke up to five more inches of snow this morning!