


Oh, oh! Finally!! I’ve made some progress on the Secret Garden embroidery project – specifically, on the hummingbirds.
But, as is usually the case with this work-it-out-as-you-go process of completing an embroidery project, there’s been a little un-stitching along the way, too.
So, today, I’ll show you where I am and discuss the circuitous route that got me here.

This is where I was, when last I walked away from my embroidery frame. It doesn’t seem all that far, does it?
And, if you’re familiar with the design, you probably realize that the heads of the hummingbirds are not very big at all, so this doesn’t look like very much stitching.
But, when you’re working two steps forward and one step back, any progress is good progress!
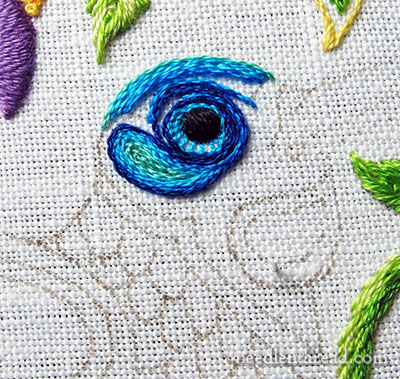
Last time we visited the hummingbirds, I had embroidered just the black eye and the small swash on the cheek. The eye was stitched as a satin stitch dot, and the cheek swash was worked in stem stitch.
Shortly after showing you that, I began stitching the rest of the face, working mostly in a deep, dark, vibrant blue.
I liked the color of blue (and it may show up later), but I was oscillating between a dark head on the bird and light head.
The more of the dark blue I worked in (and the more I worked on that helmet area on the top of the bird’s head), the less I liked it, especially from far away. Besides the fact that there wasn’t enough separation in color between the eye itself and the dark blue around it, the bird was looking somewhat angry.
I didn’t want an angry bird!
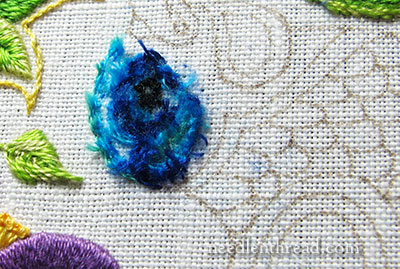
There was nothing for it. Out came the scissors, the seam ripper, the tweezers, the tape – the four tools I use to un-stitch an area, especially one this densely packed with stitches.
Even the eye came out.
Ahhhhhhh. Linen! How I love thee!
What other fabric can come through such an ordeal looking so darned good? This is why I don’t use cotton or cotton blends or synthetics for major projects. A good linen can handle the stress of concentrated stitch removal like no other fabric can!
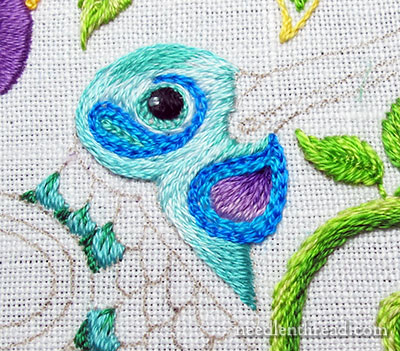
With the stitches out, I worked the eye again in satin stitch.
The head is long and short stitch, beginning at the edge of the beak and following the curve of the head.
I used lighter colors this time – I’ll share all the color numbers in the next update, when we discuss the scallops on the breast – and I avoided anything too dark at the top of the head that might make the bird look angry.
The eye has two little straight stitch glints in it, and directly around it, following the design, I embroidered a buttonhole stitch outline in a medium greenish blue – something that blends with the surrounding colors. I didn’t want a larger dark spot there, just a little deeper color and a different texture.
The neck swash is outlined in chain stitch in two colors of bright blue, and the inside is worked in long and short stitch in the same shades of purple used on the flowers.
There was a point when I considered working the background of the head in a light seed stitch (like the seed stitch filling on the flowers), because I knew I wanted the head to be light. But I also wanted it to be smooth and solid, without the speckled texture of the seed stitch.
I’m working on the scallops now. They’re simply unpadded satin stitch, with a few straight stitches over them to add some color blending as each layer builds.
But we’ll discuss that process next time!
So far, I like him fairly well. What do you think? Have your say below!
I love reworked, not angry, bird!
The eye is now perfect. I am going back to some projects and redo the eyes. The white makes the eye come alive. Susan
I can see what you mean about the dark head looking angry… Quite a change! I am also glad you have Included some of the purple from your flowers…the effect is just stunning. Will you be mirroring the other bird or will there be a whole new set of colours to anticipate? You are so patient. Thanks for your inspiration.
It did not look angry though until she chose a color for the head. Just goes to show you how things can go from great to not so great in an instant. Perhaps other colors for the head would not have made the hummer look angry, but would have given it some other appearance. 🙂
I like it … a lot! I love the lighter blues you’ve settled on and I particularly like the blend of colours in the scalloped feathers. I think it’s going to look lovely as you add more scallops. Thank you for sharing the decision-making/unpicking process; I’m enjoying watching you work out the colour combinations. Looking forward to the next instalment … no pressure though! 🙂
I think the outer edge of the below beak swash is too dark 🙁
Ah – well, it could be, but once the surrounding areas are stitched, you might like it better. The band on the neck will be darker, and I think you’ll be surprised with what happens with the scallops on the breast, too. We’ll see!
Love him totally and the background as well but poor thing that terrible dark Goiter he must have very bad lack of iodine.
i think its coming out beautifully. love seeing all the detail and your attention to calling out each stitch. thank you.
Sorry to disagree – I loved the darker version, and surely all birds look indignant (probably at us invading their environment) with their dark stare.
The new version seems too wishy washy and I think their heads will get lost in the undergrowth! Time will tell!!
Mary,
A world of difference. I love seeing your artistic mind work. Thank you for “thinking out loud” .
The new stitches have done exactly what you desired. You were right that the lighter colors “lightened” up the bird in every way.
I work out my stitching problems with needle and thread, too. There may be an easier way, but I have not found any that work so well as this. And, as I love stitchery, it is not overly burdensome for me to rework. The rewards are always worth it.
I am glad you did not use the seed stitch. I am not fond of that look.
Floss
Well, I’ll be! You did it! I had quit stitching all together on this project as I thought those birds looked mean and didn’t care for them. You did it! it looks lovely and I’m in awe. Love all the stitches and colors and the bird looks sweet. I’ll start up again. You are a master!
I think bird necks are called the gorget. 🙂 The male hummers around here (Annas) have crimson/scarlet gorgets. 🙂
Do you plan to do both hummers the same or will the second one be different?
They’ll most likely be slightly different, but not too different.
🙂 Well, no, I would not expect you to re-invent the hummer. Most hummers (and birds in general) have slight differences between the male and female anyway. Just a thought, another color that may have worked in the center of the gorget would have been the yellow that you used around the leaf clusters. 🙂
Mary,
That was a wonderful tip about not using too dark a thread to keep the bird from looking “angry”. She looks great! -Donna
Wow I thought that eye was a glass bead and had to read your description twice to believe it is stitching. Well done!
Do I see two colors in the glint in the eye — white and gray?
No. Just one color – it’s a very light, light blue, the same that’s mixed in with the background on the head.
I think he looking good so far. He’s not angry now, that’s for certain. He looks happy, light-hearted, and carefree.
Thanks for sharing, Mrs. Corbet!
Sarah 🙂
Hi Mary,
I have a question about the long and short stitch used. I know you will most likely go over the colors, but how did you go around the circle? How did you get the two sides to come together to look smooth and the same? Can you kind of explain I guess how you got this result. I am trying something similar and it does not look like this at all. Thank you so much for your help!
Ah. Good question! I’ll try to demonstrate that with the other head. It’s easier to show it rather than explain it. But the basic principle is one of easing the stitches around the various areas and filling gaps with extra stitches, worked randomly. I actually stitched the chain stitch elements first on this one, but you might find it easier to stitch all the long and short stitch first, and then work the other elements, which is what I’ll do on the other head. I’ll take more detailed photos with the other bird.
I like the lighter head much more than the dark.
Dear, Mrs. Corbet, once again you leave me astounded and bewitched by your skill. As much as I love that dark shade of blue, I agree that it put that charming little Hummer into “Angry Bird” zone. While my four-year-old nephew wouldn’t object, it doesn’t fit the piece. The lighter version is much happier.
That said, I do have a tiny issue with the purple. I think using the *exact shades* as the flowers makes this little guy blend in too much! I think a purple with a bit more red in the base would look much better. Of course, I don’t mean to be presumptuous, this is just my gut reaction. All in all, it’s so beautiful, I find myself getting a bit teary!
😀
Love the eye, those two stiches make such a difference! The lighter blue/aqua is definetely gentler, great choice of colors!
Is the work you are stitching on the Hummingbird considered Crewel embroidery?
No…it’s just surface embroidery. Crewel embroidery is done with crewel wool….
When I saw the first pictures I thought, “Oh! Those colors are lovely” and then as I continued to read I thought, “Why is she changing that?” but then I saw what you had done after the ripping out and you are right (of course you are) — it is much better. I like the blend of stitches — not so heavy. And I like the lighter colors. Looking good so far, Mary!
Your new colors are intense, yet cheerful. Good switch!
I think he’s gorgeous, and I love the sparkle in the eye. Those tiny light bits make a huge difference. And I like the shading at the top of the head and throat. Is that just the light reflecting off the thread or something you did with the stitching?
Do you think it was the dark color that made him look angry or the shape/curve of the “eyebrow”? (Not an eyebrow at all, I know.) Mind you, I’m not convinced he looked angry, but I do like the second version.
I think a lot of birds have a natural scowl.
Hi,
I love your bird and I’m curious what kind of transfer technique you used that can remain even after all of that handling and ripping.
Thanks,
Mary
Hi, Mary – here’s the article on that: https://needlenthread.wpengine.com/2014/01/sg-embroidery-project-ground-fabric-design-transfer-and-more.html
Hi Mary, thank you for sharing your tips and tricks regarding the issue of “unstitching” and why linen is your fabric of choice. I will remember that pearl of wisdom the next time I am choosing fabric for a project as I am getting good at unstitching. I had to laugh at your angry bird description, have you ever been around these beautiful little birds? They are nasty little buggers, they defend their territory which is usually a feeder with great ferocity. We had a beautiful hummer stake a claim on our feeder so I put a second one up to allow others in but he also felt that one was his. A third feeder was put across the yard and he defended all three, apparently they don’t like to share so I gave up.
Can’t wait to see your next step, this is like reading a good book.
Hi Mary. I wish you would take out the chain stitch, so the finished bird is beautifully smooth with some iridescent coloured metal stitches within your long and short stitch. Especially on the head and neck in contrast to the underside matt browns of the wings. Regards Jackie.
YES! The lighter is much better and I wondered if you would pick up any of the colors in the flowers and you did. Love the green to aqua shading in the scallops.
Have just returned to ‘hand work’, as my mother called it, after a long time away from it. Your website has inspired me. I’m finishing some cut work my mother started and a cross stitch center panel for a baby quilt. Not ready for something as envolved as your Garden Project. But do want to try some of the monograms.
Love the new colors. Makes him look like the beautiful bird he should be.
Oh, this is lovely.
The highlight in the eye is perfect. Colors are beautiful. Looking forward to seeing more of this.
Love the change to the shades of aqua for the head. The suggestion for the neck scallops is a good direction, I think. I am not sure of the color choice for the neck (throat) under the beak. It might work if the direction of the stitches were changed.
Glad you decided on the lighter head. I love the feel of it.
I did not like the first head you were stitching but the second one is very, very nice. I appreciate all the work you are doing on this piece.
I like the new look . The darker blue was too much in such a small space.
I was looking at your long and short stitch and will appreciate more detail on that when you get to the next bird. How many strands of floss did you use?
Diana.
Wow – linen is definitely the way to go. I can barely tell that you had ever stitched on it….amazing!
After much thinking have decided to go my own way with the colors on the birds and flowers. Have picked shades of turquoise, royal blue, coral and magenta. (partly inspired by my pet parrot; a Bronze Wing Pionus) I have hints of turquoise in my leaves and will use the same shades on my birds highlighting magenta and coral on neck and throat which I will then use again on my flowers. At least that is my plan for now. That way, everything should tie together.
I absolutely agree with the change. That bird now looks alive.
I like the idea of the lighter colors for the birds face. My birds outside my window have darker faces but the little eyes are still visible. The stitched birds need to be vibrant.
Hi
You make me feel so much better as a beginner that seems to be reworking stitches/pieces all the time and is sometimes hesitant to do so. To know that even the best do it makes me feel much better. You are right though the lighter colour blends with the greenery. The adding of white does make the eye lifelike.
Love it! You chose some of my favorite colors so its even more fun watching your progress. I thought the first eye was fine but this one is so, so perfect–at first I though you had used an onyx cabochon, it looked like such a little jewel.
Absolutely beautiful and such an inspiration.
Thanks Mary
I love that glinty eye but I’m not sure about the much lighter colours. I don’t know what you’ve visualised for the rest of the bird but your colour choices for the rest of the embroidery work splendidly, so I look forward to being surprised and delighted.
Mary,
I do so enjoy these lessons. You push me to study and practice and observe elements that I am not always aware of. I realize creative style requires so much more knowledge of every aspect of design, shape,stitches, coordinating values not to mention giving your subject the perfect personality.
The study of the eye was a real “eye opener”. Couldn’t resist!
I have never used linen, but I have seen the disadvantage of too many stitches in cotton satin. Thanks for the visual with the linen, what a difference it makes.
I love reading all the opinions and ideas, it makes me realize the endless possibilities in the world of embroidery. All of it so stimulating.
Thanks for being the master, most humbly just one of your students, Bernadette C
I agree with you that the new colours are beautiful and the head looks nice and light as in weight. Now I am interested in what other colours you are going to use.
Regards Linda
the colours are now lovely bright and guy
This is prettier like this ! Good job !
I just can’t get over how much that little glint in his eye adds. I thought it looked good in the first pics with the darker color. Then you changed it and now it is gorgeous!
I like the lighter colors in the head of the bird too
Coming out very pretty,at first I could not see why you wanted to take it apart, it was so pretty but when I saw the re-do I agree with you it is now not just pretty but BEAUTIFUL.
Your work is beautiful and subtle and elegant. I love reading about everything you do. I really hope to get to be this good someday!! Thanks for sharing it.