


Well, I tried several different approaches and several different stitches on the tail feathers for the Secret Garden Hummingbirds, each resulting in a little more un-stitching.
Finally, I succumbed to the fishbone stitch, which is the same stitch I used to embroider the hummingbird’s wings.
So, today, a little update on the Secret Garden Hummingbird Project, just so you know I haven’t abandoned it!
I’ll also share some tips on how to gradually change shades with the fishbone stitch.
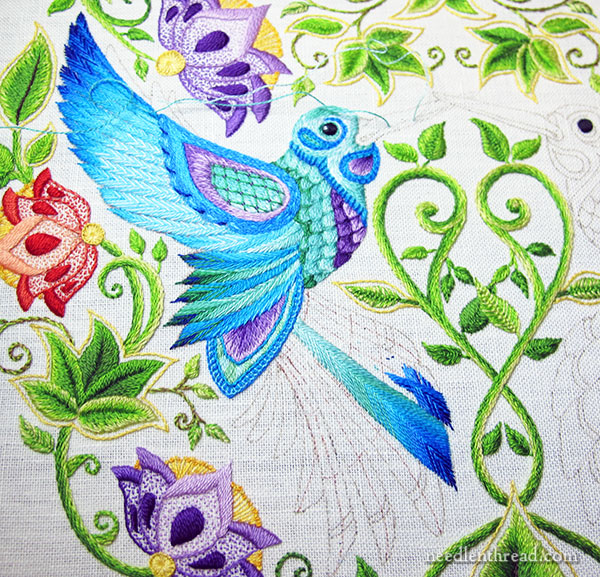
You can click on the photo above for a slightly larger version, if you wish.
If you recall, the last time we visited this project, I was testing the fly stitch for the tail feathers. I didn’t like it at all. I didn’t like the thickness the fly stitch created, or the crowded look to the feather.
And on top of it, as many of you pointed out… the stitches were going in the wrong direction!
Boy, that was a V-8 moment!
On the new tail feather above, you might notice that there’s something missing. I didn’t include the little accent band at the end of the feather.
In the previous version of the embroidered feather, I was going to stitch that in purple. But I decided not to add it on this version (after trying it out several times), for a couple reasons:
1. The angle of stitching on the fishbone stitch here is quite extreme, especially on the right side of the feather, where I have to get around the squared corner. Throwing in a purple band up there made the feather look lopsided, with an extreme angle on one side, and a not-so-extreme angle on the other.
2. The purple interfered right where I wanted to change shades, and it broke up the blending of the feather.
So, I decided to skip it altogether.
Oh, I forgot the third reason: it was the easy way. You know, there are times when it’s ok to take the simple approach!
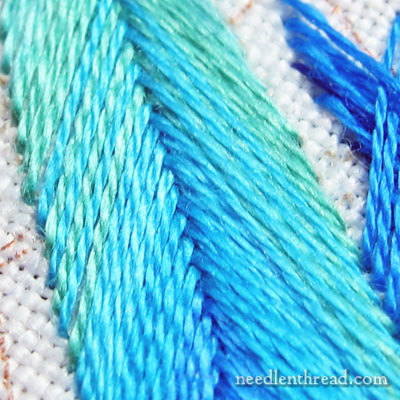
Here’s a close up on the tail feather, where I’m merging two colors. The idea here was to create a gradual change-over to another color, so that the feather doesn’t sport super-distinct color bands.
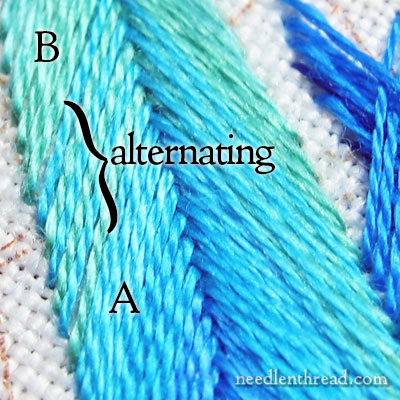
Color A is a lighter bright blue, and color B is a lighter green. To blend the colors so that they don’t meet abruptly, I embroidered a transitional area, where A and B alternate from stitch to stitch for about three pairs of stitches.
If you want to think in terms of stitch sequence, coming down from the tip of the feather towards the body, the sequence for this color transition goes like this:
…AAAA (stitches in the light blue), B A B A B A (the transition), BBBB…
Alternating colors like this is the only way to “shade” or to create a gradual color transition when working the fishbone stitch or stitches similar to it.
And that’s the update on this project! Next time, I’ll show you the finished tail.
You’re welcome to chime in below with commentary, questions, suggestions, severe reprimands – or just a howdy.
Enjoy your Wednesday! See you tomorrow with… shhhhhhhhhhhhhh…. don’t tell anyone. I’m giving away a rare embroidery book!
If you’d like to follow along with the Secret Garden hand embroidery project, you can find all the articles relating to this project arranged in chronological order in the Secret Garden Project Index. If you’d like to see photos of other Secret Garden embroidery projects, you can check out the Secret Garden Flickr Group, where quite a few gorgeous works are in progress or already finished!
Looking very lovely, Mary!
Thanks, Maureen!
Witam, czy do mieszania kolorów używasz dwie igły?
Pozdrawiam Anna
Yes, Anna! One color is in one needle. One color is in the other needle.
Tak, Anna! Jeden kolor w jednej igły. Jednobarwne w drugiej igły. (via google translate – don’t know how accurate it is!)
Dziękuję, zrozumiałam.
Pozdrawiam
Howdy! 😉
Howdy! 🙂
Absolutely beautiful. And I’m looking at this while struggling with finishing a long-time project that has become disappointing. This project, as it stands now, makes me feel really good. Lovely. Thanks, I needed that. Glad I’ve been saving all your articles so that I can read them again from the beginning and perhaps give a try to something like this.
Hi, Patricia! Oh, take heart! I’m actually writing an article on this very subject – the long-term project blues. I hope you’ll find it encouraging. Many stitchers go through it! And there are different ways to get out of the slump, all of which are legitimate, in their own way.
I’m glad you enjoy the articles!
Hi Mary,
I’m wondering how you alternate the colors for shading. Do you have two needles threaded at once? Or leave spaces and fill them in later? I Can’t quite picture how it would work. But it looks lovely on the tail feather!
This is a very timely post for me too… I’ve been trying to work out some designs with feathers, and couldn’t figure out why my shading looked so funny. Guess I have been doing it incorrectly.
Thanks!
Karen
Hi, Karen – Yes, you use two needles, one for each color. Or more needles – depending on how many shades you’re stitching with! If you check out the last photo in this article: https://needlenthread.wpengine.com/2014/09/secret-garden-embroidering-feathers.html, you’ll see where I’ve talked about this before. It’s the same approach in the wings.
Leaving spaces to fill in later doesn’t really work well with many stitches, but it won’t work at all with fishbone stitch, because fishbone stitch relies on the overlap of each consecutive stitch from side to side, to achieve the overlapping spine down the center. You can see what I mean if you check out the fishbone stitch video tutorial here: https://needlenthread.wpengine.com/2006/11/fishbone-stitch-video-tutorial.html
Hope that helps!
Thanks Mary – it makes sense to me now! I’ll try it with my next attempt at feathers.
Beautiful, Mary! Incredible solution!
Thank you, Judith! Very kind, very kind… I’m afraid it’s not a very original solution – I really wanted to do something slightly different for the tail feathers, but nothing else would satisfy when comparing them to the wings!
I’m admiring the center of the feather. Each stitch is precisely placed so there’s a clear step effect like bricks alternated on a path. Amazing needle control to do that. Beautifully done.
I think that you are VERY patient. Doing and undoing so many times. But that is the way you are satisfied by your end product.
The fishbone stitch in the tail is beautiful! It’s just perfect for the tail & I really like the way the colors are changing. Good decision! I’ve learned SO much about stitching while following your Secret Garden project. Thank you.
Thanks, Linda – I’m glad you like it, and I’m glad you’ve enjoyed this project!
So much nicer Mary. Since I think all of your embroidery is stunning, I had to go back and look closely at the fly stitch version–and yes, the fishbone is the way to go. Can’t wait to see the completed tail feathers!
Excellent choice!!! And thank you for the tips on shading with that stitch. It can be a puzzlement as the King says in Anna and the King of Siam.
The bird is looking very nice!
Lovely. Beautiful shading. Can’t wait to see this all done. 🙂
Thanks, DeAnna! You know, I can’t wait either!!!!!
I love how this looks. Just a thought: if using more than one strand I’ve had good luck using a strand of each color to blend for a few stitches, then totally change to the new color.
Yes, that works well – I used that method in the stems on this project, using two shades in the needle at once, switching out shades according to a sequence: AB, BC, CD, DE (A being the lightest of the shades, E being the darkest, or visa-versa). Works great for stem stitch filling, and also works great on stitches like fishbone, fly stitch, etc.
Hello! Mary, it’s looking beautiful…. the colours are gorgeous!
Beautiful! I’ve been embroidering for almost 50 yrs and still learn a lot from your blogs.
Hi Mary,
I had toyed with the idea of a major amount of purple in the tail and of course that would have been a very different bird, but that is neither here nor there. The main effect that I wanted to see is what you have achieved masterfully.
Darkness at the tip, a full richness of color achieved by the length of green, to finally easing off into the light blues. You’ve given the right eye pleasing amount of color to make the tail stand out as a major flourish. The blending has been done so smoothly that it looks like a real feather would. It even gives the impression of light shimmer, spectacular! The tail when it is finished is going to look so full and lush. The execution of the tail colors are making completion and justification of all previous colors and shading patterns by enhancing them all. What a delight!
Hi Mary. I look forward to your article about long term projects. I am almost finished the leaves on the secret garden…. 3 to go! I enjoy stitching but I am ever so slow. Also other events come in the way. One leaf may take 2 hours. I wish in could stitch faster! Does it matter how long the linen is stretched on the frame? I will be unable to do any stitching for 2 months over Christmas period. Would it be better to take it off frame or leave it where it is? I can’t wait to start flowers and the hummingbird looks beautiful. I love your reading your articles & updates on SG. Jude
It’ll be fine on the frame! Linen is so great for that!
Love the way the tail feather is coming out. The colors you are using in the entire project are just beautiful and I am enjoying watching your progress. You inspired me to buy the coloring book and I am enjoying that as well. Thank you for sharing your progress with us and giving us inspiration.
Hi Mary, I guess that beautiful darker blue “haze” developed as you stitched the spine of the fishbone stitch? I can’t see it happening any other way.
I think it might be the shadow from the overlap? I’m not sure exactly which area you mean – I’m guessing the shadow down the middle? If so, I think it’s from the way the stitches overlap as you work down the feather.
Hi Mary, I think it looks fantastic.
I like the idea of alternating colours to blend. A new trick you’ve taught me. Thank you 🙂
Is this secret garden project a pattern you sell? Or would you consider selling the pattern? I love this bird!
Hi, Alesia – nope, you can find it in this book: https://needlenthread.wpengine.com/2013/12/this-is-not-an-embroidery-book-or-is-it.html it’s a great coloring book, full of all kinds of pretty designs that could be translated into embroidery! I received permission from the author to undertake the project with her design and blog all about it.
This is beautiful! The one question I have is–how to keep the needles (with their different threads) from tangling on the back while working?
Looking lovely Mary!
Hi Mary, it’s looking beautiful and much more feather like. I also contacted the author of the colouring book and got her permission to stitch from it. She was very obliging. Mind you I haven’t done any yet, just keep looking through it longingly. Roma
Good Morning, Mrs. Corbet! I’m sorry to have been MIA for so long. I do miss the purple, but I understand why you can’t do the band. I think I might have added a bit at the very tips, just for continuity’s sake, but in all honesty, your work is so beautiful it can’t really go ‘wrong!’ So glad for the update!
I’ve been waiting awhile to see what you’ve done,
I’ve read about red and the chenille was good fun,
My needles are sorted so I will use the right one,
But where are the hummers – where had they gone?
My two have been tweeting (in the old fashioned way)
While they waited for yours to come out to play.
At last, there it is and you explained the delay,
So hopefully now they are well on the way.
I cannot find fault with your stitching so fine
His feathers are plump with a glorious shine.
You asked us to comment, you suggested we ‘chime’
So pop over to Flickr and take a look at mine !!
Dear Mary
I’ve been out the last couple of days sightseeing yesterday at the RAF Museum WW2 Operations bunker and today I went on an old London Bus touring WW2 sites and ending at the Imperial War Museum great days. Anyway back to stitching I really love what you have done on the tail feathers the different colour shades are beautiful that must have been hard to change colours stitching the Fishbone stitch beautiful and thanks for your instruction on how to change the thread colours and the simple approach definitely works, beautiful stitching. Thanks for sharing how you change colours in stitching very instructional.
Regards Anita Simmance
Dear Mary,
I sent you an email earlier today regarding shading and some suggestions that work for me – not sure if you got it. Please let me know if things make sense? Keep up the good work!
Nupur
mary- again you made a big difference to the way i approach some of my embriodery projects. you are constantly WOWing me. my embriodery is better because of you. thanks for all your hard work to help and showing us easier ways.
Lovely shading and fishboning, but how does it look from the back? Do you have several threaded needles hanging from the reverse side, loose threads, etc.? Lots of colors means lots of thread changes; an explanation or example would be helpful.
Hi, Nancy – the back looks pretty much like the back of fishbone stitch. To change out the colors frequently, I just keep the threads I’m working with going, and I park them out of the way until I need them. Then, I run them behind the stitches on the back to the new starting point. You can find an explanation of parking threads here: https://needlenthread.wpengine.com/2014/02/parking-embroidery-threads.html
I’m currently enrolled in an Arts and Crafts class at my college. I never really thought about sewing, quilting, crocheting, etc. This class really opened my eyes. I also have a bad nerve damage situation in my hands and feet, and embroidering has been alot of help!!
Love your website