


Split stitch gets a bad rap.
It’s a great little stitch – one of the basic hand embroidery stitches – but every time I bring it up on Needle ‘n Thread, I get an influx of anti-split-stitch commentary.
Some people just don’t like the poor little split stitch!
When I wrote about this monogram worked in split stitch with floche, at least a dozen people commented or wrote in about their dislike of the stitch in general.
So today, I thought I’d write in defense of split stitch, using a small sample project I’m working on to illustrate. I’ll share with you some tips that might make you like split stitch better, and that might encourage you to give this versatile, easy stitch a second chance!
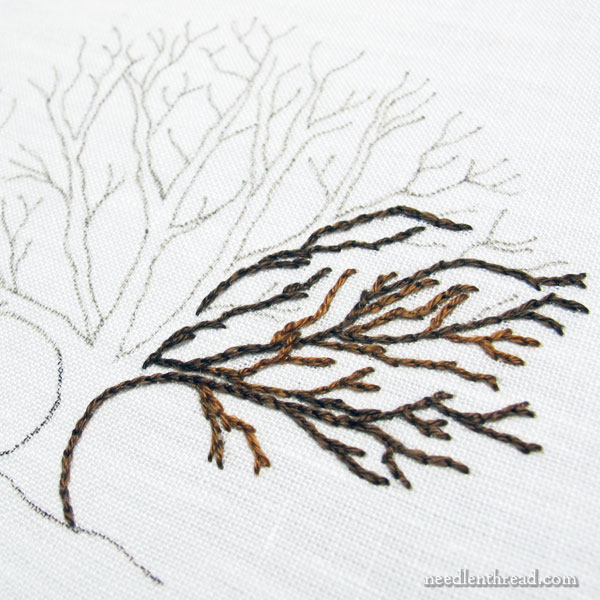
One of the projects on my table right now is this wee little tree. The trunk, branches and twigs of this little project will be worked entirely in split stitch. On the trunk, I’ll work in some combinations to give it a little bark-like texture.
Why did I pick split stitch?
Well, split stitch, especially when you’re working with a non-divisible thread (here, I’m using coton a broder 25), makes a nice, clean line. But it also gives you the easy option of making a nice dirty line, too!
Now, by dirty, I simply mean a “not so neat” line. It’s easy to stitch up nice, neat, straight, fine lines with split stitch. But it’s equally as easy to work up lines that are a little jagged, a little bumpy, and this works out really well for tree branches and twigs.
Working up the branches of this particular little tree, I can vary my split stitches to thick or thin, simply by choosing where I want to split the stitch.
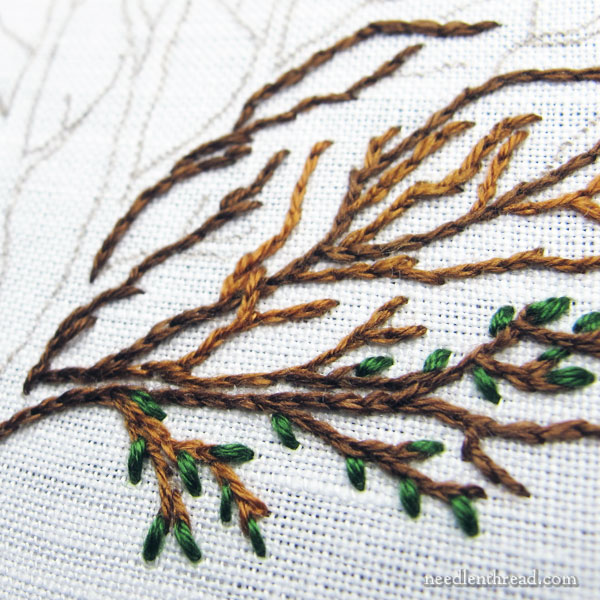
If I work a line of split stitches with each previous stitch split towards its origin, the line will be a little thick and quite smooth.
If I split the previous stitches in the center, the line will still be quite smooth, but not quite as thick.
If I split the previous stitches towards their end, the stitches are drawn out, a little longer, thinner, and they end up with a little break right on the end that gives the stitch a bit of a twiggy look.
If I want a jagged twiggy line with little poking bits here and there, I just need to split the stitches in the middle and go slightly off my line with the present stitch, so that the previous stitch sticks out from the line a little bit.
Split stitch, in short, makes terrific twiggy trees.
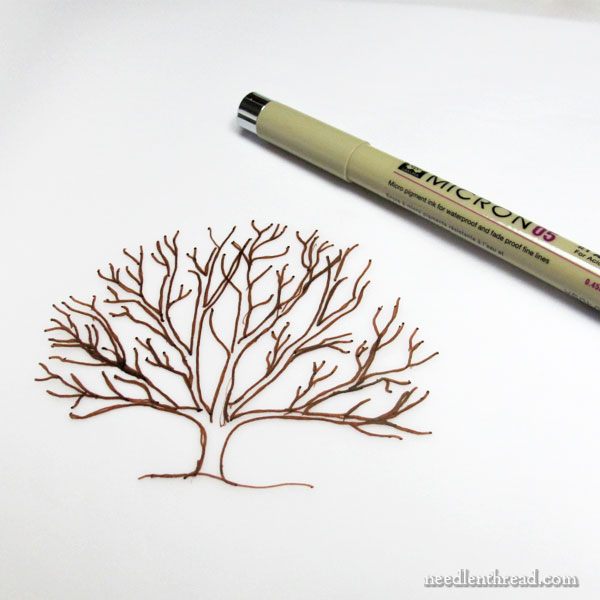
This, incidentally, is what I originally sketched up for the tree, and you can see the micron pen there, to give you an idea of scale. It’s a little tree, and cotton a broder is a good weight of thread for achieving the look I want with this particular tree.
Thread weight, single strands, and split stitch
If, however, I wanted a much lighter structure to my tree – where the branches were a bit more spidery – I’d use a single strand of cotton floss with the split stitch.
If I wanted a much heavier structure – where the tree looked cumbersome and thick – I’d use a heavier thread, like a pearl cotton.
(Although, that being said, split stitch doesn’t look as good in pearl cotton. Pearl cotton has a pretty tight twist to it, and it doesn’t receive the splitting stitch as well.)
If I wanted a bit of a wooly tree, I’d use one strand of crewel wool for a tree this size.
The point here is that I’d use only one strand of whatever embroidery thread I was going to use. Split stitch is much easier to work successfully, if you’re working with a non-divisible thread that can’t be broken down into usable parts.
Ah. It’s starting to bloom!
How can you use split stitch?
As mentioned above, split stitch can be used to create smooth lines or jagged lines. It’s a nice stitch for creating delicate lines, and it takes curves – loose or tight – very well.
It can also be used to fill areas (like on this R monogram), with a filling that’s smoother than chain stitch, but not as smooth as long & short stitch or satin stitch.
Split stitch is also regularly used for padding under satin stitch and long and short stitch.
Getting comfortable with split stitch
The key to getting comfortable with split stitch is the same with any other stitch – practice with it! Put it to work for you and see what it can do!
When you practice, use one strand of whatever thread you want to use.
Soft cottons like floche and coton a broder work great with split stitch. Crewel wool works great with split stitch. One strand of stranded silk works great with split stitch. One strand of cotton floss works great with split stitch.
Just make sure you’re using one strand of whatever thread. The stitch will behave much better for you.
Then, practice the whole splitting thing, splitting the stitch from below in different areas of the previous stitch, to see where it splits best and most comfortably for you, and where it gives you the results you want.
If you’re having a hard time splitting the stitch, perhaps it’s because you can’t see it well. This can easily be the case when working with one tiny strand of floss. Consider better lighting or magnification.
Technically, for uniform results, the previous stitch is usually split in the front third, towards the new stitch – so, not right on the end, but not right at the middle, either. But you can achieve varied results by splitting in different parts of the stitch. Experiment!
Finally, you can mix up split stitch a bit. Think of working split stitch filling with a variety of textured threads. Or consider how you can turn split stitch into a composite stitch, by whipping it or lacing it.
Don’t confuse two different stitches!
Split stitch and split backstitch are not the same stitch. Here’s a detailed explanation of the two stitches side-by-side and a demonstration on how they are different.
Split backstitch is split from the top down, while true split stitch is split from the bottom up.
You can find a video tutorial for split stitch here, if you’d like to see it worked out.
What about you?
I just love split stitch, and I hope you can learn to like it, too. But even if you can’t, I’ll still stand by it. It’s a good stitch!
Any questions about split stitch or suggestions that might help others learn to like it, too? Feel free to leave a comment below!
I’m a relatively new embroiderer (about 7-8 months now) and wish I’d been able to read this post about 2 months ago when I started the project I just gave as a bridal shower gift! I decided to use split stitch for a tree trunk and branches, but I was using a full strand of embroidery floss–all plies because I wanted it thick and visible–and had difficulty getting my split stitch even. I may have made a different choice of thread if I’d read this post first. The end result was fine and the recipient loved it, so it’s all good. But now I’ll have more info to think through the next time I’m making choices–so thank you!
I have actually been considering using this stitch as filling (like the R mentioned above) in a project I’m working on. I’ve been going back on forth on stem stitch and split stitch. Or maybe I should mix both for texture. It’s an aerial view of a park and I want to do circle with texture as well as filling around them, I really like split stitch for this – especially if I do several colors of green it would be very visually appealing. I’m curious if the hand quilting thread I’m using would be roughly equivalent to the one strand of the other options above. Either way, I’m a huge fan.
I love split stitch! And I have used it on trees as you are doing. It is perfect for that. Thanks for all those great tips, Mary.
Hi Mary – Thank you for the split lesson – I learned something again. Well done lesson as always.
Not a stitch I would have selected. However, it looks perfect when used in a piece such as this. Rustic, rough and gnarled.
Great job…. as always.
I can testify about how nice the split stitch is once one masters the length and how/where to split the thread. I did a crewel picture of two parrots sitting in a tree…guess what the bark on that tree was? You guessed it, split stitch and lots of it as the tree took up almost a full third of that picture. I remember talking to that stitch every time I sat down to work on it but it was well worth it. That picture turned out to be gorgeous and anyone who saw it forgot about everything else just to stare. Split stitch is in my list of good stitches to use.
I dislike split stitch because if I use more than one of the six from the skein, the needle often goes between the two (or whatever) and it looks like a chain stitch and not split. So it looks very uneven because some will look split and others chained so it looks like a “gnarled” tree (example) and not a healthy one. Just my two cents.
Mary, this is an addendum to the email just sent. I had tried opening the referenced site (“R monogram”) directly from my email when I got the warning about malware on your site. Opening the “R monogram” reference from your home site did not result in that message. I just don’t know enough about this techno stuff!
Sorry if I misinformed.
Evie
Hi, Evie – No worries. There’s no malware. It’s just anti-malware software reading the links on the photos incorrectly. I’m sorting it out now, and will suspend the newsletter until it’s sorted. Thanks for letting me know! I know other readers have had the same warnings – it really depends on your email server settings. Some people got warnings, some people didn’t. It’ll be fixed soon! Thanks again!
Hi Evie, Mary – thanks for this. I knew I hadn’t changed my settings so I was very puzzled as to why I had to tell my email server that I trusted you. Mary, I trust you for absolutely everything to do with embroidery! Of course!
Dear Mary
I really like you take on the split stitch the branches are really lovely especially when you added the green leaves and your tiny tree is great as well. I don’t have a problem with split stitch and I am very comfortable when I use it. As your demonstration shows it is a versatile stitch and there are many styles to it and it’s so useful to know which threads are best to use with this stitch. Thanks for sharing your views and tips and techniques on the downtrodden split stitch. I will look at it in a new light from now on and branch out to new embroidery horizons and create split stitch vistas.
Regards Anita Simmance
Mary,
Once again you have managed to pick a topic for an issue that has been in my thoughts this week… I don’t know how you keep reading my mind!
I love split stitch and I use it all the time, particularly for items that may be washed or handled quite a bit. I use it almost exclusively for my gifts for my nieces and nephews as it seems sturdier than most. I have been thinking about using split stitch in a number of upcoming projects and so I went back and read the articles you referenced. I had one of those head thump moments when I realized that something that I have been doing for decades was just plain wrong. First of all, I now realize that I have been using the wrong thread all these years (stranded embroidery thread). I also did not know about the difference between split backstitch and split stitch and stitching up or down with split stitch.
I have so very much to practice! Thank you so much for writing this timely article today. It will help me so much.
Glad it helped, Elizabeth! I’ve been doing a lot with split stitch recently, too. How well it works really does depend on the thread you’re using. If you are going to use stranded cotton, try using it without separating the individual strands and putting them back together (“stripping the floss”). If you can separate, say, three strands from the main thread and then use those three strands while still twisted together, you’ll have better luck with it, with regular stranded floss. But I especially love floche with split stitch, because it’s such a soft thread that the split stitches hug around each other and make a nice, smooth surface. Good luck with it!
Good morning Mary
I am a fan of split stitch! My present passion is needle painting and the split stitch works very well here as an outline stitch and as a filling stitch.
It is time we gave split stitch its due!
Sharon
Absolutely agreed! LOL! Split stitchers, unite! 🙂
I learned a lot of information on the split stitch from your articles. I have always loved the split stitch, yet have never really “played” with the stitch. Thank you for sharing all of your knowledge and tutorials! They have been of great help to me in broadening my stitch uses.
I adore split stitch!
ADORE!
It’s just so versatile…I’d guess that 90% of my embroidery has split stitch in there somewhere.
All I can add to everything you wrote is that, with practice, you can make split stitch work well even with more than one strand of floss.
Now, back to the split stitch I was actually working on when I paused to open this email!
Always learning! Love your tutorials and have sent quite a few customers your way, especially those working on crazy quilts! So glad I found you, Mary!!
I’m a split stitch lover! I use it all the time. Great tree!
Mary, I love split stitch! Thanks so much for this tight focus on variations we can accomplish based on where we decide to make the split. Invaluable…like everything you post!
I love the split stitch. It is one of my favorites. When used as a tiny tiny stitch for instance on a woven fishing basket print the detail becomes outstanding. I have also used it to fill in long leaves on cat tails.
Your tree has a certain depth and texture that only the split stitch can bring. I love it.
Hello Mary, I’m a definite fan of split stitch but totally agree that good lighting and maybe magnification is needed! It makes it much easier to split the stitch where you want it to, especially when using smaller stitches on curves etc.
Ha ! I was only talking to my friend just the other day about the Micron pigma pen ! How are you getting along with it ? I like the ultra fine sepia best . Not sure I,d trust it on anything too precious though
I occasionally use split stitch as someone has already said , when needle painting ….to give a slightly feathered look or blending colours.
Hi, Daisy – I use the micron pens pretty often, especially if I’m transferring a design for something like goldwork – pieces that I won’t wash afterwards. But even for some that I would wash, I use them. On silk and similar fabrics you might a get a bleed with them, which is not a good thing, but on linen, they work well. I use the two smaller sizes. I think those are 005 and 01, in either black, brown, or sepia. I like the brown best. To be safe, I generally iron the linen on the back, face down, after transferring, to make sure the ink is good and fixed. Of course, they only work out if you’re planning on covering the lines completely. If you’re stitching something that’s open and airy and you don’t want lines to show in the end, they’re not the pens to use, because they won’t go away! So, yes, I use them for projects that’ll be on the frame for a while, where the lines will be completely covered, and where no laundering will take place.
It is a good stitch! One I use quite often. I have had people tell me it makes no difference whether you outline satin stitch in back stitch or split stitch before you do the satin stitch and I beg to differ. With split stitch you have a smooth side to put your needle into while doing the satin stitch. With back stitch you have a definite bumpy side where your needle wants to go into the already made needle stitch holes, if that makes any sense. On it’s own when it is showing I think the split stitch is much more refined than the back stitch. It might take a little more practice to get it even looking but not much. I almost always will do the split stitch over the back stitch.
I love split stitch! I do some needle painting and silk shading and it is essential for these techniques. I generally use it with one strand of either DMC or Anchor floss or with silk thread. I have yet to use it with wool, but I can see that it would probably be lovely. I also have never tried it with more than one strand of floss. I don’t know if I could even bring myself to thread a needle with unstripped threads! Thanks for this article, you’ve given me something to think about (as usual).
Hello Mary. I have had a break from embroidery while doing other projects, however I always seem to come home with some lovely thread whenever I visit other places or towns. So many beautiful threads that I can use..one day! Reading your split stitch article rekindled my desire to do another project and I feel confident you will direct me in which stitch to choose to best display my beautiful threads. By the study of the stitch it assists me in discovering the best way to use tthe thread for its colour or texture …to display the overall beauty of it. So a huge thank you. I love reading your advice and explanations for stitch choice. Left to my own devices I am akin to a preschooler colouring in a picture compared you who is an artist blending or displaying colour. You help me make a piece to be proud of.
I had never tried split stitch until I read about it on NeedlenThread. Now I use it all the time! The line it produces is so much nicer than a back stich and it’s much more controllable.
Mary, personally, I like split stitch. It is so good for the items you mentioned, and gives an effect nothing else can. My very favorite stitch has always been Long and Short but this is close enough for me to enjoy.
I think after people use it long enough, they will come ton joy it.
Cookie Ziemba
Split stitch aka finger stab. I constantly poke my finger with the the needle. I try not to use it. OUCH 🙂
If you don’t like split stitch–or any particular stitch–then don’t use it. Of what merit is there in criticizing it to others who aren’t so opposed?
The split stitch is one of my favorites for outlining, and I am really bad when it comes to the size of the stitch, I think the smaller and tighter the better. It makes an awesome filler too.
That is exactly what I needed to hear for the gumnut project I am currently working on. Thank you!
I’m using split stitch as the outline stitch for my padded satin stitch in the project I’m currently working at (and need to finish in a week!). I am doing it with one strand of floss, and it’s been good so far! I am still getting the hang of the stitch; you are absolutely right about good lighting for this stitch, Ms. Corbet – it is something you must have!
I wouldn’t look down on split stitch – even though it is not my favourite to do. It still looks good, when well done, and certainly has a place in the embroidery world.
I’m currently working on Susan O’Connor’s “Embroidered Flowers For Elizabeth” using DMC stranded threads. There is a lot of split stitch used not only for outlining the long and short stitch for the flowers and leaves but also a few of the leaves on some of the designs are all filled in split stitch making them very flat and dense this looks very effective against the more raised stitching of the other stitches used.
I never really used or was even aware of split stitch until I started reading this blog. I used split backstitch on occasion, but it wasn’t among my favorite stitches. After I tried real split stitch though, I’ve never gone back to split backstitch. It works up quick, makes nice flat lines and fills, and is way easier than it seems at first glance. You’ve definitely made me a convert to the wonderful ways of split stitch 🙂
Hi, I am glad that you have clarified the two different stitches as I am doing an embroidery at the moment and couldn’t work out why my stitches didn’t look right. I was doing the split backstitch NOT split stitch.
thank you so much
Jo
One of my favorite stitches for texture. I’ve used it to great effect for hair and as fill stitching on a Tiki. Gave it a nice carved wood texture and was still able to get nice clean lines. I’ve only ever used an even number of divisble cotton floss but now that I’ve seen how it looks with a non-divisible I can’t wait to try it.
I use the split stitch and split backstitch to outline areas before filling in with satin stitch or padded satin stitch. I find that I get a much more even edge around the area with the split stitch under the satin stitch. Also when stitching the satin stitch I angle the needle so the stitch actually goes a bit under the split stitch outline.
Where can I find the pattern for branching out.
Do you have a list of the thread colors you used for this tree. I wanted to order it from the Hedgehog Handworks website. I was hoping to get the exact colors you used. You said it was DMC Coton Broder #25 Would you mind helping me with this. Thank you Wendy
Hi, Wendy – I’m not quite ready to publish that yet, since I’m not finished with the tree and since this is a sample for an article on a different website. Once it’s published there, I will either include it in a series of tutorials here on NNT, or in its own printable.
Hi Mary-
This post just made me chuckle. I have been so afraid of the split stitch, specifically because of the comments that are in many of your blog posts. I have been going through the stitches in your e-book and I (gasp) came to the split stitch. I was terrified! Absolutely nervous to even try it! You know what? I did it with absolutely no problem. Granted, I was using Perle Cotton #5, but I use that exclusively to learn and get used to the motions of a stitch before I move to the stranded floss. (I am only working with Perle Cotton & Stranded cotton right now)
I know when I try on a single strand of cotton floss, I am not going to be able to do it, not because it’s a hard, unpleasant stitch, but because I do not have a magnifier and I just bloody can’t see the dang thread. Point is, I am not afraid of it any more. Not breaking out in sweats, no night terrors, just knowing I did it, and I did it quite well, made me proud of myself.
Before I even started, I thought about the stitch and realized that I just can’t poke my needle up and expect it to going through, so I held the stitch that I wanted split down with my thumb nail and just poked the needle right through the stitch. I sighed and said “That’s it? That’s what I have been so afraid of?”
I will now refrain from letting anyone’s comments get in the way of my learning a stitch.
So, you can now see why your blog post gave me quite a chuckle!!
By the way, can you recommend a good magnifier? One with lighting. I don’t want to spend more than $150.00. I do need a lap hoop and I think I found the perfect one. I really need it because some of the stitches you really need 2 hands! (sometimes 3!!)
Have a good day! And, thanks for the chuckle.
Christi ;0-)
JoAnn’s has sales on Ott Lites pretty often. I have the one that converts to both floor and table.
Thank you Liz!
I found on on Amazon (couldn’t find it on Joann’s website) and it’s within my budget. I like that it has a 3x magnifier, although I need to know the difference between magnifiers vs reading glasses as the reading glasses I have are +3.25, so I don’t know if it will help much. The most I have seen magnifiers were 2x + (four key isn’t working but four)x in the little inset.
I just want to know if I am investing in a quality product before I shell out that much money.
Thanks again Liz!
We have three, no, four magnifying lamps (we do a lot of crafty/buildy/make-y things around here!), but the ones I use most often are the 3X and the 2X that I mentioned before. The 2X has that little 4X “spot” near the edge of the lamp, which helps you see smaller areas better. I also use reading glasses, but usually don’t wear them when I’m using the lamps. I really, really like that the bases are weighted enough so that the lamps don’t tip over!
I’d look at JoAnn’s online, too, because they always have really good coupons for online, and who doesn’t like to save a few bucks? 😉
Hope you find one you like! Magnifying lamps make SUCH a difference!
Thank you Liz!
I am going to be going to Joann’s within the next month or so (nearest one is over 39 miles away (no four key) down the hill, so I don’t get there much. Plus, I don’t drive. I will look at them in the store. One of the main concerns was is the base heavy enough, along with the strength of the magnification and it looks like they are. Can you tell me what model your use? The floor lamp one. This big ticket item is going to be purchased in May as I need a lap hoop first. I need both, desperately, but my craft budget will only allow for one of these a month. Once I have those I will invest in more THREAD! I have become addicted to thread! I should have known this would happen as I crochet and I am very addicted to yarn. LOL!
Thank you again Liz, you have been a great help. It’s nice to be able to chat with a fellow crafter. No one I know does any crafts and it just boggles my mind how they can get through life without doing something with their hands just for the fun of it.
;0-)
Christi
It’s the 2-in-1 LED Magnifier Floor and Table Light. My husband said to make sure I tell you about his favorite, which is the hands-free magnifying light that hangs around your neck. (It’s not my favorite because it only magnifies 1.5X, but he loooooves it. It runs around $25.00) We also have the 3-in-1 Craft Floor Lamp, which also converts for tabletop use, but that one costs over $200, and since I use the 2-in-1 almost all of the time, I think it’s a better value.
Do you have a smart phone? If you sign up for the JoAnn’s e-mail newsletter, you get coupons online and can just bring them up on your phone when you’re at the store. They’ll scan the barcode for the coupon. Also, if you’re purchasing several items that qualify for the two to four coupons that come in the emails, JoAnn’s will stack them so you can use ALL of the coupons in one trip! Huzzah!
Anyway, I hope you find one you like!
Hi Liz!
I found the Ottlites at Joann’s and of course they have them on sale for 50% off until the end of the month but I will keep my eyes out for a 50% off coupon. I get the JoAnn’s weekly add in the mail. I don’t use a cell phone as I don’t like the expectation that I am available day and night and since cell phones came to be, people just don’t like leaving voice mails so they keep calling and calling until I pick up. So, no phone for me! Plus, I don’t like talking on the phone anyways, so I use that money on my hobbies. ;0-)
I don’t know if I will go with the 2 in 1 or the 3 in 1. I go to the doctor’s once a month and my appointment is in the middle of next month, so I will stop at JoAnn’s and have a look-see and see which one I like best.
I really appreciate your input, you always have such great comments here on needle-n-thread, so I was glad you responded to my initial post. Tell your hubby that I might just splurge and get the one that hangs around your neck, too. I go to the doctor’s a lot and I am starting physical therapy next month, so it would be perfect for when I go to the drs. office so I can embroider while I wait.
Have a great day and I will let you know which one I went with. ;0-)
Christi
My big dork of a husband just informed me that “he wins” because you might buy “his light.”
What a dweeb.
😉
(Totally understand why you don’t want to carry a cellphone. It does get a bit invasive, doesn’t it?)
Sign up for the JoAnn’s email newsletter so you can print off those coupons!!
Okay, I’ll stop pestering you. Anything to keep the stitching going, right? Lol.
HA HA HA HA HA You really gave me a chuckle!
I am actually going to be going with the 2 in 1 as the magnification is the same as the 3 in 1, except for the inset magnification is a 5x in the 3 in 1 as the 2 in 1 has a four x inset.
Plus, the 2 in 1 has the LED lights and I like that. It also has the light and magnification together instead of them being separate. I really don’t see a need for the clamp on that the 3 in 1 has, I just want a floor lamp that can convert to a table lamp for when I am making quilts, pot holders, bags, mug rugs etc. not to mention I like to sew my own sun dresses and skirts. It will be nice to actually SEE the thread/stitches when I have to pick them out. Or, maybe with using the lamp near my sewing machine, I won’t have to be a picker anymore, well, maybe not as much! ha ha ha.
Just curious, what is the strength of your reading glasses? For just reading I use 2.75 but with embroidering I went up to the 3.25. I am just wondering if we have close enough vision that the four x magnification will help or if it really needed? I want to do split stitches for needle painting, not to mention threading a size 10 needle!
I really have enjoyed chatting with you. If you like, I give Mary permission to give you my email address. I don’t have anyone who does any sort of crafting and it would be nice to make a friend. Plus, I would love to hear about the crafts/hobbies you and your hubby create! This way we don’t clog up the comment section on Mary’s blog…;0-)
And shhhhh don’t tell your hubby that the hands free will only be purchased AFTER I get the 2 in 1, so actually YOU won, but it’s fun to let him think he’s won. I picture a faceless man doing a jig while singing “I won, I won, by golly gee-wiz I won!!!”
Again, thank you liz for all your helpful advice and recommendations. I was truly lost and I thank you for taking the time to help me out. Oh, and I had failed to mention that I DID sign up for the JoAnn’s email coupons! I love JoAnn’s, except, living in a remote area and don’t have the mail delivered to my home but to a PO Box, half my orders only arrive and the other half goes back to JoAnn’s and/or the manufacture. Instead of buying enough to receive free shipping, I will now use the digital coupons to save 50% off and just pay for the bloody shipping. I can break up my orders for those that do come to a PO Box separate from the ones that will not be shipped to the PO Box and via UPS instead. Even then it’s tricky! But, I love living in the middle of a national forest, so I guess that’s about the only downside of living here.
Have a great day!
;0-)
Christi
Lol, yes, we’ll let him think he “won.”
I use 2.75 reading glasses, Husband wears 3.25, so either way, I think you’re good. And yes, the lamps definitely help with thread painting…and stitching on those itty bitty seed beads.
I don’t mind if Mary gives me your email address or if she gives you mine. Totally fine with me.
Enjoy your new lamps!
Olá.
Amo seus tutoriais e seus vídeos. São todos muito bem detalhados e curtos.
Estou aprendendo vários pontos novos aqui. Obrigada pelo cuidado e carinho nas postagens. Santa Luzia, Minas Gerais, Brasil.
This has to be one of my favorite postings. In the top five. So glad to find it.
I’m confused a little about splitting one strand for split stitch. Typical I use 2strands, maybe 3, learning thread painting with 1 single strand,… Seems all I see are videos using all 6 strands, DMC cotton. What is least# strands needed for split stitch? Also has metallic and neon threads, no more one long strand folded make 2. If I use 2 strands, isn’t it then chain stitch?
When you use two strands and split between them, it ends up looking more like chain stitch stitched with one strand.
The whole point of split stitch is to split the stitch. If you’re using various numbers of strands, you don’t normally end up splitting. You end up passing between the strands.
Thanks for a great article! Currently working on vintage Jiffy crewel kits from the 7os and many of them use this same stitch — except in some kits it’s known as Pueblo stitch. I’m working on a series in which the bulk of the design is filled with Split stitch. And the tree trunks are in black!! Sometime difficult to see even with good lighting. Wish I could send you a pix. Anyway, thanks again for this info.