


After a long weekend of stitching off and on, my voided floral-themed A monogram is just about finished!
Let me warn you right now – this type of embroidery is addicting. Once you get into a piece like this, it’s a bit like getting hooked into a Really Good Book. It’s hard to put down!
For those of you just joining in, you can see the beginnings of this project here. That’s where you’ll find information on fabric, on transfer method, and on most of the stitches used up to that point.
Today, we’ll chat a little bit more about the stitches I’ve used, and a bit about the approach I use to filling the whole background up.
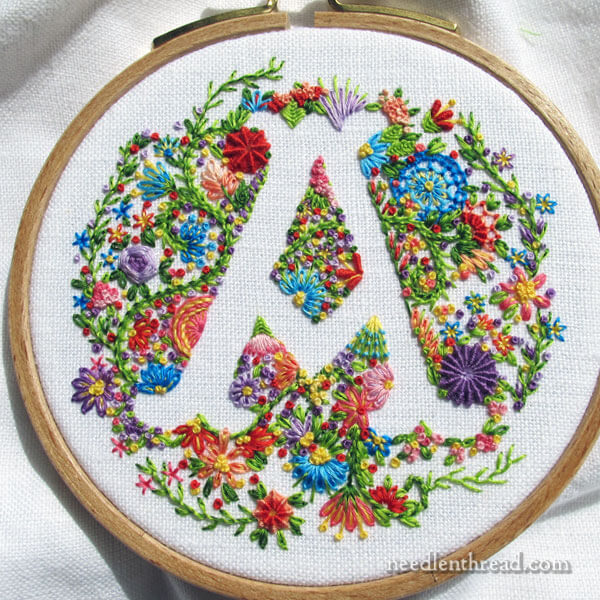
After embroidering on this piece off and on during the week, this is where things stood by Sunday. Compared to last week’s photos, it looks like a lot of progress. In fact, you might almost be tempted to say it would be a good place to stop.
After all, there is such a thing as going overboard, right?!
Squint to Balance Things Out!
But if you squint at the photo above, you’ll understand why I didn’t consider it finished.
Never underestimate the power of squinting when you’re examining a project!
With a good squint, you’ll see that the right side of the piece is a lot “lighter” in filling than the left side. You’ll see that the base lacks the same concentration of stitching. And you’ll probably notice that the top of the A is a little lost – it doesn’t stand out as well as it should, because there’s not as much stitching over the top of the A.
Part of the reason for the lack of stitching at the top is the way the letter fits in the hoop.
Remember, this is a 2.5″ tall letter, inside a 4″ hoop. It doesn’t leave a whole lot of room around the letter, before the hoop begins to interfere with stitching.
If you want to remedy this in your own version, it’s easily done: just use a larger hoop! If you decide to fill the hoop completely with stitching, this will definitely increase your stitching time, the amount of thread you use, and – of course – your stitching pleasure!
But you could also situate your letter in the middle of a circle (or a square, or whatever shape you want!) and transfer that outline to the front of your fabric as well (using the transfer method we talked about in last week’s article on this project).
With the whole thing mounted in a larger hoop with a defined outline, you have more control over how much stitching will fit around the extremities of the letter.
All that being said, there’s still room there to fill in with more stitching – all around the letter, actually – so I kept on going!
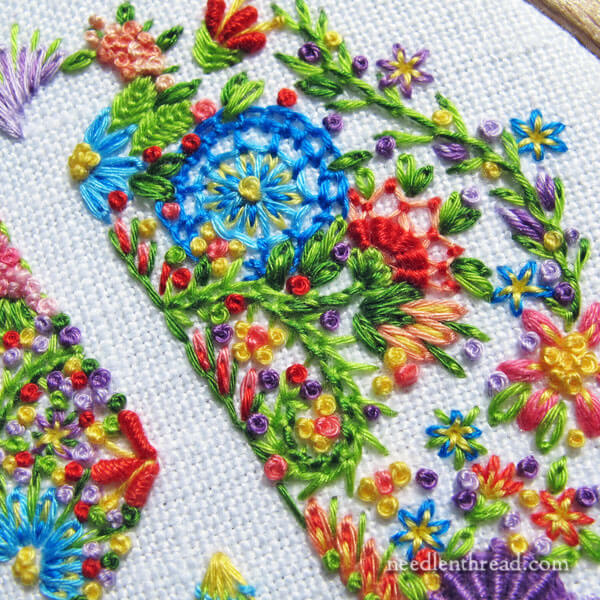
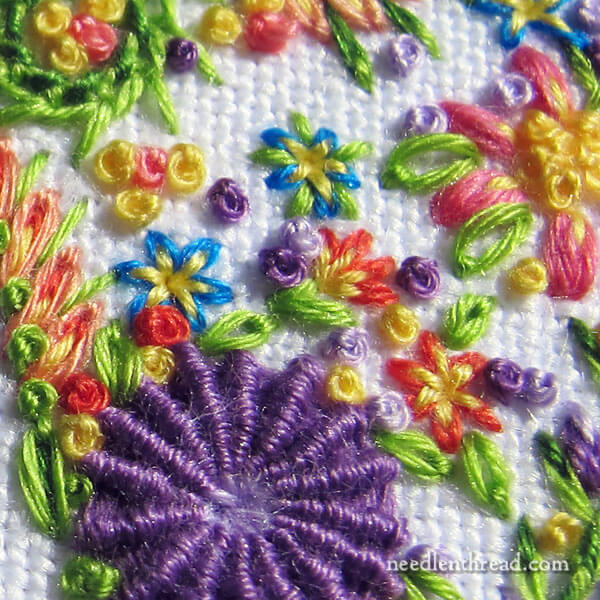
Here’s a bit of a close up on the right side of the letter.
The stitches predominantly used here are daisy stitch (detached chain), French knots, and straight stitch. It can’t get much easier!
In addition to those, I’ve used buttonhole wheels (for the blue wheel), a daisy stitch and ribbed spider web combo (the red and coral flower just to the lower right of the blue wheel), granitos (the larger bright pink flower on the lower right), and a few bullion knots (the small three-petaled red flower at the top of the photo).
For greenery, I’ve used feather stitch (the vine on the far right of the photo), a whipped wheatear stitch (the heavy spiked vine in the middle of the photo), some fly stitch (down the right edge of the letter, in dark green), and some fly stitch leaves.
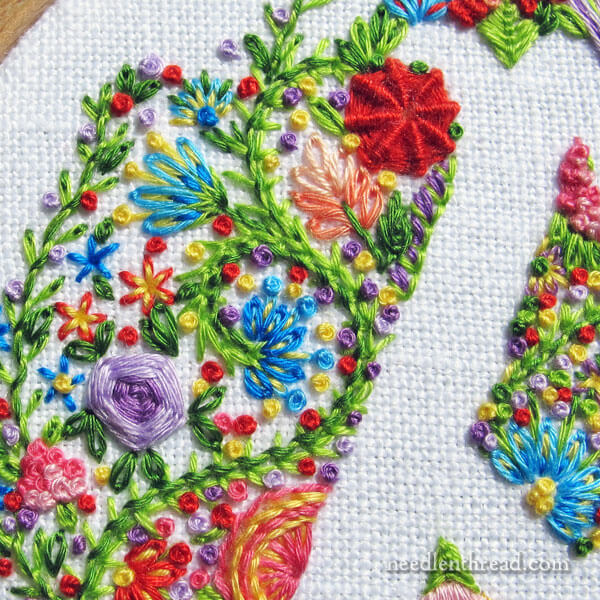
And here’s the left side of the letter. (Don’t forget, you can click on the photos for larger versions!)
On this side of the letter, aside from detached chain, French knots, straight stitches and split stitches, you’ll find a woven wheel (in two tones of purple), a ribbed spider web circle (the large red circle at the top of the photo), and a buttonhole wheel, in pink, with some layers whipped over in yellow (at the center base of the photo). The vines are the same as the ones on the right side of the letter, mentioned above.
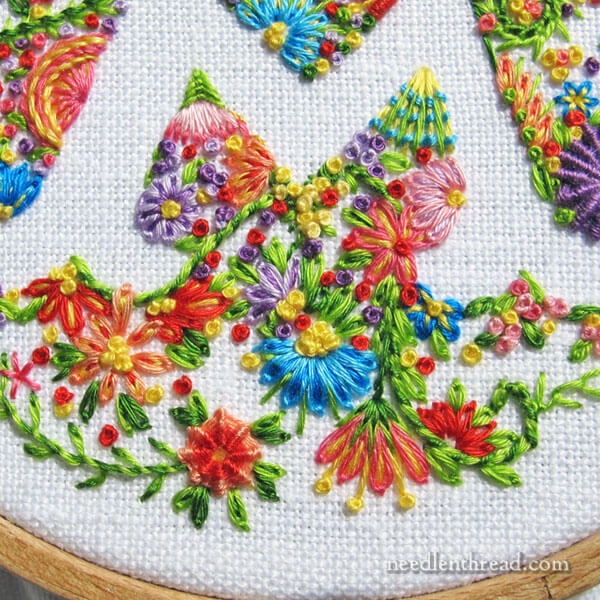
At the base of the letter, it’s more of the same!
Configuring the shapes of the floral elements adds variety, as does filling daisy stitches with straight stitches in contrasting colors. You can even split those straight stitches with yet another color, to add a little variety.
And then there’s the whole question of filling in spaces, so that you get a nicely covered ground.
With this particularly monogram, I’m shooting for a really well-filled ground. So in the photo above, there’s still a lot of white space that I want to cover.
Besides using daisy stitch for scattered green leaves everywhere all over this piece, and French knots for a bit of color and texture, the little flowers in the photo above are really great for filling spaces.
These are just tiny flowers made up of straight stitches, worked into a center point. With some of them, I’ve split the straight stitches with yellow, to add an extra layer of color.
These tiny flowers are no more than a quarter of an inch in diameter. Each little straight stitch is about 1/8″ long, or, in some cases, smaller, depending on where I need to fit the flower.
These little flowers make a terrific filling between larger flowers, and they help add a little variety to the French knots that be-speckle the whole piece.
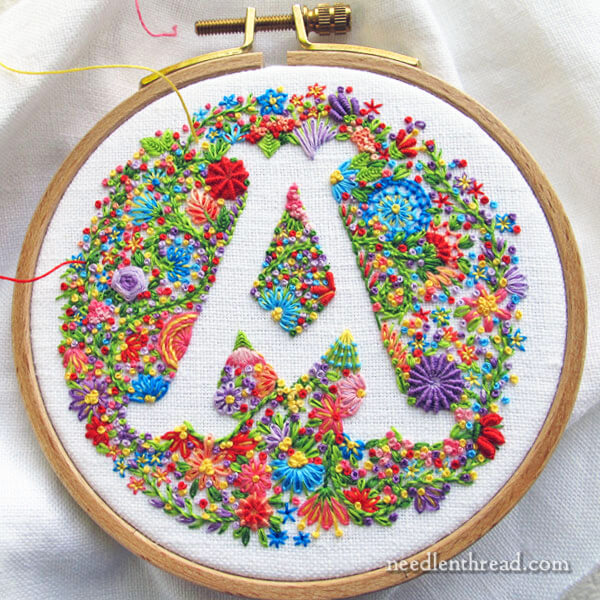
Aha. Here you go! Things are filling up!
In a sense, it’s almost just a … beautiful mess?
There’s still some work to do at the base of the letter, on the right side and up to the top, and then just around the edges all around, where the hoop pretty defines the edge.
If you like the idea of completely free-form stitching – doing whatever you want, wherever you want – you may very well enjoy working one of these voided monograms! They’re a lot of fun!
And they’re very forgiving projects, too. If you make a mistake (and I’ve made plenty in that mess above), no one will ever find it… including yourself when you go back to look for it.
Resources
You can find the alphabet used for this letter here, in Favorite Monograms. There are several other alphabets in that book that would work well for voided letters like this – the Modern Roman alphabet, the Open Script alphabet, and the Shadow Work alphabet.
If you like the idea of the floral theme, but you don’t want to work a voided monogram like this (which takes a lot of time), you might enjoy Stitch Sampler Alphabet. The monograms in this series work up pretty quickly and still give you the pleasure of working with many types of stitches in one small project.
The Voided Approach
Remember, the voided approach isn’t just for monograms! Anything that will work up in a clear silhouette would be fantastic for voided embroidery like this!
I hope you try it!
Nest time we visit the piece, I’ll show you it completely stitched and we’ll chat about what you can do with it when it’s finished.
Wow, Mary, that is spectacular! Now I’m quite tempted! And I was just telling myself to keep my head down and finish all these other things…
WOW! This is gorgeous. I am feeling very inspired right now.
Mary, this is so beautiful and inspiring! I love it!
Dear Mary
What a wonderful, beautiful voided monogram completely full of vibrant colours I love the colour scheme the stitches and the thread colours it really reminds me of a cottage garden approach and the A really is vibrant with all the other colours and different stitches beside it. I love it. The stitches you have chosen are so easy to use and they blend in so well together that I can imagine it is addictive as you show above. Thanks so much for sharing this lovely way of embroidering a monogram and sharing the stitch and thread combination with us, delightful.
Regards Anita Simmance
Very pretty!
That is just gorgeous! Would love to know the colors you used. Are the flosses floche?
Yes, it’s all floche, and I just choose random bright colors that I like as I stitch, and then try to balance them across the whole area.
Mary,
As you know, I am already addicted to free style embroidery. It is like flying on the tail of a kite letting the wind and your imagination take you to,,,,, wherever you land up. ‘A’ is lovely. Bright, eye catching and full of interesting morsels of creative stitching. Hope that you had a fun time doing this. Also hope that your health is now as you wish it to be.
All the best,
Ann B.
Fabulous!!
That is gorgeous. What a way to use negative space.
Hi Mary,
Love it!!!!!! What a fun project for some truly relaxing stitching. You always inspire me to try something new. Thank you.
Wow! It’s a burst of happiness!
I saw a small scissor case several years ago that was completely encrusted with white embroidery and beads. I’ve always wanted to try to replicate that look, but have never known how or where to start. Freeform is not my style, but I really love the look. You’ve given me lots of great ideas! Thanks, so much. Your blog is such a wonderful resource.
Absolutely gorgeous! It will be even more spectacular when it is finished. Thanks for sharing.
Wow! That letter is getting so cheerful and busy. The fun you are having with it is visible in the stitching.
The opposite of this style would be pretty, too: a letter without an outline, filled in with busy, colourful, floral stitching like the background of the voided one, with bits of the pattern cut off where they reach the edge. As if you were looking through a cut-out onto a flower-filled fabric…
That’s the trouble with embroidery – one idea leads straight to another one!
You read my mind, Sue!
Thank you Mary for yet another inspiration, another “I’ve got to try that”! You and your blog have been a blessing to me. The inspirations, the links, the tutorials have opened a passion. With needlework I will never be bored or worried about what to do. God bless you.
It’s absolutely beautiful.
mry, I love the way the monogram is turning out. Generally when I think of the word “voided” I think of something having been done wrong and then crossed out. Your monogram has given me an entirely new meaning of the word.
LOVE this! Absolutely gorgeous!
Gorgeous! Stunning! Very beautiful work, Mary!
Gorgeous! Looking forward to next time, and wondering about using this on a CQ block or if it will be too heavy. Just finished another of your monograms on a CQ block and it turned out very well. Probably not as well as yours but I was a happy camper. Thank you.
Hi, Phyllis – I think it would work great on a CQ square! Most CQ squares are pretty heavily embellished anyway, and this one isn’t “heavy” although it’s pretty densely stitched. Yep – I think it would work!
What is a CQ?
Hi, Louise – Phyllis is talking about a Crazy Quilt or crazy quilting. Hope that helps!
A new twist on Assisi Embroidery! What a LOT of fun!!
This is absolutely gorgeous! I cannot wait to try it!
Mary,
It is just beautiful. Just beautiful. What an inspiration to all. Where are my needles, my new hoop and Irish linen? I need to get started.
Peggy
Beautiful embroidery. I love the bright colors you use.
C’est magnifique, Mary!
Sorry, I had to say it in my own language.
Your creativity is amazing.
Your brighten up even the darkest days and help me maintain the flame to go on doing embroidery. Thanks a lot for your emails.
I hope you will soon get back to good health.
Louise
So beautiful!
I can imagine the voided approach would work wonderfully for a silhouette portrait.
Hi, Nora – yes, I think it would work great! I was thinking of those profile view silhouettes of children – it would be adorable!
Oh Mary, it’s just beautiful! Beautiful variety and colors! I am adding it to my ‘I want to do this’ list. Thank you for your site, I love it. I’ve learned so many things.
Hi Mary, This is turning out so beautifully! How about adding some bullion knot roses in you voids? Can’t wait to see it finished!
Hi MAry! This monogram is just looking so beautiful! I can’t tell you how much I enjoy your blog and so happy that you are willing to share your skill and passion with the world! I so appreciate your skill in writing teaching and stitching!
I hope treatment is going well, I pray for you!
Hugs,
Ginny M
Mary,
This is just so very Awesome! I love flowers fo much, thank you for doing this for us. I can not wait to do my own. I am excited to see what you will do with it.
How are you doing Mary? I Pray for you all the time.
Hugs,
Terry
It’s beautiful;and so inspiring!
It’s wonderful Mary! Looks like a lot of fun.
Beautiful – YES! Mess – I know what you are getting at, but surely there must be a better word 🙂
I especially like the partial flowers peeking out from behind the letter.
Wow, that is STUNNING. I’m so jealous of A, LOL. There is no “mess” involved, but maybe just a riot of color and beauty.
Like Monica, I need to keep my head down and finish some things before I start this.
How about a voided cat/dog silhouette?
Hi, Robin – yep, a dog, a cat, a bunny – any kind of silhouette will work!
LOVE, LOVE, LOVE!!! Not only do I like all the different kinds of stitches, but I am always attracted by varied colored projects. I can’t wait to try this on my own.
Mary, Eye-popping! I feel like I’m looking at a wondrous wildflower garden. What you can see around that voided space is breathtaking. Thank you for showing your stages, and why you kept going. Absolutely love it!
Mary, “A” is for awesome. This voided monogram is perfect to coordinate with many Liberty of London florals. I have three granddaughters and have been looking for a unique way to personalize items in a traditional, yet modern way. Thank you so much!
It is stunning! Just jumps out at you! I am so inspired!
Awesome and so inspiring! I have been gathering ideas for a project for freeform embroidery. This would look great with a butterfly silhouette too. Thank you so much for sharing.
Mary,absolutely beautiful. So inspiring. Thanks for sharing.
Beautiful as always Mary. I just wanted to say that I hate when people ask to see, or turn over to the back of my needlepoint. I equate it to someone wanting to peek under my skirt. The dress may be gorgeous, but my underwear is a little ragged! 🙂 You are the best!
Dear Mary – I have just recently discovered your blog/website and I want to THANK YOU sooo much for your inspiration and all the knowledge you share! It is wonderful to see such beautiful work and to know that it is all done by Human Hands! I can’t believe
how wonderful the colours, the skill with thread and stitching look amazing! I shall continue to look at your blogs with much admiration. Thanks again!
With the Floche, how many strands are you using in the various stitches. Are you mixing types of threads or using Floche only. Absolutely beautiful work! I am setting up a voided four leaf clover
Hi, Beth – floche is a non-stranded, meaning it doesn’t divide into smaller threads. Normally, you use on strand of floche at a time, which is what I’m doing here, and it’s all floche.
Fantastic
This is beautiful. I have done all forms of needle art, but nothing as beautiful as this piece
En français s v pl
Je ne comprends pas l’anglais.
What a beautiful piece of art. I’m just learning how to embroider. I hope I get to be as good as you are.
Hello Mary… having stitched for many many years (now aged 70), have just found your wonderful site… so full of inspirational ideas. I am in love with your technique/s. I wanted to make a special embroidery for my sister who I am visiting next year in the UK (she is 82). I found your monogrammed A and think it will be perfect. Thankyou so very much for your wonderful site and sharing your ideas.
Jan x