


Today, I want to show you a really simple approach to embroidering a pretty, classic monogram. Nothing overly fancy, and nothing difficult to stitch!
I’m going to share with you exactly what I did on this monogram, including everything I did wrong and the solutions.
This way, you can learn from my mistakes. The overall concept here is very simple and it makes for a nice, neat monogram that anyone – including beginners – can stitch up in just a matter of hours.
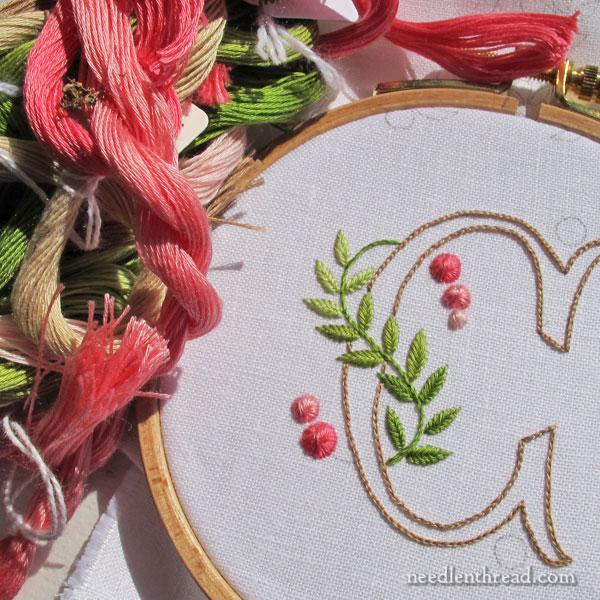
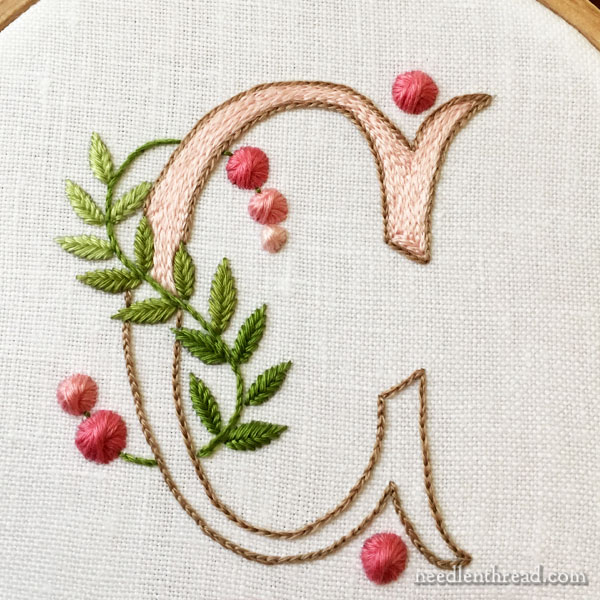
For this monogram, I used the “C” from the dots & leaves alphabet in Favorite Monograms.
The ground fabric is Alba Maxima embroidery linen, and I used cotton floche for the embroidery thread.
I used a #7 crewel needle for all the stitching.
If you don’t have floche, you can substitute two strands of embroidery floss (from the six in stranded cotton floss).
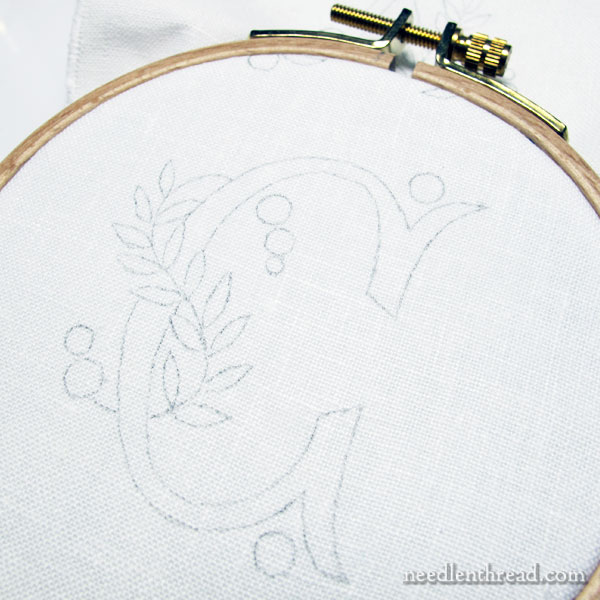
The first step: I traced the monogram design onto the linen using a light box (I have this light box and I love it!) and a pencil. My linen was ironed and starched lightly with spray starch – if you want to know why, read this article.
Then, I set up fabric in a 4″ embroidery hoop, with the inner ring bound.
I bind the inner ring of all my wooden embroidery hoops, because it helps maintain an amazing and perfect tension on the fabric and it helps protect the fabric. You can read about how to bind your embroidery hoops here. I’ll be writing a little more about that in the near future, too.
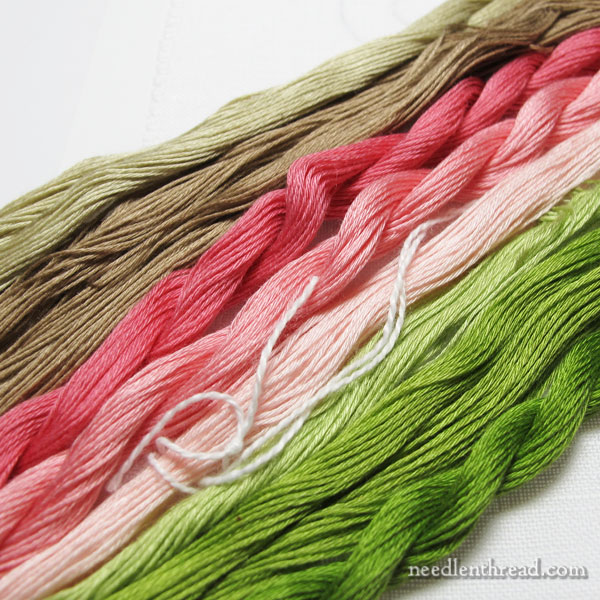
I selected three colors families and multiple shades in those families for the embroidery: three shades of green, three shades of pink, and two shades of a sort of natural / taupe-ish color. In fact, I ended up ditching the light natural color (on the end in the photo above), because it just didn’t work, and I didn’t really need it.
In the order of stitching, I started with the leafy vine.
This was a mistake in the long-run. If I had stuck with my original plan, which was just to outline the letter, it would’ve been ok, but you’ll see what happens later, when I decided to fill the letter.
We’ll talk more about that below.
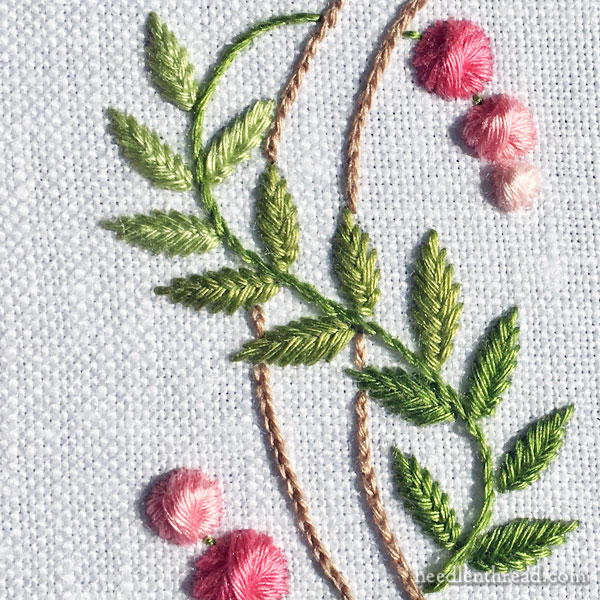
The leaves are worked in fishbone stitch, from the lightest shade of green at the top to the darkest shade at the base.
The vine between the leaves is worked in stem stitch in the darkest shade of green.
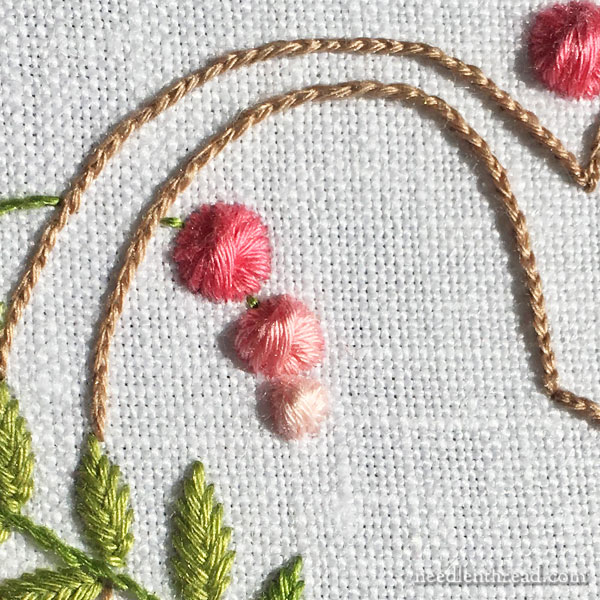
Next, using the three shades of pink, I embroidered the little dots or buds using Rhodes stitch in a circle. I explain this technique in this Stitch Fun! article on embroidering holly berries.
For those who are intimidated by stitching a perfect satin stitch dot, you might find this round Rhodes stitch much easier. However, if you want to go with padded satin stitch dots, you’ll find a tutorial for stitching perfect satin stitch dots here.
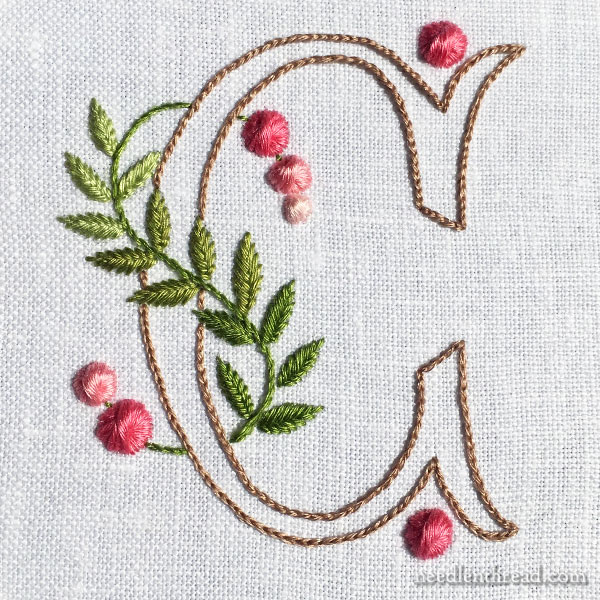
Then I stitched the outline of the letter using split stitch.
If you’re using floche, split stitch is a great option for nice lines. It stitches up beautifully with floche!
If you’re using stranded cotton embroidery floss, though (with two strands in the needle), I’d suggest using stem stitch for the letter outline instead of split stitch. Embroidery floss doesn’t make as nice a split stitch.
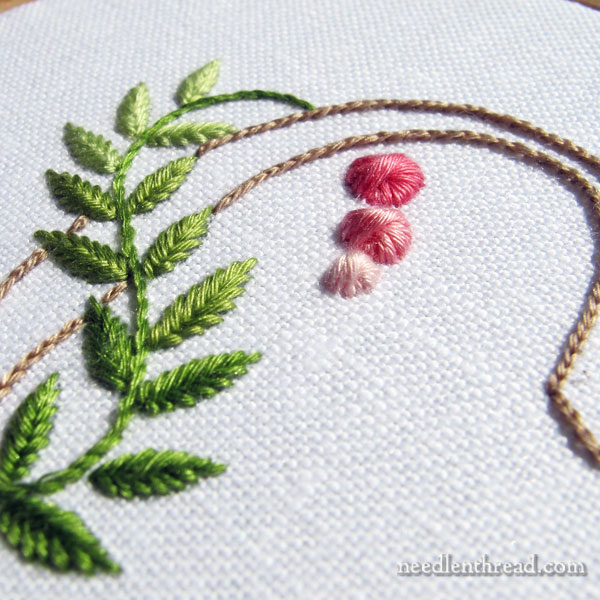
Here, you can see the height of the Rhodes stitch dots and you can also get a sense of the nice line that floche creates with split stitch.
Troubleshooting Problem Areas
Now we can discuss the problems and seek the solutions to them. (I love dissecting my mistakes!)
Remember, you can click on the photos for larger versions.
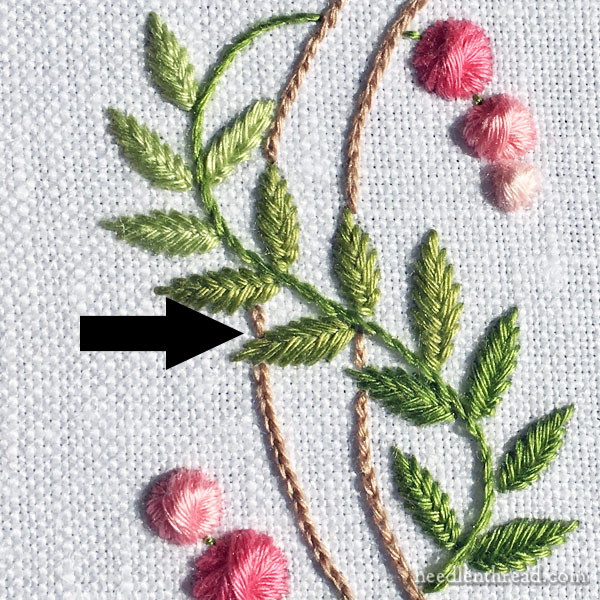
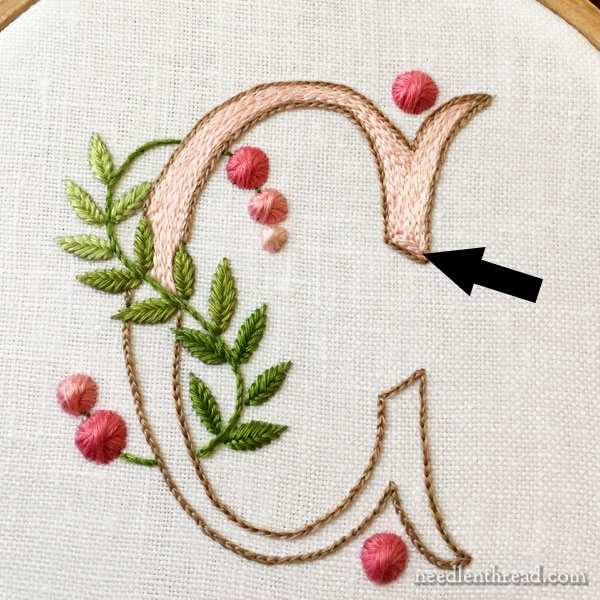
First of all, this line jiggle. When I stitched that tiny section of split stitch between the leaves there, my line was off. It seems like no big deal – that it wouldn’t be noticeable – but it really is noticeable. It gives the letter a big of a jiggle right in the middle.
The lesson: take special care when you transfer your design, or at least pay attention when you’re stitching, so that you can correct any discrepancies in your transfer!
After I finished the monogram the way I intended it, with just an outline, I decided to go ahead and fill the letter with split stitch, too, to show you how you can create a nice filled monogram with the same simple stitches.
Above, you can see the first half of the filling, which is worked in split stitch in the lightest pink.
But there are some things I should have done differently!
For one thing, as I filled, I followed the shape of the inside of the letter, all the way around. If you click on the photo above, you’ll get a better idea of the place where the arrow is pointing.
I should have brought those split stitch lines straight down to the outline, and not taken them across that short line at the base of the design there.
Turning the tight corners and changing the direction of the stitching lines really made that area stand out and look messy. If I had just split stitched from the top of the design area and straight into the dark outline without turning corners, it would look much better.
You’ll see this below, on the lower half of the letter.
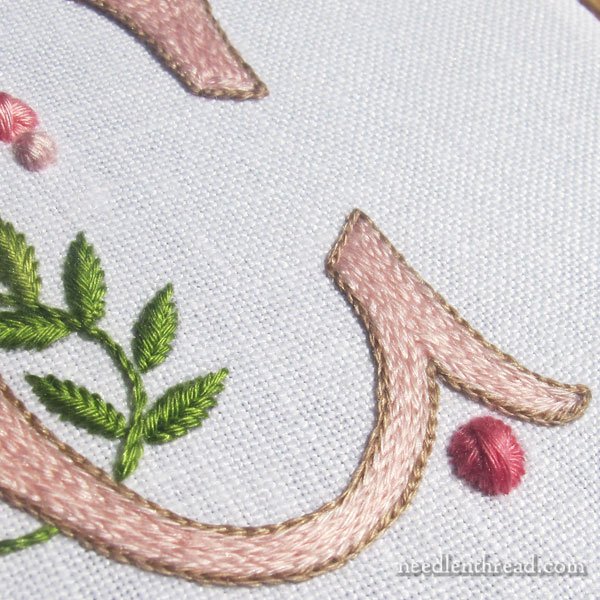
On the lower half of the letter, I took the split stitch filling straight into the short, straight design line in the photo above, and it looked much better than creating little corners inside that small space.
Now, onto an area that looks decidedly worse!
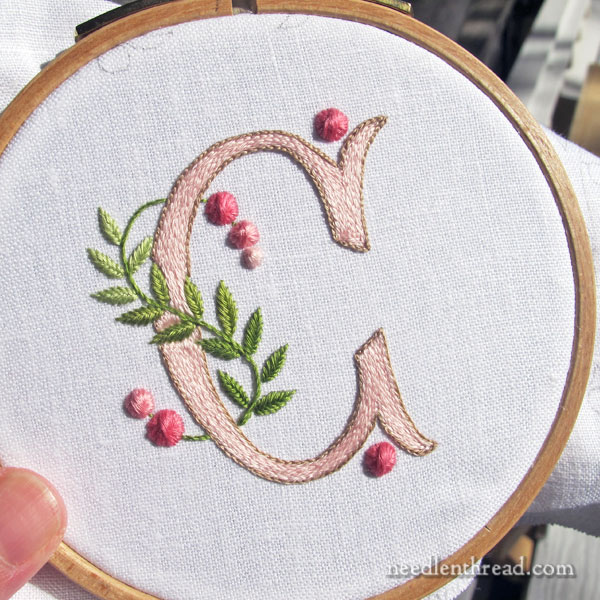
Here’s the whole letter, filled.
Notice the warbles and wobbles in the filled letter around the leaves and vines area.
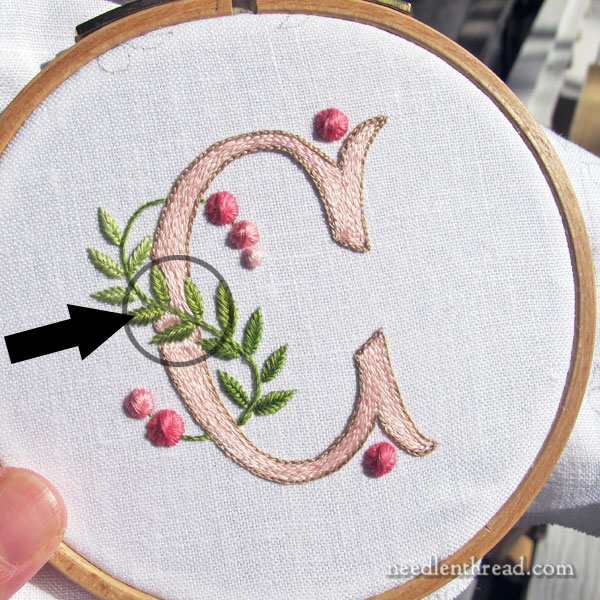
That’s the area circled above.
If you decide to fill the letter, stitch the filled letter first and then stitch the decorative elements that cross over the letter. This will help eliminate that warbly, wobbly look when you have to start and stop stitches in the tight areas between the leaves and vines.
As you fill the letter, you can cover the design line for the vine, but leave the leaf areas blank to fill in with fishbone stitch.
When it comes to stitching the vine line once the letter is filled, you can eyeball that as it crosses the letter, and just stitch right over your split stitching or stem stitch filling.
When it comes to the leaves, because you’re stitching them after the background letter is finished, they will appear to sit on top of the letter and they won’t cause the stitches in the background to look crowded.
In a Nutshell
1. Trace your monogram design.
2. Mount your fabric in a hoop.
3. Select your colors and thread.
4. Decide if you are going to fill the letter or not.
5. If not, go ahead and stitch the decorative elements first, because they’re so much fun!
6. If so, stitch the letter first and then the decorative elements.
Resources
If you’re looking for Alba Maxima linen, check Needle in a Haystack. For floche, you’ll find it through Lacis or through Vaune.com.
Favorite Monograms – PDF Collection
This alphabet – plus many more! – is available gathered in one easy-to-download PDF in Favorite Monograms, a collection of 16 monogram alphabets perfect for hand embroidery and other crafts.
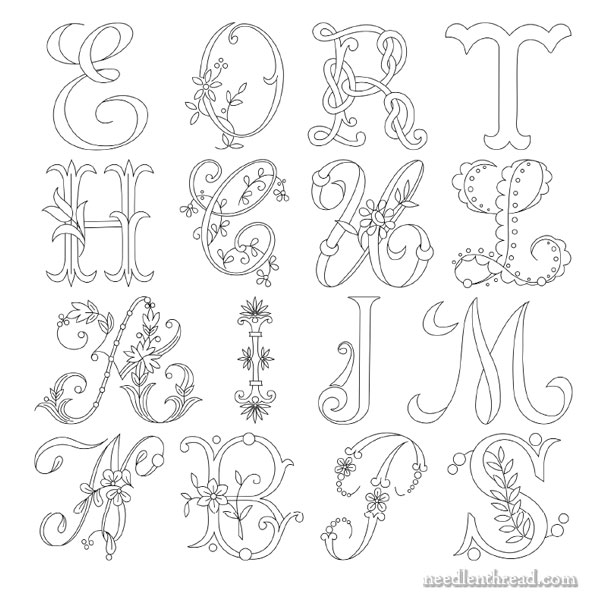
In the photo above, you can see samples of each alphabet available in Favorite Monograms.
Each letter in each alphabet in Favorite Monograms has been carefully traced into a clean line drawing that can be easily enlarged or reduced on a home printer or a photocopier. If printed straight from the PDF, the letters print at 2.5″ high, when choosing “no scaling” or “100%” in your printer settings.
The 16-alphabet collection is delivered as via a download link to your inbox shortly after purchase, so that you can begin creating right away! Priced at less than $1.00 per complete alphabet, monogram lovers can’t go wrong with this collection!
Favorite Monograms is available in my shop, here.
Give it a Try!
If you’ve been thinking about stitching a monogram but you don’t know where to start, I hope you give this approach a try! It’s simple, relaxing, and fun stitching.
Next time we visit monograms, I’ll show you a slightly more complex approach (but definitely an easy and manageable one!) to a classic embroidered monogram.
Hi Mary,
This is so lovely. I am an avid cross stitcher, but am trying to branch out to other types embroidery and would love to do this project.
Here is the question….you say embroidery linen. Is that the same as cross stitch linen? (Of which I have no short supply). And if so, is there a particular count that is better suited to this type of embroidery?
Thanking you in advance, or thanking anyone else who would like to share their opinion.
Hi, Mary Margaret – embroidery linen is not quite the same as counted cross stitch linen, although sometimes, you can use very high count counted linen for surface embroidery. But most counted cross stitch fabric doesn’t work as well for this kind of surface embroidery, because with surface embroidery, you’re not stitching on a grid. Counted fabric generally has a very clearly defined grid to it, with definite holes on each corner of the weave.
If you’re doing surface embroidery on it, those holes often end up dictating where you place a stitch, which will make your surface stitches and lines look a lot less smooth. This is one reason why we use a crewel needle with a sharp tip in surface embroidery – you pierce the fabric threads wherever you need a stitch to start or end, instead of stitching in the holes that naturally occur with a weave.
With surface embroidery, the fabric is closely woven and smooth, without that definite grid. That being said, Alba Maxima is about 50 threads to the inch, and it could be used for very fine counted work, but it isn’t an even weave, so you might get a little distortion.
In any case, if you have any high count linens that have a close weave, you can still use it for surface embroidery. You’ll probably need to back it with muslin, to ensure that your needle and thread have something to really grip into when taking a stitch. Backing the ground fabric will help you avoid falling into the “stitch in the hole” method of counted work. It’ll support the close stitches and the smooth lines of surface work better.
G’day Mary,
This is so very appealing. Love it. And your explanations are detailed but not fussy. In other words, just exactly right!
Thank you. Cheers, Kath
Thanks, Kath! You’re a dear! 🙂
Dear Mary
What a beautiful C monogram you have embroidered and I do like the Rhodes stitch it really looks different and lovely, I will definitely include this stitch in future embroidery projects. I wouldn’t have noticed the mistake unless you had pointed it out, but you are right that filling in first is the better option, as you say you can then stitch the vine leaf which would lay on top of the monogram. But I still think you have done a beautiful job of the monogram. Thanks for sharing with us your C monogram and for your tips and techniques on how to fill a letter and how to apply decorative stitches.
Regards Anita Simmance
Glad you like it, Anita!
You are too critical of yourself. I think this is beautiful, and I love the colors you selected.
Hi, Jeannie – thanks for your note! I’m not really super OCD about my embroidery. It’s just that the little foibles here and there serve as good instructional material, to help other people avoid the same problems or just to help them improve their stitching, too. I’m glad you like the colors – it’s one of my favorite color schemes, and I find it hard to stray from it!
Mary, if we don’t have the flouche for the split stitches can we use a small chain stitch instead?
Hi, PJ – if you don’t have floche, I’d suggest a stem stitch. Still, you can use chain stitch, but with two strands of floss in the needle at once, the line of chain stitches will be much heavier.
Mary, I clicked on “light box ” and was happy to read your article about the flat light box. Several weeks back I was looking boxes up on the Internet, wish I had seen your article back then. Anyway. Went with the US ART SUPPLY- Lightmaster 17×24. It’s going to be a b’d gift so anxiously waiting for it! I was getting so tired of trying to move my pattern around to be able to trace it on my smaller light box,, taping and re-taping! Was excited to hear how much you love yours! Not that I do real large projects, but I always seem to have a pattern that is slightly larger than my light box. Taping around the edge of the box is not fun!
What do you use to clean your screen?
Windex! 🙂
I have been interested in trying out floche, but I’ve been uncertain of what colors to buy. This looks like a nice project to try it on. Would you please provide the numbers/color names you used?
Hi, Rebecca – Sorry for the slow reply on this one. I had to do some color matching, because not all my skeins were marked. The pinks are 819, 899, and 3326. The taupe color is 841. The greens are 470, 471, and 3348. Hope that helps!
Thank you so much for taking the time to do that!
Me encanta, la voy a bordar en una almohada,
Gracias,
Carmen
Ahh, my favorite letter! I love the colors and the Rhodes stitch, I’ll have to give it a try. I would probably have made bullion roses, as I’m a glutton for punishment. Thanks for all the hints, they are very helpful, especially the one about the split stitch in the top end of the C.
Mary can you recommend a book just for monograms?
I purchased your download and I want to get started. I’m using felted wool and making Christmas ornaments! So, what do you recommend for thread? Wool? Silk? Floche?
Loved your tips. Glad on the personal front that you are getting better!
Hi, Holly – Susan O’Connor’s book, Monograms: The Art of Embroidered Letters is excellent.
Good Morning! I really would like to create the “K” of this Monogram Alphabet but every time I try to print the letter from my downloaded copy of Favorite Monograms, no matter how I change the settings it(my printer/computer) wants to print the entire book. Did the book not download correctly? At a loss. Kathy
Hi, Kathy – your printer should have a setting in the menu for “print current page”. Open the document to the page the letter is on, and go to file, scroll down to print, and the menu box should have a “current page” option. The settings vary from printer to printer, but I’ve never handled the printer that didn’t have the option to print a specific page from a document. It should be there somewhere! Drop me a line if you have further problems with it and I’ll see if I can help you troubleshoot over email.
I love your tutorials. I am deciding on a letter G to embroider and this is perfect encouragement
I’m so glad you showed us this monogram. I’m just so un-inpsired with the black and white outlines, but seeing it in color makes it so beautiful!! Now I’m ready to go try some of the monograms (I got the Monogram set that you made, but was not sure what to start with. Now I know!) Thanks for all of your information and tips> I look forward to your posts!! Hugs, H in Healdsburg
I read your article on monograms with quite a bit of interest. Afterward, I realized stitching monograms is like painting or quilting, you do the background first, then the middle and what you want if the foreground is stitched last. I liked the way you did the berries on the monogram. Thank you for this article.
Hi Mary, you have encouraged me so much to get into embroidery and I am loving it. I am writing you about your bounding of your hoops. I have and really prefer the old metal spring hoops with the cork on the inner ring. Do you think the Twill Tape would work on the cork part of the hoop? The cork has thinned over the years making the hoops not quite as tight. Thanks for the wonderful newsletter. I am learning SO much!!!
Hi, Lynda – I think the binding might interfere with how well the inner hoop closes into the outer hoop. But if the hoop is becoming useless, it might not hurt to experiment with it!