


I have a rule about the back of embroidery – and it’s pretty much the same rule that applies to… well, underwear.
Today, let’s chat about the backside of hand embroidery projects – perspectives and opinions, circumstances that might change your approach, and practical tips!
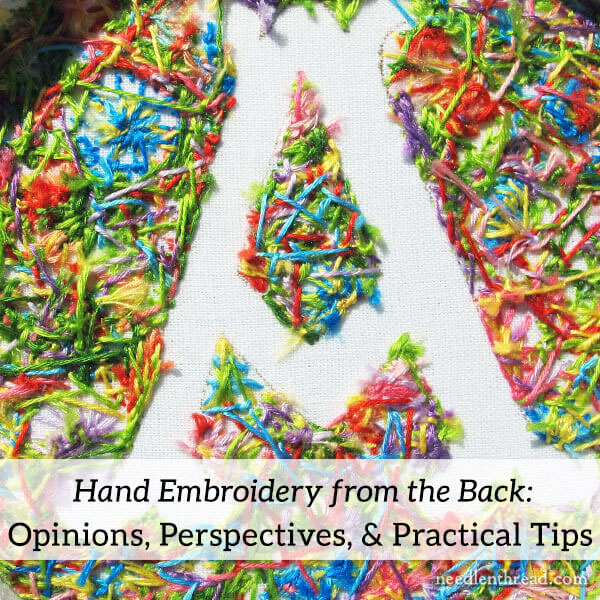
If you’ve been out and about in the needlework world, you’ve probably met stitchers who are obsessed with the back of needlework.
Never use a knot! they tell you.
Never carry your threads! they exclaim.
Check the back every few stitches! they cry.
The back’s a mess! they chide.
Approaches like this can be pretty disheartening, can’t they?
Perspectives & Opinions
Perspectives and opinions on how the back of embroidery should look are numerous and varied.
There are those who believe that the back should always look as good as the front.
There are those who believe that you can never use a knot.
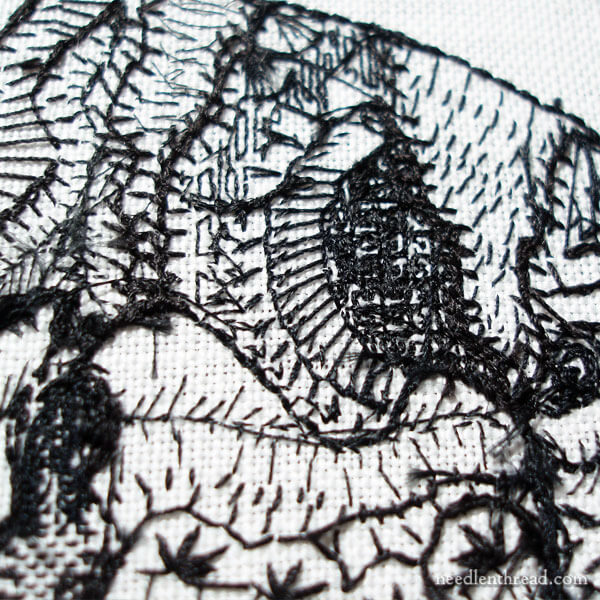
There are those who contend that the neatness of the back of embroidery indicates a good stitcher or an inferior stitcher.
On the other hand, there are those who never give the back of their embroidery a second thought, which can sometimes lead to disappointment in the finish.
A Few Guidelines
When it comes to the back of embroidery, a few guidelines can set you up to achieve a neat back – especially when it’s necessary – and can increase your stitching pleasure considerably by eliminating too much worry over what’s going on on the other side of the hoop.
If the back of the embroidery will be visible in a finished item (think: tablecloth, towel, hankie), you’ll be much more pleased with your finished result if you’ve taken some pains to keep things neat.
Tips for a Visible Back
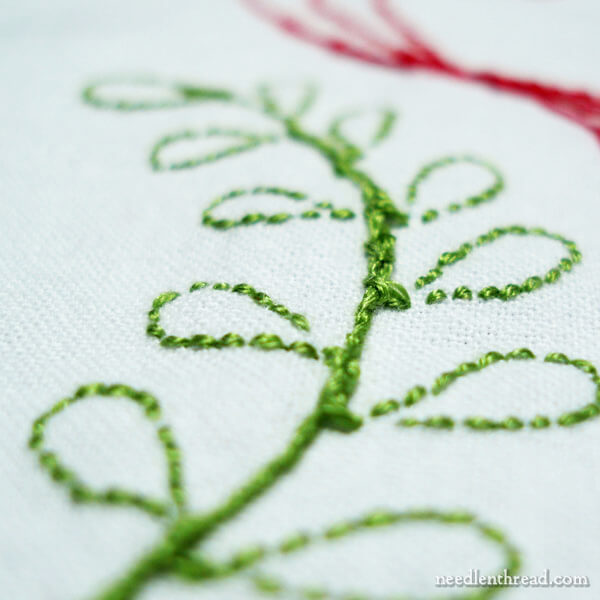
1. Consider using a waste knot and tacking stitches to start lines or filled areas of embroidery. This will eliminate bumpy knots and their subsequent tails on the back of the work.
Here’s a tutorial for using a waste knot and tacking stitches on a line of embroidery. The same principles apply to filling an area of embroidery. And, similarly, tacking stitches can be used to end a thread, by working them in an adjacent area that will be covered with embroidery.
2. Avoid carrying threads to a new starting point across the back of the work in areas where there is no other stitching.
3. If you do need to carry a working thread a short distance, and there are other stitches in the area, whip around the backs of other stitches to travel your thread to a new starting point, instead of carrying a thread any distance with no anchoring. Carried threads can become loose and snag on things, so it’s best (and it looks neater) to secure them by whipping them into adjacent stitches on the back of the work.
Here’s a tutorial on traveling a thread to a new starting point.
4. If you need to work isolated stitches like scattered French knots that are a considerable distance apart, start and end the thread for each isolated stitch.
Here are some tutorials for working isolated stitches like French knots:
Isolated French knots – Part I
Isolated French knots – Part II
4. If you end up with a slip knot on the back of your work that you don’t notice until much later, this tutorial will show you how to remove the slip knot, secure the ends, and neaten the back of the work.
5. To end your threads when there’s nowhere left to work some tiny tacking stitches that will be covered by other embroidery, either run the thread under the backs of your nearby stitches or whip the thread around the backs of nearby stitches. You can even work a little half hitch around the last stitch you whip around or pass under, if you need your thread to be extra secure (for laundering items, for example).
Here’s a tutorial on ending threads.
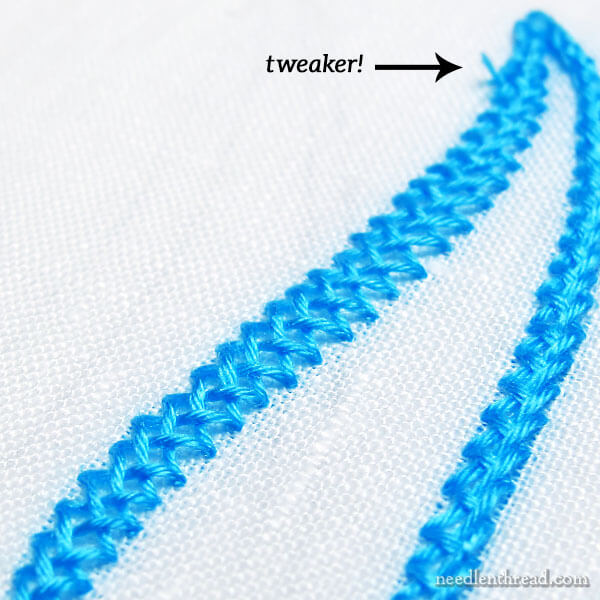
6. Trim the tweakers! When you’re finished with the piece, go over the back carefully and trim any tweakers, or little thread ends that are poking out beyond your embroidered lines and edges.
If the Back is Not Visible…
If the back of the embroidery is not going to be visible in the finished work (think: a framed piece, a pillow cover, a quilt, a finished item of any sort with a backing behind the stitching), then ask yourself:
1. Is your ground fabric transparent to any extent?
2. Is the stitching on the front smooth, flat, and lacking texture, or is it raised, textured, bumpy or heavy?
Here are some tips that will lead to an overall better finished look on the front if you’re working on a lightweight fabric or relying on a very smooth surface on the front:
1. Don’t carry threads from one area of stitching to another, across a blank area (see the points above on visible backs). If carried threads can be seen from the front, the finish will look sloppy.
2. Use the same starting and ending techniques discussed above.
3. Don’t forget to trim tweakers!
If the fabric is moderately heavy in weight and completely opaque, or is backed by another piece of fabric, or if your stitching is heavy with texture, here are some tips that will make your stitching easier, more efficient, less worrisome, and perhaps even more pleasurable:
1. A thread carried a short distance that won’t be seen from the front is no big deal.
2. A knot that isn’t big enough to cause a bulge on the front of your work is no big deal, so yes, you can start your embroidery with a knot, if it’s easier for you!*
3. Tweakers are no big deal.
4. And if you get a slip knot and it’s fairly tight and secure, you can whip over it and leave it, or just leave it. Who’s going to ever see it? If, however, you’re afraid it might loosen over time, you can secure it (see the tutorial linked to above).
*Regarding knots: keep in mind, some threads don’t hold a knot as well as others. Synthetics, silk twists & perles, and some cotton perles can be finicky about holding a knot well. But if you’re using regular cotton floss, spun silk, cotton floche and the like, go for it!
What it Boils Down To
As with any art, craft, or hobby, the last thing you want to do is diminish the pleasure the artist, crafter, or hobbyist takes from the pursuit.
If rules, regulations, and the opinions of others about the way the back of your work should look diminish your pleasure in stitching, ignore them!
If, however, you are anxious about how the back of your embroidery looks, use the easy and practical tips above as common sense guides to improve the neatness of the back of your embroidery without going to obsessive extremes.
And the Underwear?
Asking to see the back of someone’s embroidery is a lot like asking to see someone’s underwear. The whole point of clothes is the outer layer – that’s the part that’s seen and appreciated. Asking to look at what’s underneath the clothes – well, that’s just a little weird and more than a little intrusive!
I’m sure there’s an unwritten rule somewhere, that goes something like this: Never ask to look at someone else’s underwear.
I never have. And I’ve never asked to look at the back of someone’s embroidery.
Don’t sweat over the back of your embroidery! If it needs to look neat, take some simple measures to accomplish that.
If it’s never going to be seen and it doesn’t interfere with what’s seen on the front, then…
…in the scheme of things…
…relative to All the Significant Concerns of Life…
…who really cares?
Questions? Comments? Suggestions?
If you have any easy and practical tips you’d like to share about keeping the back of your embroidery neat, or if you have any questions or comments to add to the conversation, feel free to chime in below!
For the sake of covering all the bases, sometimes, when embroidery is being professionally judged or evaluated, the back is carefully scrutinized. There are also types of embroidery that rely on a perfect back (like two-sided embroidery). This article focuses on stitching for pleasure, not questions of professional training.
thanks for this…I do counted cross-stitch and embroidery – I always weave the thread on the back of my counted cross-stitch and for my embroidery, after I’ve marked the design I put a light-weight fabric on the back that I got from Australia several years ago (forget the name and, of course, never wrote it down!) but I know that Pellon has a similar product – it allows you to cross open areas of the stitchery and not have it show through. I do notice that when you show people who do handwork your stitchery, the first thing they do is turn it over!
When I took up embroidery againnafter decades away I used knots to start a thread. Then I caught a knot as I was stitching and it pulled my woven wheel out of shape. Now avoiding knots is the one rule I follow. The rest is a glorious mess!
When I first started doing embroidery I was told to NEVER use knots and instead burying it in the the layers. But that only works on quilts. So I taught myself a new way. I start on top and make two tiny stitches where I knew I would be sewing over and they would be anchored and not showing on the back.
Mary,
Excellent article and summary of how to deal with the back of an embroidery project. Being a new embroiderer, your comments and tutorials are essential. Thank you.
Someone once ask me the question on my embroidery page what my embroidery was looking like at the back. So I posted a photo once one of my projects were finished. I think my work look more or less the same as yours Mary. I include a link to the photo. Fact is, if the piece is going to be framed like all my pieces, it need not look that fancy. The only problem I have when using a knot, is to make sure you cut of the end as close as possible to the knot, otherwise that piece sometimes comes with and then you sit with a piece of fluff on the right side. 🙂
https://www.facebook.com/ElzazEmbroidery/photos/a.793285217364262.1073741833.576114682414651/1405670492792395/?type=3&theater
When I was 7 and embroidering a rabbit (that I didn’t want to do) I cobbled it so badly, back and front, my mother made me take out every stitch and do it over. She was a Tartar for taking as much care on the back whether it would be seen or not. Now, 60+ years on, I can see her point. There’s a lot of pleasure in knowing the back is as neat as you can make it and reflects the care you’ve given the piece.
*Thank* you! I needed to hear that!
This post came at the perfect time! I’m ready to start on a pair of pillowcases and although the back won’t be seen it would be nice to have it tidy. Thank you!
A real pet peeve of mine is when someone picks up an embroidery piece and before they even look at the front, they flip it over and look at the back. If it’s messy, they tend to dismiss the front, no matter how lovely it is. Invariably they tell me about so-and-so whose embroidery is so fine that the back is as good as the front. It really irritates me that they have judged my embroidery as inferior work because the back is a little messy.
Sometimes I weave all the ends in, and weave my way from point to point, and sometimes I just do the best I can without obsessing. Usually depends on whether or not a neat-ninny looked at my last piece. SOMETIMES weaving in (stuffing) all those back threads can Mess Up the Front by pulling the finished stitches too tight. So there you have it, all I can say is, “Be careful.”
I agree “Who cares!” If the stitcher wants a tidy back then so be it. If they don’t give a hoo ha about what the backside looks like than more power to them.
Wendi
Hi Mary,
Happy Spring! This is a great article. I always thought the back does matter and I knew to never cross threads and singly knot but this is a first to hear how we should address this topic. All I know is the back shouldn’t add drama to the top – but a total mystery on how to do this correctly.
Thank you Mary. All my best, Margaret
Thank you very much for the “back of embroidery”…it has been spoiling my fun & I need fun!!
I make linen aprons which include an embroidered panel. I would not give or sell an apron with the back exposed under any circumstances. I try to be conscious of dragging threads too far, which might cause the work to pucker. But if nothing is harmed visually by a lack of attention to the back, I simply sew in a light cover of cotton to cover the back of the panel and call it a day.
Dear Mary,
You’ve accidently provided me with a great answer. Next time anybody asking to see the back of my embroidery in order to see if I am a good enough stitcher, will be asked to show his or her underwear first. Mind you, I usually get this questions whilst working in the Museum :).
Chuckle, chuckle, chuckle!
Jessica
Hi! I would say that there are fabrics, projects that you have to worry about what your back will look like especially if you’re carrying threads. We’ve all had the “oh no” moment when we get something back from the framer and there are all those ghost lines showing thru from the back. The one thing I figured out years ago (thanks to my quilting friends) is lightly basting muslin onto the back of your piece and then stitching through that so that those travel threads don’t show thru. I think you did a tutorial on that, didn’t you? It works like a dream especially when it involved a lot of backstitch lettering and you really don’t want to take the time to have to stop and start every few stitches.
Thank you for this validating information on the back of an embroidery work. About 60 years ago my grandmother taught me with the exact same words as you just did! She was a grand stitcher. She created embroidered clothing, table clothes, and other items where the back was important. And as you say and she said don’t get so obsessive that the joy of creation is diminished!
I agree- back of needlework = underwear! My momma always said to never show your panty line! 😉
I would like to pose some questions to the last part of your article regarding professional judgment:
Why do they continue to use the backside of a piece that will never be seen (because it will be framed) as one of the criteria of judging?
I get that it’s in the rule book and you know this when you submit the piece, but why is that criteria still there? Do we still think it’s important as an artisan community or is based truly on tradition?
I’m so thankful that you’ve posted all the links and “it’s okay” advice! Less stress during stitching will help me for certain
Thank you, Mary, for some common sense thoughts on this topic! I heard that old myth, “the back must look as good as the front” when I was a child just learning embroidery. And I knew then it wasn’t going to be important to me. I do try to keep it neat, for just the reasons you listed, but giving it any more thought than that would ruin the experience for me. So my opinion is: if it’s important to you and you enjoy the challenge, good for you, you go for it. Just don’t ask to look at my “underwear!”
I have found that most people ask to look at the back of your work don’t actually stitch! LOL
Thank you for writing about the backside. I was just wondering about it myself! Now I know better. Thank you for all your tutorials. I am rather slow but I think I am making progress.
Julita
Oh thank you Especially for the tip on the unnoticed slip knot!
I’ve used all these techniques, some of which I learned from you, Mary. I am currently embroidering monograms on napkins for my niece who just got married, so I am being very careful about how the backs look. Thanks again for super tips!
I always enjoys posts like this one on the back of embroidery. I don’t sweat mine too much (unless it’s blackwork or something similar of course)…one thing I do that I don’t recall from the post is to use a piece of muslin or white cotton fabric as a backing for stitching. Especially if the ground fabric I’ve chosen is white or cream. This gives stability to the surface work but also helps to hide the little cross overs and little ends that I inevitably end up with.
Mary once again you have nailed it! With your comments about the back of a project & how the back of a project looks. I have always thought that it is non of anyone’s businesses how the back of my work looks; what’s important is how the finished work looks, in most cases!
I was once involved with a competition of sewing and needle work. When two women who were judges, proceeded to pull apart a garment and the lining, so they could see the inside work. They tore the fashion fabric in the process (which was really expensive), in the process. The woman who had made the garment, was totally devastated! And all they could say was that the maker should have left the garment unlined so that her work could be viewed, even though the lining was necessary for the finished look. Needles to say there was a big brouhaha over the whole thing. And this mess was totally not necessary, had those judges not been so obsessive, about seeing how the inside looked. When the look of the finished garment was what was important.
I love your comparison between the back of a piece of work and asking to see someones undies. That’s a really great line! And with your permission I will use that line in the future. That should put them in their place. Brilliant! Thank you for your great ideas and sharing them with us.
LOL! Chris F.
I have a lot of women in my family that do a lot of various needlework. Back when I was a teenager, I had completed a piece that I was very proud of and took it with me to a family gathering to show. I don’t recall now what the item was, but I remember being very angry and insulted because every one of my aunts and my grandmother took barely a glance at the finished embroidery piece but flipped it over to inspect the back. I was so angry. For many years, I would not show my embroidery to anyone until it was finished. That is framed or finished off like in a pillow. I’ve gotten over it now. Funny, my mother was never like that. She would look at the back, but only after inspecting and admiring the front. And she never inspected the back. It was just a quick look.
Thank you Mary!! I appreciate you so much for the balance you bring to your wonderful work — beauty, intricacy, simplicity, secrets and humor. This article is a home run — providing help where needed and the very best humorous response I’ve seen in a long time where really needed!
This is a good one. I have been stitching hardanger for decades – hardanger does not have any knots, and the goal is for the back side of the embroidered piece to look as tidy as the front side. This was my training, and I appreciated the fact that the work was tidy, both front and back.
Then: I took Brazilian Embroidery classes – working with EdMar rayon thread, and learning that knots were a necessary part of the embroidery process. It was THE hardest part of learning BE for me: I was paranoid about the knots, the loose bits of thread at the ends of the knots…..finally the instructor said to me “You need to get used to the fact that in Brazilian Embroidery, the back of the piece will never look tidy.” Moral of the story: I think the type of embroidery you are creating determines what the backside of the piece looks like.
Thank you, Alice, for mentioning that knots are just a fact of life in Brazilian Embroidery. I’m a self-taught beginner who is learning more from experienced stitchers like you and the others who have commented on Mary’s article. I look forward to each of Mary’s topics as they always provide a learning opportunity for me!
Thank you, Mary. I’ve always wondered about many of the issues you addressed. I like the way another reader, Margaret, summed it up, “…the back shouldn’t add drama to the top.” I chuckled about your analogy of asking to see someone’s underwear! I so enjoy your spirit
and humor; they bring light and life to your writing. Thanks again for the back-side management tips.
Oh my Goodness, this is so helpful! I’ve been embroidering for years and years but still didn’t know these tricks. Thank you so much for sharing. Your work is absolutely beautiful and you are so talented.
I took a class many years ago at an EGA seminar. My class was taught by a gifted artist named Dorothy Lesher and she told our class something I’ve never forgotten. She said ” what is on the back of your picture is between you and your framer.” I still heed those words today. Mindful of your “common sense” tips, which make a world of sense I think Dorothy’s message is also true today.
This one made me laugh! Yes, I am one of those particular with the backs of my work so I take care not to use knots and to clip all ends, even the most minute ones. But then, I am from the older, older generation and taught by my Grandmother and she was older when she taught me. But no, I do not check other people’s backsides (or undies). Mary, my Grandmother would have loved you and your sense of humor. I love learning all the new things that Grandma just didn’t know about. Thanks.
Dear Mary,
Thank you for this article. I was always taught to keep the back of my work as neat as the front – and nearly all my pieces are on light colored fabric – so carrying over threads is just not always possible. This article did relieve my fears of an occasional knot here and there. I was chided by a fellow embroiderer once about knots, and that has stuck with me.
I really enjoy your articles, helpful hints and your beautiful designs and work! Thank you for all you contribute to the art of embroidery!
Sincerely,
Susan Nortman
When I first started doing needlework, I wanted to see the back of other people’s work. It wasn’t to judge their back sides (or look at their underwear), for me it was a learning experience. Starting and stopping my thread was a big mystery and I was interested in how others did it. I have since learned several ways to start and stop my threads, many thanks to people like you. Some of them I feel confident about. Others, would leave me wondering if they would hold for the long run.
Thank you for all the good information you share. I copy and keep an album with many of your tips as a handy reference.
I like to keep the reverse of my embroidery passably neat, but I don’t stress about it unless it’s necessary. For instance, the bridal dress panel needed to be as smooth as possible on the back for comfort. (‘Backside’ in UK English means buttocks!!)
I use knots only when necessary and only look at the back of someone’s work if I need to see how something’s done. That rarely happens though.
I don’t mind others looking at the back of my work if it interests them.
A snippy old woman at a craft fair once told me an embroider’s worth was determined by the back of her work. I gestured to my wares with a smile. Her smirk disappeared when she flipped a huck towel over and saw nary a thread! She had nothing to say, nothing to say at all. Sweet victory!
Hilarious! Guess she’d not come across huck embroidery before!
My mother taught me embroidery. I did a mountain of “duchess” sets and centres with very tidy backs. Yes, I have put some down back to front and yes they are hard to tell. Later I went into cross stitch in a big way, these pieces adorn my house walls as framed work, the backs are less fastidious because no-one sees them. It is regarded as rude amongst my stitching sisters to look at the back, but one often does if it can be done discreetly. Thank you for your valued opinion on this, which I tend to agree with being neither a professional stitcher or seller of my works.
The Chinese school for embroidery does embroidery on very fine silk, and you can often see the backside through from the front. Some pieces are designed to be placed in a frame, like a room divider, where both sides are going to be visible, and the design is planned around being able to have light come through. I always wondered what they do to hide ends.
I wrote to Mary on this very subject asking if she’d consider a column–she has such a great reference library!
I do know Tanja Berlin has some double sided instructional kits available. I think I’ll order one of hers. My regular fiber work is just good enough on the back, but I do want to learn double sided stitching!
Dear Mary, this is just what I needed to read! Up till now I have been agonising over the back of my work…but I will in future take to heart all these tips – and relax into my stitching. (But, I do notice that the first thing people seem to do is turn over my work to look at the back. Why is that? Maybe I should mention your ‘underwear tip’!)
Once again, thank you
love this post! I never heard the word “tweakers” before in reference to those little threads..i always called them whiskers…… and on small things where the back might show, well, i always figured a lining would be wayyyyy easier for me to handle!(yes, i am that lazy)or impatient, or whatever….lol. Probably i would line it as well even the piece was big, and then tack it in places so that it would act like one piece of cloth, but not having made any really large pieces i don;t know truly how they would be handled. More power to all those wonderfully patient stitchers, obsessive stitchers,judgemental stitchers, and just like things neat stitchers…..i salute you with all my admiration.
Dear Mary:
What a welcome article. I too was taught that everything I made-sewing,embroidery- had to look as good on the inside, backside as the front. This was before the days of sergers, so I had to do French seams on everything sewn, and be meticulous on the backs of my embroidery. It’s funny how I needed permission from someone I admire and respect -you- to even think about anything but waste knots, no carrying threads etc. I had relatives and friends of my mother that would turn my clothes inside out while I was wearing them (!!) to inspect my finishing techniques.
I swear I will be more relaxed from hear out, and I love the technique of using an additional backing layer of cotton to make it more opaque. I will be using it on my next project-a blackwork picture of my youngest son’s house, a Victorian they have completely rehabilitated on their own.
Thanks again for your sterling advice, and the comments of encouragement from your other readers.
I start every class I give by saying ‘we use knots’. Almost every person heaves a sigh of relief because that tells them, this is going to be relaxed. That’s what it should be. It is interesting to me how, given the chance, even a man will look at what is going on at the back. I have been known to ask a man if he would let me look INSIDE his underwear. That request has always been declined. No, so why is he looking at the back. Find the obsession interesting.
I’d say it’s the equivalent of looking under the hood at a car show. Those who look may or may not know anything about cars (or needlework), but they want to look like they know. And they can usually get away with it as long as they don’t say much.
My mother and her mother were both superb needlewomen. My mother believed that it must be almost impossible to tell the back from the front – both must be equally neat. My grandmother on the other hand and this surprises me because she was ultra Victorian and particular, held that “the back of your embroidery was nobody else’s business!” I loved this article because I am always in a quandary as to the finishing and ending of threads….making them disappear can be quite a headache. Jeanne
These days the only people who look at the back of my work (for more than a cursory look) don’t stitch. If they comment the back isn’t the same as the front, I figure they are just parroting something they heard. If they keep on, I just tell them it isn’t Blackwork. That normally hushes them up while they try to figure out what I am talking about.
Of course, my current Blackwork project isn’t reversible. So I will have to get that framed before showing off. Ha!
Thanks for the tips for when a neat back matters, and how to help it be neat. Even more, thanks for saying when neat backs don’t matter and how to make stitching easier. The only time I can think of that I’ve looked at the back of needlework with any intensity is looking at old items in flea markets & antique/thrift stores to see if it’s hand or machine embroidery. I hope I’ll never be the crabby stitching-police person nit-picking and disparaging other stitchers’ work based on the back side that will not show.
Oh Mary, you do make me smile 🙂 Loved this article!
Thanks mary for the tips, this was really helpful.
I absolutely and totally agrre with you, Mary. Asking to see the back of a piece done by someone who embroiders for pleasure is like asking to look at underwear. More and more “professional” embroiderers and teachers agree with you – and me – and say so in their books. The one person who comes immediately to mind is Hazel Blomkamp in her book, Hand Stitched Crazy Patchwork. She states, “This is the 21st Century. We do our needlework for pleasure…….While the back of your work should not look like a bird’s nest, it does not have to look the same as your front. We’re humans, not machines.
From my own personal experience, I know that “shoulds” will diminish one’s enjoyment of doing what started out as a pleasurable hobby and past time.
When I first learned to stitch – before I was five – I was taught to knot the thread to start and end. Either that was what my great aunt did, or she knew anything else would be hard for me – heck, making small neat knots was hard enough.
As I went along I found out that I should I not be knotting threads on the back. Since I was extending my knowledge on my own there was no one to tell me about waste knots. (I first heard of same when I was in my 40s or 50s and joined EGA). I therefore developed my own system for not making knots.
I leave a tail of maybe 2 inches when I pull the needle through the start of use of a piece of thread. I hold this tight to the back with a finger from my left hand. I make my first stitch – I then move the thread so it will fall under the back thread before making the next stitch. I repeat this alternating back and forth until enough of the thread is caught. At the end I weave the thread tail through the stitches.
When I start a section of stitches if they are adjacent to a prior stitched area I will start the thread by weaving it through the back of the prior stitches along the edge of same.
I have continued to knot on the back of single stitches as I don’t want to carry the thread.
I would never ask to see the back of someone’s work, but I have had other stitchers turn over a piece of mine either while I am the process of working on it or when I bring it to show and have not framed, or etc. it. I am told how neat my the back of my work is, so I must be something right.
Thanks for the tips Mary. I agree that it really shouldn’t matter unless you are accomplishing a specific purpose such as the ones you mentioned. I’ve been leaving a tail after weaving the thread through previous stitches because my cross stitch instructions told me to and so I thought it must be necessary to keep things from coming unraveled. I think I will be more judicial in deciding which ones to trim neat.
You are a GENIOUS. Even though it is the greatest, you are humble and consoling. You are very right in everything. Thank you very much for your advice Mary !! Best regards from Argentina! Paula.
I think a tidy back helps if you have to pick out a section. You can more easily determine where a thread *should* be and gently tug on it accordingly.
My sister was trying to cross stitch a cat, made an error and asked me to try and pick out her work so she could keep going…I have no idea what she was doing, but I couldn’t take that sucker apart for anything. (I’m the one people go to if stuff gets knotted, since I have the patience and ability to untangle whatever it is…jewelry is a major request to untangle the chains…)
Then my cousin gave me a partially started kit for a greeting card. You could tell whose work was whose on the back, but it’s only the front that counted and you couldn’t tell there.
But knots are a necessity in certain situations. I generally avoid them, but if I’m using beads or french knots…you know there will be a knot (or more) somewhere on the back!)
I personally find it unfortunate that the back of a piece of embroidery is considered such a taboo topic. I understand we all come from different viewpoints and treat the backs differently, but to not talk about it? I find that there is very little instruction on how to end/start or plain deal with a thread that is not in an immediate stitch. I’m really curious how other people treat the back of their embroidery and the few stitchers that I know well enough to ask, have taught me a lot. I just want to see if there is a different way out there that might make more sense than what I have come up with or realize that different approaches are needed depending on the end goal. While I think it is silly that we are all reinventing the wheel in secret, I will continue to respect that the back is taboo.
I don’t mind showing the back of my work to people, because i know it sometimes helps. It’s funny, though, that it can be a point of contention. My point is simply: don’t worry about it! Depending on the circumstances, it’s worth taking pains to keep it neat. But it isn’t something that should cause anxiety or take away your stitching pleasure!
Point taken. This is probably one of those that I should have waited a little bit before posting. I totally agree that it depends on the circumstances on how much effort is spent on the back, but enjoyment is why many of us do embroidery and we should not put that much stress into it. I also wanted to say thank you to you, Mary. You have some of the best tutorials/discussions on how to end and start threads. It has really changed how a view that part of the process.
This might be a repeat post, sorry if it is. I laughed when I read your comments about asking to see someone’s underwear! I’m a doll maker and the first thing we doll makers do is lift up a skirt or dress and check out what’s under there! Some doll makers will even put the unexpected under there just for fun. So don’t be shy, peek if you must 😉
Thanks for this Mary. I grew up in a house with a Dad who would routinely tell me that my work should look as pretty on the front as it does on the back. I spent many years trying to figure out how that could happen. Somehow he was sure that Grandma’s work looked equally beautiful on the front as the back. And her quilting proves his point! Admittedly, she was a fantastic embroiderer and seamstress, but his constant fussing made me very insecure in my ability, and afraid to the point of anxiety attacks when having to sare my work. Thank goodness for my 4-H leaders and judges who encouraged my talent even when I thought I didn’t do well. I won many prizes in 4-H and open entry competition at our county fair, but never knew until I was an adult that other people had occassional loose threads, knots and a mishmash of thread layers on the back of their embroidery. For many years, I thought I was the only one who couldn’t figure out how to make the back look like the front and since I couldn’t do that, I always thought my work was inferior to those who could. As long as it can serve its purpose, I agree with you, who cares what it looks like on the back. If that back is going to show, I also know how to turn my embroidery into an applique and hide the backside under the backing!
I try to be careful for the sake of not wasting my precious threads , especially if I,m doing a kit and not sure if there will be enough to finish it . Also any big knots could make the piece lumpy . I,m satisfied that my embroidery is fairly neat and tidy on the back .
I think beginners , especially children , should just enjoy the pleasure of stitching .
I use knots because I was a quilter first and quilters knot. Now I am trying to use non-knot methods more, but on kitchen towels, I am a little worried that the other methods cannot hold up to heavy laundering that towels generally need, and the stitches would unravel. Would some other method prevent unraveling just as well as knots?
I guess that makes me an underwear model?
I’ve never had a problem with people looking at the back of my work. Depending on the style the back may be as neat as a pin or not so much. I find it a lot easier to keep the front of my work beautiful and to avoid catching something on the back that distorts everything if I keep the work neat.
My favourite back checker was when I had a very well respected embroidery teacher flip over a piece of my blackwork. When I asked her why her response was that she loves seeing how my mind works in creating the patterns for blackwork (I’m very math orientated) versus how she does it. It was truly a complement.
My grandmother used to embroider pieces that were premade (ie a prestamped quilted tree skirt) and none of the stitching showed on the back side. Does anyone know how to do this?
Hi, Susan – On something like a quilted tree skirt, she would have scooped the stitches (called the “sewing method” rather than the “stabbing method”), only going through the top layer of fabric.
Thank you . This is very helpful
Hello, I recently bought some Pellon fusible cotton interfacing to iron on the back of my embroidery in the hopes that it will help it last longer through use and washes. I’m not certain I bought the right stuff and was wondering if you had any thoughts on this?? I can’t seem to find any info online probably because I’m not wording it correctly. Please help I want someone I can iron on that will stabilize and last. Thank you
Hi, Autumnbree – Normally, fusible interfacing fused onto the back of hand embroidery after the embroidery is finished is not perhaps the best idea. For one thing, the fusing is not coming into regular contact with a surface (due to the interference of the threads) so over time, it is pretty likely that the interfacing will separate from the fabric, causing sagging or bubbling. In most cases, there’s really no need to fuse the back of embroidery. If it is for support within a finished, constructed item – like on a handbag or a tote or something – you’d normally fuse the opposite piece of fabric (the lining of the tote, for example) to provide the stability for the bag, rather than the back of the front piece with the hand embroidery on it. Another problem with fusible interfacing is that, if it’s not done just right, it can cause fabric to ripple, and then you have to peel it off and start again, and in peeling, you can make a mess of the back of your embroidery. Hand embroidery is a little more durable than we give it credit for – it’s ok if the back is exposed!
Making a wall hanging out of my mother’s red work embroidery. The ends are at least 1/2 inch long- too long not to be seen through the flour sack material but too short to make a knot closer to the fabric back. I don’t want to cut them either. Can they be glued down somehow?
I probably wouldn’t glue them. Maybe you could use a small crochet hook or something, to run the ends under the backs of other stitches? That’s what I’d try first!
Thank you….I had become obsessed with the back of my projects. Now I know how and when it matters to me. Freedom!
When entering hand embroidery into a competition, should the back of the embroidery be left visible?
Hi, Margaret – I think it depends on the requirements, but mostly, when I see embroidery in competitions (such as at fairs or seminars) the embroidery is finished however it is intended to be finished, whether framed or made up into something. But you might inquire to make sure, on any individual competition you plan to enter.
Thank you for this article. I am working on my very first embroidery project and was so worried if I am doing the different stitches correctly because my back is a mess. But the front looks pretty darn great! So I am not going to worry about it!! 😉
I’m wanting to do a custom hand embroidery hoodie for my boyfriend.
I want the stitches to last forever and be tight, what can I use underneath (not visible, inside the hoodie) to keep them from getting loosened?
I’m new to all of this and have no idea what to use, please help, no one has helped me yet. : (
I just wanted to know if it’s necessary to use a backing if i hand embroider on a t-shirt, since its going to be directly in contact with the skin, are there any other alternatives?
No, it’s not necessary to use a backing for embroidering on clothes. It really depends on the the fabric and how dense you plan to make the embroidery.
Isnt there a backing for the back of projects to cover threads?
Am working with pre-embroidered patches for children’s t-shirts. Are there any tips or suggestions for how to attach the patches to children’s clothes to not create an unpleasant situation with the inside of the garment? Am trying to avoid the possibility of chafing a child’s skin. Thank you for any suggestions.
There are some interfacings or stabilizers out there for sensitive skin, for use on baby clothes, heirloom clothing, and the like. They may help. You could perhaps just use a thin layer of soft cotton flannel and cut away the excess. It really depends on the size of the patch and how much support it needs.