


When it comes to hand embroidery, the only supplies you really need to accomplish a simple embroidered piece are fabric, thread, and a needle.
But for those who really get into the art of embroidery and who like creating and stitching their own designs (not using a kit, for example), there are lots of tools that will help you do just that.
I’m not talking so much about stitching supplies, but rather art supplies in general, that I use for embroidery-related stuff. If you’re interested in pursuing your own designing or you like to dabble in mixed media, you might find some of these supplies handy.
So here’s a look at some of the art supplies I use most frequently and how I use them.
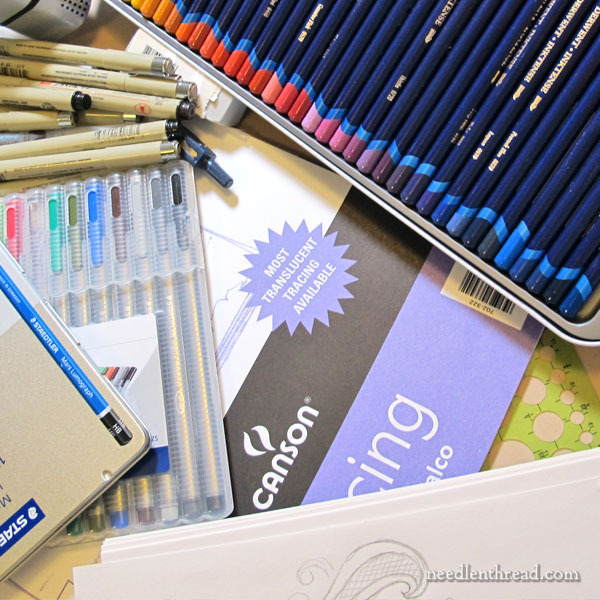
This is a good representation of the types of art supplies I have knocking about in my workroom, that I use for designing and preparing embroidery projects.
And although this article might make it look like I have a huge amount of art supplies, I really don’t – they all fit comfortably in a couple trays on the utility carts that I wrote about in this article on workroom organization.
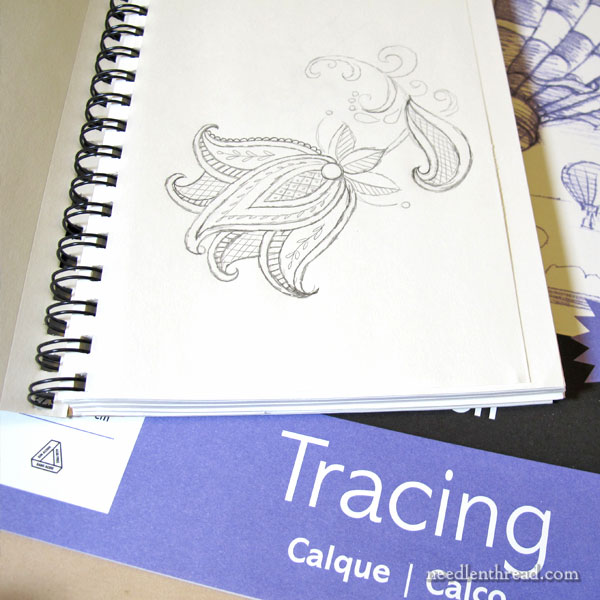
First, there’s paper. I have several sketch books that I doodle in, and those doodles often end up as designs for stitching.
I like small sketch books for the most part, because I don’t really create huge designs for embroidery. A sketchbook that easily fits in a tote or a purse is my favorite paper tool. It has to open easily (I like spiral-bound sketch books) and it has to have a stiff back. I usually opt for paper suitable for mixed media, so that I can use pens on it when I want to without the ink bleeding through.
I also have several tablets of tracing paper. Tracing paper is super-handy for the hand embroiderer! I use it to trace my “final” drawings out of my sketch book in a clean format that scans clearly. Tracing paper also allows me to combine design elements that I like, without having to redraw them from scratch. For example, I might like a floral element in one of my sketches, but a leaf element in a totally different sketch. I can use tracing paper to combine the two, without drawing either from scratch. And then I can sketch on the tracing paper to create a new design altogether that incorporates both desirable elements.
I also use tracing paper for prick-and-pounce transfers now and then, and it also works decently for tissue paper design transfer.
Another type of paper I use often in my workroom is vellum. Vellum makes an excellent tracing paper as well, but it’s heavier than regular tracing paper. I use it for design transfer, too, especially for making my own “carbon” transfers, like I did in this tutorial and for prick-and-pounce, where it works better than regular tracing paper.
Next, writing tools!
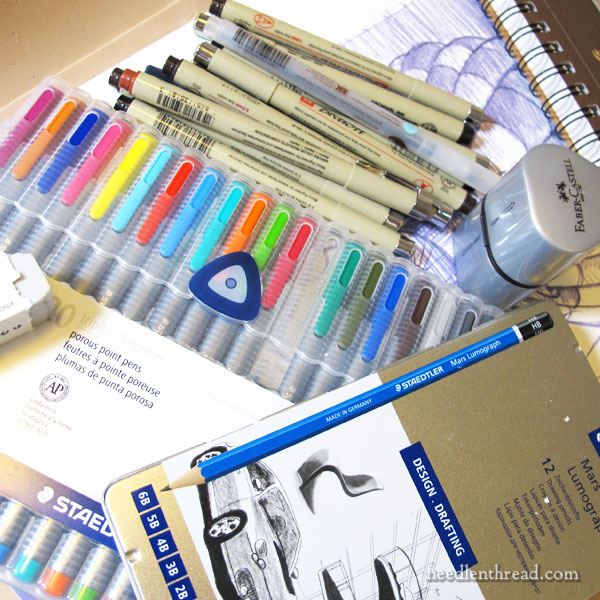
A collection of sketching pencils in different weights of lead come in handy not just for drawing, but also for design transfer. Hard lead pencils (2H) are perfect for tracing very fine, light lines on spray-starched linen. (The spray starch helps release the lead when the piece is washed.)
Soft lead pencils work well as a transfer medium, too. If you turn your printed embroidery design over and trace over the lines with a soft lead pencil on the back of the paper, you can then turn the piece of paper over, pin it to your fabric, and trace over the lines on the front of the paper with a ballpoint pen, effectively using the soft lead on the back as a kind of carbon paper. Works great! (Tutorial here.)
But I use drawing pencils, first and foremost, to sketch and doodle.
Along with the drawing pencils comes a good eraser (or 10, depending on your needs!) and a small, portable, hand-held pencil sharpener.
Besides pencils, I frequently use artist’s pigma pens with various sized tips. I particularly like Sakura pens, in sizes 005 and 01. I use these pens to draw over the final lines of a sketch, to produce a clean line drawing that scans well.
These pens can also work well for design transfer. You can use them to trace fine, clear, dark lines. Beware, though – the ink is permanent, even though the manufacturers don’t guarantee permanence on fabric. It’s always a good idea to test your fabric first. If I use a micron pen like these to trance a design, I will generally run over the fabric with a hot iron after tracing the design on, to help set the ink.
Sketching and all that is fun enough, but things really get fun when it’s time to play with color!
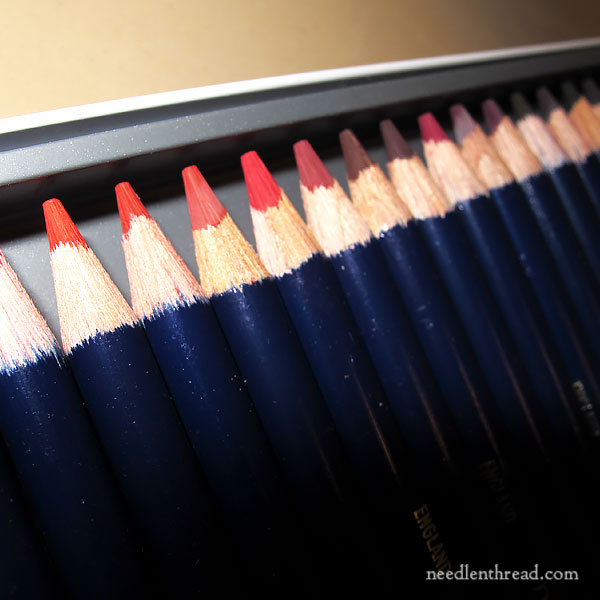
I prefer colored pencils when dabbling with color for any embroidery design. Often, before I stitch, I’ll get an idea of color layout and what works well by working over the design with colored pencils. My favorite pencils for this type of work have always been Prismacolors, but last year for my birthday, I received a set of Derwent Inktense pencils, which are watercolor pencils that are quite vivid. They’re fabulous! I love ’em!
Sometimes, I’ll use markers, though – usually when I’m deciding on color combinations and layout for outlined designs that don’t have any filling. Even if I don’t get the colors exactly right on the lines, since most marker sets don’t have a large, subtle range of colors and shades and such, I can get a good idea of the general layout of color.
My favorite fine-tipped markers are the Staedtler markers above. They don’t come in a huge range of colors, but they draw a nice, fine line, they’re affordable, and they seem to have a longer life than most similar pens I’ve used.
I’ve considered Copic markers, but they are way beyond my art budget. I’ve tried them a couple times, and if you can afford them, I think they’d be nice to have due to their blending properties, especially if you’re design shaded pieces.

Lastly, other tools!
I have a plethora of small rulers, a decent compass, some curved rulers, a protractor and similar tools that I keep in a pouch, easy to access whenever I need them.
The circle template (green in the photo above) is a great addition to your art supplies, for drawing quick, specifically-sized circles directly on fabric.
For easy transport, I keep a set of pencils, an eraser, a small sharpener, a protractor, a compass, and a small, clear, thin plastic ruler in one pouch. This pouch, along with a sketchbook, fit into a grab-and-go bag. And in fact, I have a beautifully embroidered bag that is my official “sketch bag” now. I’ll show it to you shortly!
I’m not a sketching artist by a long shot, but I do like to doodle stylized designs. The Blackwork Fish started out as a doodle, and so did this goldwork pomegranate, this little satin stitch thingamabob that I never finished, this lettering sampler, a few individual monograms that I’ve stitched up, this tree, and this tree, and many other little playful things that have and have not made it into the embroidery arena. Some day, they might!
What About You?
Do you have a collection of outside-the-realm-of-embroidery tools that you use regularly in conjunction with your embroidery pursuits? Any that you find indispensable? I’d love to hear about them! Feel free to chat about them below!
(I’ll link to resources for these supplies on Needle ‘n Thread, here, if you’re looking for sources!)
Where to Find Them
If you’re looking for any of the art supplies mentioned above, you can find them through the following affiliates links. If you shop Amazon through these links, Needle ‘n Thread gets a tiny kick-back without any extra cost to you. Every penny helps keep the website going, so thanks!
Canson tracing paper is available here through Amazon.
My favorite Canson sketchbook is available here through Amazon. It’s less expensive here than the same one at arts and craft stores, though you’d probably get a comparable price locally when drawing paper is on sale or if you have a coupon.
Staedtler Triplus Fineliner markers are available here.
Sakura micron pens are available here through Amazon, but I often find them less expensive (especially with a coupon) from Hobby Lobby, JoAnn’s, or Michael’s.
Derwent Inktense Pencils are available here. They can be more or less expensive at arts and crafts stores, depending on coupons, sales, etc.
The circle template here is a decent one. You can also pick these up at arts and crafts stores, for around the same price.
Great article! I am in the process of re-reorganizing my craft supplies. (yup, organized once and then again) I also, am a weaver and spinner so most supplies cross over to other crafts. Now, if I could only remember to put them away so I can find them!
I was wondering if you have articles on “how to estimate supplies needed for a doodle to finished project” I am planning my first goldwork “idea” and need advice on amounts to order. Don’t want to run out in the middle just to wait for the mail person to deliver the mail. My town does not have a needlework shop that carries gold threads anymore! 🙁
Thank you for a wonderful website that I use all the time!!
Barabal
Hi, Barabal – Tanja Berlin covers this question in her FAQ’s about goldwork on this page of her website. Scroll down to the last question. Hope that helps!
Loved this article. I’ve recently been trying to get over my terror or drawing/sketching and have put out a few supplies within reach of my evening sitting chair to encourage me. I have out a lot of the same supplies you mention (small spiral bound notebook, drawing pencils and erasers, prismacolor pencils, sakura micron pens). I will add my inktense pencils to the pile and look for the markers. I also sometimes like my little pan watercolors with a glass of water and a paper towel it’s easy to add a dash of color to my ideas.
My mother was a full-blown painter and could make the most wonderful little drawings effortlessly and I’ve found it intimidating to draw my own designs. As an intermediary step, I’ve found it helpful to make little sketches of pictures from books that I find inspiring – my hand gets a bit more sure from the “copy” which undergoes a transformation in my process of sketching, and I end up with a library of ideas to work from. Recently I’ve sketched some “Old Europe” pots that I would like to use as inspiration for an embroidery and make color notes based on fall colors seen in the back yard. Can’t add to the notebook everyday, but I am trying to put in at least a few things a week to keep the fear away.
I use graph paper of various sizes in my sketching and embroidery moods. In sketching, graph paper can aid in capturing proportion and size of objects which you can later transfer. In embroidery I use it to do designs like mandelas because it helps me produce symmetry easily and correctly. I think it can best be stated as an accuracy tool. 🙂
True< excellent suggestion. I missed it, but I use it often - I especially like vellum graph paper with the little blue lines on it, so it can work as tracing paper, too.
Hello Mary
I soooooooooo love your work and your whole though processes you share with us.
I’m (kinda) jealous of your work, but I find it inspirational! Some Day!
I’m writing to ask if you use Pilot Frixion pens when marking lines. I use them for cross stitch all the time. No more threads hanging off your work. They are erasable (on paper) but they disappear on fabric with very little heat from your iron. They come in about 11 colors.
Thanks for sharing your talent,
Nancy
Hi, Nancy – I’ve tried Frixion, and I’ve written about them, but mostly about why I don’t use them, here: https://needlenthread.wpengine.com/2014/09/embroidery-design-transfer-question-frixion-pens.html
Hi Mary,
I use some of the tools from NeedlePaws.com in the UK. They’re nice people. They have finely crafted stumpwork tools, cone sticks, stilettos, laying tools, lifting sticks, etc., that are fun to use and pretty to look at. It’s a real treat getting tools from them and their prices and shipping costs are decent. I use their half-cones, a stiletto, and wooden head pins in my Brazilian dimensional embroidery.
Dear Mary
A really interesting review on outside embroidery accessories. I have some of the same equipment. I have some micron pens/colour pencils/tracing paper and drawing pads although I am extremely bad at drawing so I tend to trace my patterns a lot. I’m looking at your circle template and pondering whether to buy one as I need it for another quiet book for another niece who is pregnant this would be great for the cut out planets that I envision on creating, I just finished a quiet book for my Godchild/niece as you have seen on fb and incorporated the science page. Alas they don’t sell Berol circle templates in the UK but they have a similar one by rapidesign so I might go for that. Thanks for sharing your other embroidery tools with us and for the tips and links to other sites.
Regards Anita Simmance
I can’t live without graph paper for lettering etc for cross stitch and then my husband because he does the tracing and producing the chart since he was an architect in his former life. So he has all of the tools you mentioned and more! Enjoying your articles. Anything I seem to Google you have written an article. Keep it up!
I use three notebooks. Despite the smart phone, paper comes in handy sometimes.
Number one is my “unabridged” 5×6 spiral sketch book, for everything from small pictures of work as well as quotes I admire, to hundreds of aimless sketches and doodles, to my own thoughts in writing to -yep- shopping lists, phone numbers, etc. I carry this one around in my purse. Number 3 is the most formal: an imperfect attempt at recording embroidery projects start to finish. Number 2 is in between: Only art/embroidery related ideas that are worth developing but are incomplete, or even design elements that ARE complete but in search of a project to put them in. Two and Three are 7×10 spirals.
Mary I love those Inktense pencils! I’m taking my embroidery places I have never been before. This is a good article on how to use a fabric medium and Inktense. I love the way I can now put color under my embroidery thread and still wash it! So fun, it’s hard to stop.
https://blog.derwentart.com/2017/02/17/taking-inktense-off-the-page-working-on-fabric/
Thanks, Holly, for the link to a wonderful article. I must explore my local art shop.
Ooh, awesome link!
You can order individual inktense pencils from Blick, but it’s more expensive.
I’ve tried using them as a transfer onto fabric while my drawing was wet; I wouldn’t bother unless you want to spend a lot of time experimenting with fabric medium and prep. I never got a consistent result.
Mary, I’ve never used vellum and now will have to give it a try. You’ve written a lot about transferring designs for small projects in this article; I would love to know what you consider the best way to transfer a large to very large design. Also, no matter how hard I try, I can’t make a round padded satin stitch circle or dot. I can’t for the life of me get them to stay round. Incredibly frustrating. Any hints would be truly appreciated. Thanks so much your help and your wonderful blog.
Hi, Karen – Have you looked at my satin stitch dot tutorial, here: https://needlenthread.wpengine.com/2011/03/satin-stitched-dot-tutorial.html? That might help.
For very large designs that have to be transferred in pieces, I’d do a whole lot of figuring first as far as layouts and overlaps and repeats go! Then it really depends on the fabric and the complexity of the design, and the size of the work space. Prick and pounce or tracing are probably the ones I’d consider first.
I also use Tombow markers on my sketches as they are water soluble and you can use a water brush to spread them out and fill in an area quickly. Plus you can layer them.
For a cheaper alternative to copic markers, try Dick Blick studio brush markets.
I use my computer, laser printer, my copying machine, camera, and a small light table for needlework. For drawing I use a pencil or a micro pen in brown (which is lighter than their sepia).
If I find something I want to stitch, for example, I made an ornament of our RV when we bought it, I copied a picture of it from the catalog with the copying machine and then scaled it to the size I wanted with same. I then put the scanned picture on my light table, the fabric over it, and transferred the details I wanted for the ornaments with a pencil. For a similar ornament of a car we bought, I downloaded the image from the Internet as there was no catalog and did the same.
I wanted to make an ornament of my husband working at his, then, new loom. I looked at the pictures that existed of the loom and none of them suited my needs, so I took a photo of the loom with my cell phone, printed it, then used it as the pictures above – then drew a cartoon version of him behind the loom.
For a family tree I made for my sister as an anniversary gift, my husband printed onto the fabric, using our laser printer, a wedding photo of my sister and her husband where the trunk would be and a photo of each of her two children, young, where the two branches would be and the stitching goes around the photos to form the tree.
I also did one piece almost completely without drawing by using pins to make when I was going to stitch. It was a platter. I marked three lines around the platter edge to mark where the stitching should fall. I then drew small circles with pencil to mark where the flowers would be and marked the other measurements for leaves, stems, and such with pins to show the locations.
Hi Mary,
I’m not a very good artist, so I don’t tend to draw my own designs from scratch. Instead, I’ll redraw a design on a piece of white paper, which I tape to a handy window. Then up goes the ground cloth, and I use washable markers to trace the backlit design on the cloth. The markers do rinse out, but it is best to leave all rinsing until you don’t need the lines anymore, because a mild run is going to set and be hard to get out later.
Other than that, I home-laminate some of my cross stitch kit design with clear contact paper, and use various kinds of markers to mark off the symbols. Highlighters that work well on regular paper don’t do so well on the laminated stuff – they rub off *too* easily!
I’ve also been experimenting with drawing outlines on felt – found out that charcoal pencils were the best for that, even above fabric chalk and fabric pens.
I’ll probably use more tools the more I experiment, but that’s all for now.
Monika in Mobile
While I don’t have all the supplies listed above, I wouldn’t want to be without my light box for transferring embroidery designs.
True, true! I agree, Beth! I consider it part of my embroidery supplies more than my art supplies, for some reason – but you’re right. It’s an art supply essential!
I also enjoy heat setting Crayolas for shading and filling.
I too use coloured drawing pencils and various hardness of graphite ones. I also dabble in using water colour paints and acrylic paints if I want to try a bit of mixed media. Like you Mary, I also have various sketch books, and usually have an A5 sized one on me somewhere! I couldn’t survive without my tracing paper [and also some vellum]. Then there’s the compass, rulers, and I also sometimes use my templates from the shapeboss and other crafts for some shapes.
Ooooh, I wish I had not looked up what shapeboss stencils are. I thought I was doing good with both circle & oval templates 🙂
I like the dual tip Blick Studio brush/chisel markers better than Copics and they’re about a third of the price. https://www.dickblick.com/products/blick-studio-brush-markers-and-sets/
I also use Spectrum Noir and Chameleon Color Tones (fabulous bit a bit spendier – – http://www.chameleonpens.com/ ) for alcohol based inks, and have ordered some Chameleon water based markers which I hope to see before the end of the year. I’ll let you know how I like them.
Like most artists, I have a few Copics and PrismaColors, but they’re nowhere near the top of the go-to box any more.
I use Graphix acetate sheets to ‘build up’ design elements – – they work well for repeated applications of prick and pounce when I have to do four or six or eight of a motif.