


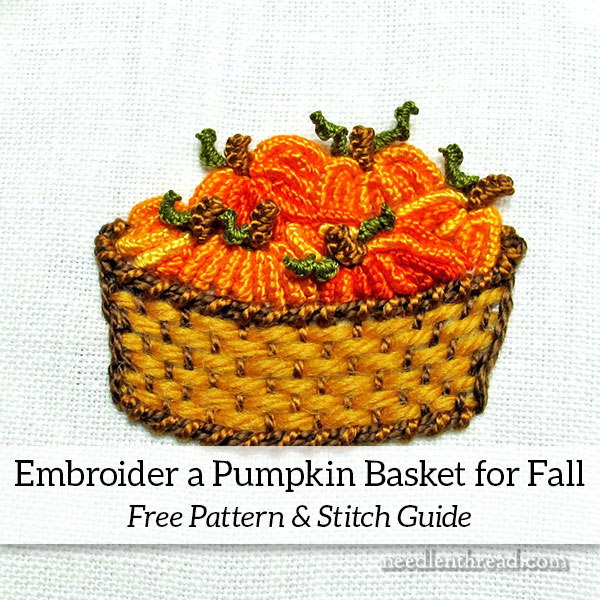
If you’re looking for something smallish and fallish to embroider, here’s a simple little design for you, with a stitch and materials guide.
You can substitute any materials you have in your stash, and you can even switch up the stitches and use your own favorites.
This little basket of pumpkins would look great on the corner of your table napkins for fall. It would also make a cute cover for a little needlebook (like the ones featured in Lavender Honey & Other Little Things), or, if you’re an ornament-for-every-holiday-and-season sort of person, you might like adding it to your autumn, Thanksgiving, or Halloween ornament collection.
You can also incorporate the individual basket into a larger design – maybe you’re stitching an autumn landscape or you’re working on an autumn-themed crazy quilt square?
It’s a simple little motif, but fun to stitch, and especially good if you’re keen to practice bullions.
(Yes, I said bullions! Don’t fear them!)
This was originally a project featured on DMC’s website, but since it’s no longer available over there, I decided to post it here for you.
Materials
Fabric: You can use any ground fabric. I used a medium-weight linen, because that’s what I generally have on hand. Because it’s worked with perle cotton, I’d suggest a fabric that has some weight and body to it and that can support the stitches. You can always back a lighter weight cotton or linen with another layer of cotton, too.
Threads:
Perle cotton #5 in light brown, medium brown and dark brown, and different shades of orange (I used DMC variegated #51, which is an orange-hued variegated thread, as well as some individual orange shades I had on hand)
Tapestry wool (you can substitute two strands of crewel wool in the needle) in a golden wheat color
Stranded cotton in a medium green and a dark brown
Tools
You’ll definitely want a hoop for your fabric. Needle weaving techniques always work out better if the fabric is taut in a hoop.
Crewel needle (size 5); tapestry needle (size 22 or 24); milliner needles (size 3 and 5)
Method & Order of Work
Basket Top and Base
Start with the top and base of the basket. I worked the top and base outlines of the basket in dark brown perle cotton, in chain stitch, then whipped the chain stitch with light brown. This gives the top and base a nice, heavy basket-like edge.
Woven Basket Area
The woven part of the basket is worked in a needle weaving technique (woven stitch), which is demonstrated in this article on woven stitches. This article on playing about with woven fillings may also be helpful.
First, work the warp (vertical) threads of the basket. Start on the sides in the darkest brown and work towards the center, switching to medium brown and then light brown in the very center.
Next, work the weaving. The weaving is done with the wool thread. It helps to use a tapestry needle. If you’re using what’s called “tapestry” wool (a thicker wool thread often used in canvas work), you’ll just need one strand. If you’re using crewel wool, I’d use two strands in the needle, so that the weaving fills up the space.
Basket Sides
The basket sides are stem stitch in dark brown perle cotton. You can find instructions for stem stitch here. And this article covering 12 tips for better stem stitch may also come in handy, if you struggle with stem stitch!
Pumpkins
The pumpkins are bullion knots in various orange shades of perle cotton. You can find a video tutorial for bullion knots here, and an article on creating better bullions here. This tutorial on bullion buttonhole wheels also has some helpful bullion tips in it. Both should be helpful, if you struggle with bullion stitches.
Work the pumpkins from back to front, stitching those farthest back first.
Stitch the body of the pumpkins first, before adding the stems.
A #3 or #5 milliner needle will help you create better bullions, if you struggle with the stitch! The longer shaft, especially, will come in handy with the longer bullions used for the pumpkins.
Work the bullions for the pumpkins from the center of the pumpkin outward. The bullions in the center of each pumpkin should lie more or less straight on the fabric, but as you work outwards on the pumpkin, you’ll add more wraps to your bullions, to force them to curve and follow the shape of the pumpkin.
Stems & Tendrils
When all the pumpkins are complete, add stems and tendrils, using drizzle stitch.
You’ll find a video tutorial for drizzle stitch right here, to help you out.
Work the stems using two strands of floss in dark brown.
Work the tendrils with two strands of medium green floss, in drizzle stitch, one on each side of each stem, or however they reasonably fit on the design.
Use a milliner needle (#5 will work) for the drizzle stitch as well.
Pumpkin Basket Printable
And here’s the PDF printable for the pumpkin basket. Three different sizes of the basket design are included.
You can further enlarge or reduce the design to fit your stitching purposes, but you might have to adjust your threads accordingly. A larger design might require heavier threads, and a smaller design might require finer threads. The materials above will work well on any of the three sizes supplied in the pattern.
Pumpkin Basket Hand Embroidery Pattern (PDF)
I hope you enjoy this little project!
Looking for More?
If you’re looking for other projects to embroider, you can find plenty of free patterns available here on Needle ‘n Thread! I’ve recently updated the pattern index, too, so there might be a few there that you’ve not seen, or perhaps have forgotten!
If you want a little more guidance with embroidery projects, feel free to take a look at the embroidery project e-books available in my shop! They include not only patterns, but detailed step-by-step photo instructions for stitching the whole project and for all the stitches involved.
Such a cute basket of pumpkins! 🙂 Thanks for posting this.
🙂 Glad you like it, Rebecca!
Gorgeous! Absolutely beautiful! I may try it – thank you Mary!
Sure, Laura! Have fun with it!
Love this —but for some reason the PDF didn’t open? has anyone else had this issue?
Hi, Marjorie – Are you working in a stand-alone browser, or are you accessing the browser through another app, like Facebook? Are you on a computer or a mobile device? The link is working fine from this end, on three different browsers, and on mobile, tablet, and computer, so I’m thinking the problem might be on your end. Perhaps you have a pop-up block on? Normally, the link will open in a new window, and then you can save the PDF from there.
Hi Mary! I’m new to embroidery, although I cross-stitch from time to time, and a friend suggested that I check out your site for tips.
However, the one question that I have is one that I haven’t been able to find an answer to – maybe because it’s kind of a dumb question!
I really just don’t know what kind of fabric I need. I’ve literally never even done the most basic embroidery stitch, so I’m starting brand new here. I don’t have any big projects in mind – just simple little patterns that look pretty in embroidery hoops, for now – just to get the hang of things.
So is there a particular type of fabric that I need (like Aida for cross-stitching)?
Thank you!!
Hi, Becky -I like linen for a ground fabric, but if you’re just starting out and you don’t want to invest that much, I’d probably go with a good quilting cotton, which you can buy locally through any fabric store.