


Last time we visited Tulip Festival, which is an embroidered kaleidoscope I’m sharing with you step-by-step here on Needle ‘n Thread, we looked at how to stitch the tulips in long & short stitch and the two tiny borders beyond.
Today, it’s the final chapter! We’ll cover the embroidery on the outer layers of the kaleidoscope and any hints and tips along the way.
If you want to catch up with the project, you’ll find all the materials and beginning stitches in Part I here, the next set of embroidered layers, working outwards, here in Part II, and the tulips and two more bordering lines here in Part III.
If you’re working your way through this project, don’t hesitate to chime in with any questions you might have, using the comment form below the article!
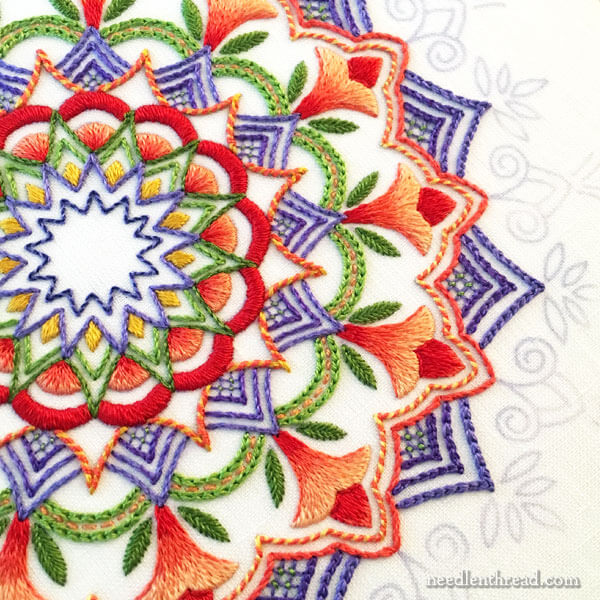
The final layers of Tulip Festival consist in the blue peaked layers in the photo above, topped with the leaves and stylized flowers on the outer edge of the design.
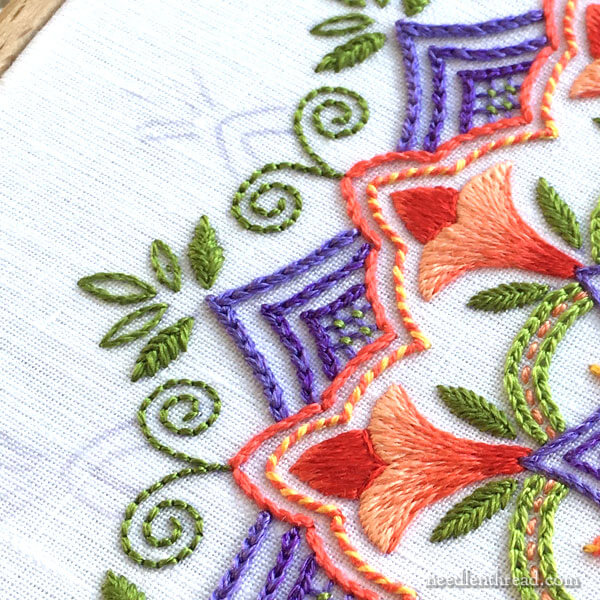
The three rings of blue peaks or pointed elements are stitched with the same colors, in the same order, as the blue lines in Part II. The only difference here is that the lines are embroidered with chain stitch instead of stem stitch.
So, start with the lattice using one strand of the lightest blue (1334) couched at the intersections with one strand of the lightest green (2124).
Then, working outwards, and using two strands for each layer of chain stitch, work the first outline around the lattice in 1335. Then combine 1334 and 1335 in the needle together, and work the next layer outwards in chain stitch. And finally, work the final outer layer with two strands of 1334 in the needle.
You can find a tutorial for chain stitch here.
For lattice filling, check out this video on lattice stitches. You can also check out these tutorials on couched lattice fillings: Doodling with Lattice Fillings and More Lattice Fillings.
Once again, if you wanted to, you could stop the design at this point. It would make a nicely finished kaleidoscope!
But let’s forge on to the end!
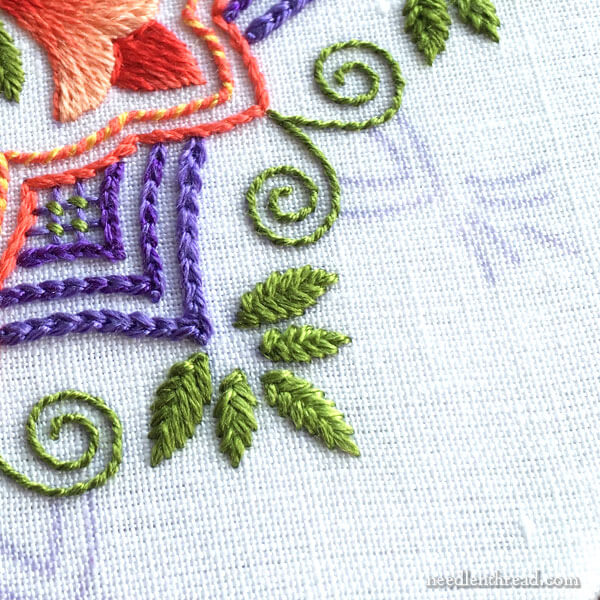
To work the bunches of leaves, I used one strand of medium green (2125) to split stitch a tiny outline around all the leaves.
Then, using two strands of silk in the needle and working the fishbone stitch, working over the outline, I started with the bottom leaves in 2126, the middle leaves in 2125, and the middle top leaf in 2124.
You can find a tutorial for split stitch here, for the outlines.
And this tutorial on fishbone stitch will show you how to stitch the leaves.
And those are the leaves!
Now, with the curly things at the base of each flower element, the line is stitched first with backstitch, using one strand of silk in 2125, which is then whipped with one strand of silk in 2126 (or you can use 2124 if you are running low on 2125, or if you prefer a greater contrast with the whipped backstitch).
You’ll find a tutorial for backstitch here, and a tutorial for whipped backstitch here.
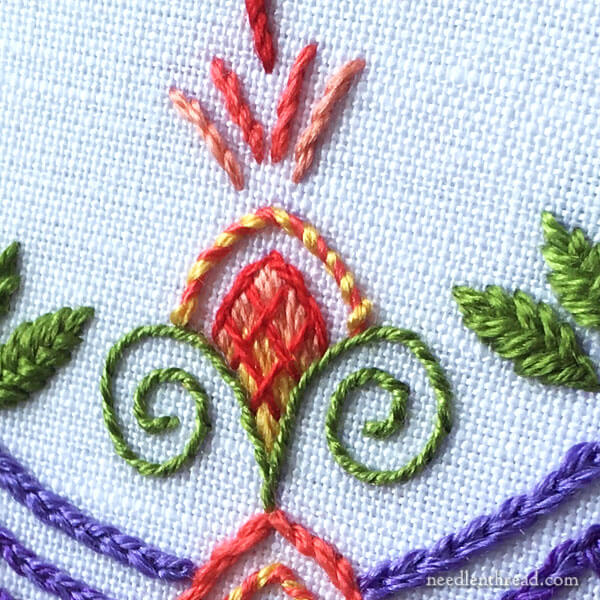
To work this floral element, start with long and short stitch in the area underneath the lattice. A split stitch outline underneath the long and short stitch filling is not necessary here.
The long and short stitch is worked with three shades in one strand of silk: 922 (light coral) on the top part of the filled element, blending into 923, and finishing at the base with 2525 (yellow-gold).
Using one strand of 925 (red), work a small diagonal lattice over the long and short stitch. If you look closely in the photo above, you can see that I worked the lines so that they alternate in the over-under pattern. I didn’t couch over the intersections. This element is tiny, and the couching just adds too much bulk in there and isn’t really necessary, especially with the over-under effect on the lattice lines.
Outline the top edge of the element with stem stitch in one strand of 925.
The next line out, twisted in coral and yellow, is whipped backstitch, with 2525 (yellow gold) as the backstitch base, in one strand, whipped with 924 in one strand of silk.
The radiating lines above the floral element are all worked with one strand of silk in stem stitch, starting with a lighter coral at the base (922), then 923, and finally 925 at the tip.
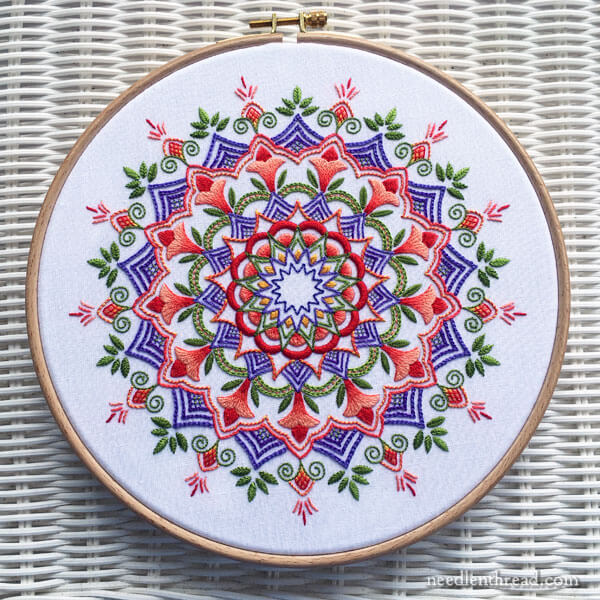
And there it is! Tulip Festival – finished!
Lesson Recaps
You can find the previous lessons in this series through the following links:
Part I – Materials, Threads, Set-Up, and first stitches
Part II – Stitching further out on the kaleidoscope
Tulip Festival Part III – the tulips in long and short stitch and two more borders.
Tulip Festival Pattern
You can find the design for Tulip Festival in my pattern e-book, Favorite Kaleidoscopes. There, you’ll find a whole range of kaleidoscope patterns for embroidery, from small to large, simple to more complex. There are over 30 patterns in the e-book, ready for you to stitch into your own colorful masterpiece!
Questions?
As always, if you have any questions, comments, suggestions for alternative approaches, or whatnot, feel free to join in the conversation below!
Coming Up on Needle ‘n Thread!
Oh golly! I’ve got some good stuff for you! I’m going to run a series of pre-Christmas give-aways like we did last year, called Stitcher’s Christmas! I’m very excited about it, and I hope you’ll join me!
A couple hints about what to look forward to in this series: a limited edition chart (for those of you who love historical historical samplers!); dream scissors (truly, I would only ever be able to have a pair of these in my dreams!); sumptuous embroidery kits; and more!
If you’d like to be in on those give-aways between now and Christmas, it’s a good time to sign up for my newsletter so you don’t miss any of them. You can sign up for the newsletter on Needle ‘n Thread in the left column if you’re on your desktop. If you’re on mobile, click the menu link in the top right, and scroll down. Or you can jump to this sign-up page.
I’ll also be sharing a new little series of projects with you. Perfect for Christmas! Perfect for short (as in, one evening!) embroidery sessions. And just plain fun! I’ll tell you about that later this week.
Hope your week’s off to a great start!
Oh, Mary, it’s beautiful. It’s an explosion of color radiance. I wanted to raise my arms and twirl around a la Julie Andrews in the Sound of Music.
LOL! Thanks, Carolyn! Funny how things make us want to go all Sound of Music, isn’t it? 🙂
Excellent tutorial! Unfortunately my supply order did not arrive yet as I was planning on starting it this week. But I have plenty of time off of work coming in the next month.
Have a wonderful Thanksgiving!
Hi, Robert! Don’t you just love anticipating the post when it’s bringing Needlework supplies? I’m glad you have time off next month to enjoy this! Happy Thanksgiving to you, too!
Dear Mary
This is such a lovely design and the colours you chose are really bright and Christmassy. The design would look lovely on all sorts of items and really stand out. I can’t wait for the Christmas Stitchers Givers give-aways especially the scissors and I’m looking forward to the series of projects. Thanks for taking the time to put all the tips and techniques of the Tulip Festival in one place for those that are following the project and for sharing them with us they are always very useful. Enjoy your Monday.
Regards Anita Simmance
🙂 Thanks, Anita!
Oh Mary! Tulip Festival is beautiful. You make it seem so easy!! LOL! But thanks for breaking it down into parts, which makes it do-able. I am currently working my way through Octoberfest, but have this one on my to do list. And thank you for all your links to previous sessions and videos. They are so appreciated! Wishing you and your family a Happy Thanksgiving!
Thanks, Sabrina! I hope you’re enjoying Octoberfest! Once you get going on that one, it’s pretty fun and relaxing. I hope you have a Happy Thanksgiving, too!
Beautiful! Will this be displayed in the embroidery hoop? I hesitate to make intricate works such as this because displaying work in hoops is not my style. I wonder if framing makes embroidery Seem more 2 dimensional. That’s what holds me back – there are only so many towels, ornaments, pillows etc one can make. I’m not sure what to do with more intricate designs.
Hi, Kim – well, I’m actually saving towards three frames for the three Kaleidoscopes I’ve stitched. The frames I’ve selected are bubble glass – that is, they are convex glass in a round frame. I think the perspective under the bulging glass will be interesting! But they are pricy, and not top in my priority list right now. Still, it’s in the plans!
Mary… thanks for this series of lessons! You really are great at breaking the directions into understandable bits…and how wonderful that you also include the links to your “how to do” specific stitches! I can’t wait to start this project!
When does you next class begin?
Do you know what stitches will be featured?
Thank You
Dear Mary,
Please, please please could you also do the same rundown on your wonderful Party in Provence? It is my very favourite and I am busting to work it.
Thank you so much for your inspiration – cheers……….Lyn
Oh yes, that’s coming! I’ll probably be starting it after Christmas, though, as I’ve got a few other things to share between now and then. If I get a chance, though, I promise I’ll start it earlier!
Happy Thanksgiving. Thank you for Tulip Festival. What a wonderful project. Can’t wait to get started. You and your website are definitely on my list of things to be Thankful for.
Dear Mary,
This is absolutely gorgeous I am so glad I purchased the Favorite Kaléidoscope ebook. I will definitively be stitching it after my actual project which is the Midnight Meander from Hazel Blomkamp. Let’s just say that I have my hands full, still learning a lot and enjoying every minute of it. Thank you for your work and dedication. I keep referring to you every time I get stuck into a new stitch, you are a very competent teacher and in my opinion you host the BEST hand embroidery website.
Enjoy the week!
I was hoping someone could tell me somewhere to order the silk thread and the better materials to use. Where I live there is no place to get any or get anyone to order any of it. I want to step up from cross stitch and basic embroidery. It is so beautiful and I would think very satisfying to work. Thank you!
Hi, Robin – the resources for this particular project are listed on Part I, where I listed the threads and fabrics. Needle in a Haystack online (needlstack.com) is a good source for both the threads and fabric I used in this piece. Hope that helps!
Lovely! I really enjoyed that — thanks for taking us through it.
Just wanted to say a quick thank you for showing us how to embroider this pattern, I am hoping to be able to do this one over the Xmas break, as I fairly new to embroidery this should be exciting and challenging.
Really thrilled you did a project in silk; the colors are so beautiful. I have an off the wall question: When you do the stitch tutorials – like the fishbone stitch – What type of thread do you use? It has too much body and covers so well to be regular DMC floss, which seems to be the stitching standard thread.
Thanks so much.
Hi, Karen – with the video tutorials, my aim is just to show the movement of the stitch, so no matter what thread is used, what you’re seeing is the way the stitch is formed. To do that in the videos, I use perle cotton, because it’s non-divisible (which helps reduce the chance of any thread snags when working through the stitch) and because it’s more visible when recording video.