


One of the questions I’m frequently asked is what I do with all my little embroidery samples that show up here on the website.
It’s a legitimate question! And it’s one I’ve pondered myself, too, innumerable times. What to do, what to do…
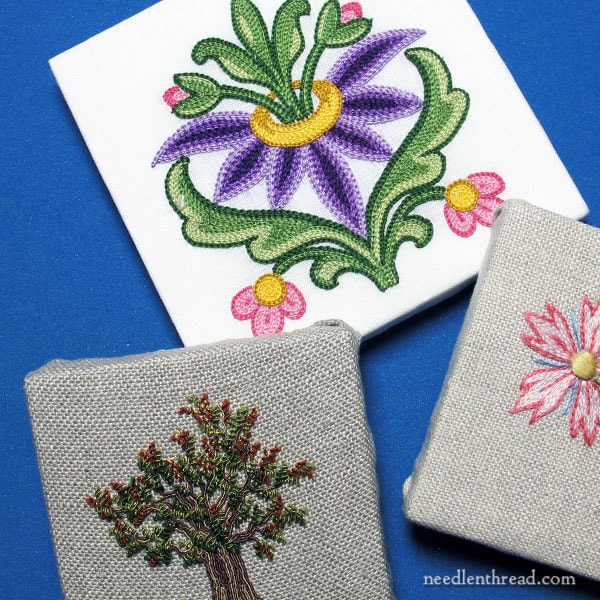
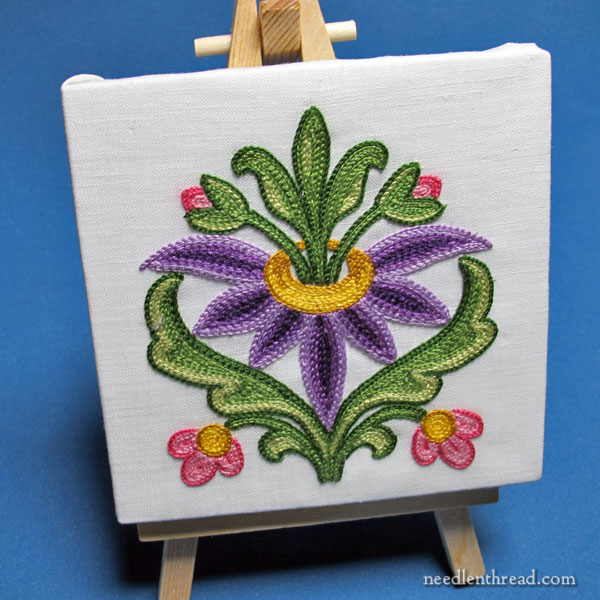
Now, I’m not talking about larger projects that I generally end up framing and giving as gifts, but the little projects I’ve stitched for the website – like all the letters for Stitch Sampler Alphabet. Or all the sample monograms for this series of embroidered monograms.
Or this little tambour bird or this little tambour flower. Or this shisha tree. Or this shisha thing. This spring tree? An autumn tree? How about a pumpkin basket? Or a woven stitch sampler?
All twelve trees for Twelve Trees for Christmas. Or this lettering sampler. Or this long and short stitch sampler. How about small doodle cloths?
The list could go on, and on, and on, and on. It seems that, in twelve years of blogging, I’ve done a lot of small stitching.
Over the years, I’ve stored my samples in binders to use for demos or to revisit when I need a photo, or I’ve stacked them in storage boxes, to pull out when I need them. Some, I haven’t looked at in years! Others, I’ve dug out for this reason or that.
One of the first things I contemplated when my dedicated studio space became a reality was how I could display little bits of stitching in a cheap, quick way – a way that wouldn’t require a lot of money for finishing and wouldn’t require a lot of time to accomplish. So today, I’m going to show you what I’m doing with small stitched samples from over the years. Maybe it will give you some ideas, too!
Before we get started, I want to make sure you understand that these are not fancy, work-involved, artistic, deeply meaningful pieces of embroidery. They are simply samples. I like them. I view them as a kind of record, but the important part of that record to me is kept on the website. I don’t classify these as “longevity” projects.
I would not do this with a piece of goldwork or silk work or something meaningful or time consuming.
But for what I have in mind, this method for displaying my little samples on my walls in my new studio is just the thing.

I’m calling these “tiles,” even though they aren’t tiles.
They’re actually canvas.

These are small canvases for acrylics, oils, and other painting. They are gessoed with acid-free gesso and the two kinds I’m using are glued onto the little stretcher bars. I’m using canvases that are 3″ square and 4″ square.
Depending on the size and the brand, I can buy 12 to 14 of these little things for anywhere from $10-$24, and whether they come with an easel or not. At $10 for a dozen for the less expensive, non-easel versions, that’s less than $1 per finish.
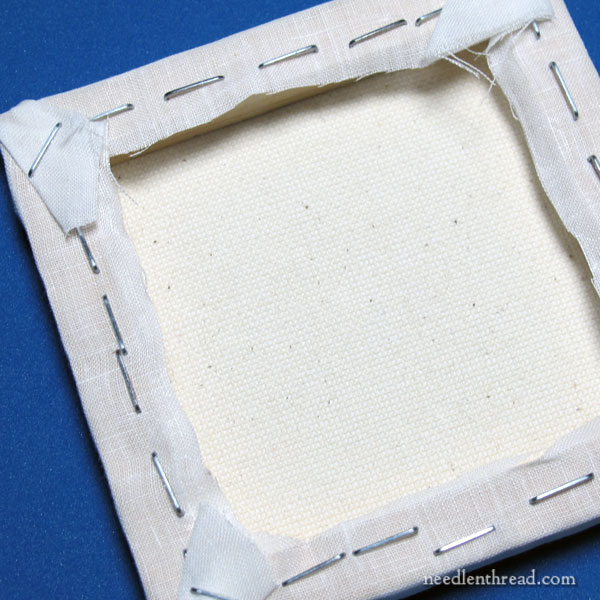
I’m using a staple gun to stretch and staple the little samples on top of the canvas.
I know many of you might be shaking your heads and collectively tsk-tsking, because this type of finishing is not exactly the best approach for long-term preservation of embroidery.
But I’m not really concerned about long-term preservation here. I just want to hang little samples up, in clusters, on my walls. And I need to do it as inexpensively, yet neatly, as possible.
Initially, I thought about tacking the samples to large bulletin boards somehow – pinning them up on framed cork in some kind of themed idea board. But having lived through dorm years with bulletin boards packed with all kinds of memorabilia, and then living through teaching, with classroom bulletin boards that constantly needed changing, and then living through college teaching with bulletin boards full of notices, I’ve had enough bulletin boards in my life. I see them as purely utilitarian now, and they rarely inspire me.
So, instead, I want tiles. And this is the easiest, least expensive and least time-consuming way to achieve tiles.
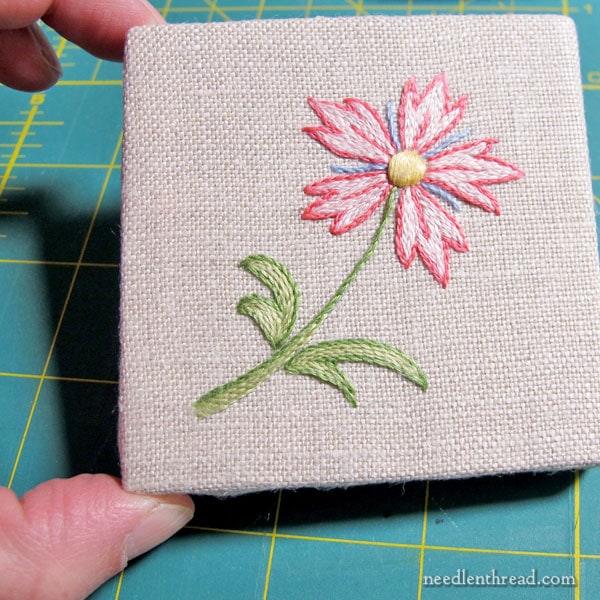
The 3″ square tiles are pretty cute! They’re a lot smaller than I imagined they would be. Imagine having to frame up a lot of tiny pieces that fit inside 3″ squares! That would take a lot of time!
With the canvases, it’s just stretch, staple, and trim.
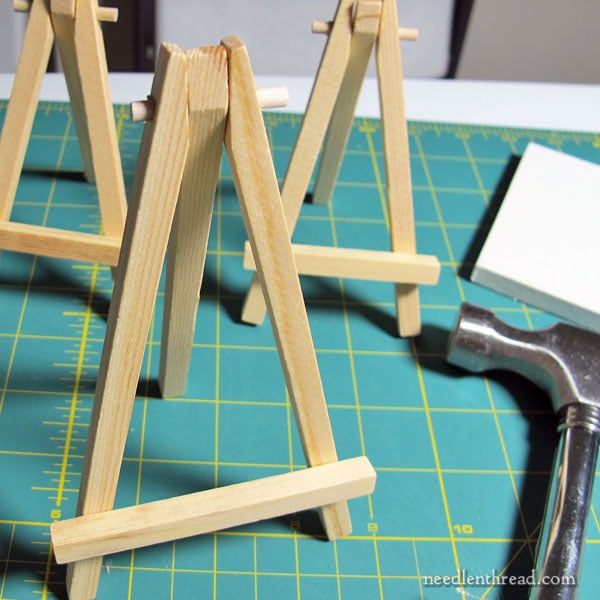
One of the fun things about the bulk Arteza mini canvases that I already had on hand is that each one comes with a tiny little easel. They’re just wee little cheap things, but they’re pretty cute!
And they’d also make a good method of display, if you had a tabletop display area that wouldn’t get jostled too much.
I don’t plan to use the little easels. Instead, I plan on doing small wall clusters. I may mount them to ribbon strips, to make it easier and more attractive to hang them and to minimize holes in the wall, but I haven’t gotten to that point yet.
The Details
If this is something you’re interested in for your own little samples, you can find an assortment of small canvases in bulk packs on Amazon. I’ve listed different kinds I’m using on my Amazon page here. I’m sure you can also find them through other art stores, if you’re lucky enough to have a good art store close by.
To mount the embroidery, which has already been blocked and damp stretched, I centered the embroidery on the canvas, over the canvas-up side and used a clip (like these) to secure the sides to keep the fabric in place and centered.
Next, I flipped it and stapled one side, starting in the center and stapling out towards the corner but not on the corner. Then, I stretched lightly and stapled the opposite side (in the same manner as tacking fabric on stretcher bar frames for embroidery, really!). And then I did the two remaining opposite sides, stretching slightly and always double checking that things were working out as they should on the front.
Then, I folded the corners in, in such a way to keep the fabric on the folds as minimal as possible and as much away from the edges as possible. I stapled the corners over the folded fabric.
Lastly, I took scissors and trimmed away all the excess fabric.
I haven’t decided yet if I will cover the backs or not with fabric or felt. I might, but only if I have enough felt or decorative fabric on hand and I can figure out an efficient and secure way to do it.
There you have it! That is how I’m making little embroidery tiles for display. Once I finish enough of them up and get them arranged, I’ll show you how they look. It’s not high on my priority list, but it’s fun to finish one or two up here and there between bigger jobs.
If you have any questions, feel free to ask below!
A Little Crewel News
Before signing off, if you aren’t aware of it, I thought I’d point out that Crewel Work Company is running a sale, and today’s the last day of it. If you’re looking for authentic crewel embroidery kits and the like, you might check it out here.
Just a thought… lots of decorative papers are available. They have the advantage over felt or fabric of being thin and and never raveling or stretching out of shape.
Good point!
I really enjoyed this post. Great idea for a quick little finish. I have several little embroideries or little cross stitch projects and I often wonder what to do with them. I made them because they make me happy and I like to display them to enjoy. They often don’t take much time but I still want to enjoy looking at them or giving them to someone to enjoy. Thanks for the ideas.
Another way to frame small pieces easily….
Cut the size needed from insulation foam. I use the blue stuff.
Wrap your piece around the shape and glue or pin in place.
The back can be covered if you are a neatnik…. I am not.
Very lightweight and can be hung easily.
I love your blog. Congratulations on the years of blogging you have done.
Mary Lou Curry
Oh that’s a good idea, too! Thank you! I will look into it!
Could you please tell me what you use to cover the knots and threads on the back of your projects, like the initials, for example. Thank you, Michele
Hi, Michele – I don’t cover them, really. If they’re framed or what-have-you, they get covered that way, I suppose. But otherwise, they stay uncovered.
Cool idea! There’s still some tiny canvases in my painter’s stash and even a little easle. And you’re right, they are really cheap on amazon. When I will finally move into my own little flat, I’ll come back to this post to decorate my walls or shelves with my samples. Thanks a lot for the instruction, Mary!
Question: When I click on your amazon link, but go from there to amazon.de to order, will you still get money out of it?
Thanks for asking – yes! 🙂
Love your suggestion for framing the samples. I would not cover the backs as this inhibits the ease of hanging. Also for hanging I would use the hangers that are easily removed rather than nails. A bit more expensive, but no holes to repair if you change your mind.
Just an idea for quick and easy hanging, 3M do packs of sticky hooks for fairy lights and they can be removed without damaging walls. I’ve used these to hang photo canvas up to 8″ square. They hold the weight and have been up for a couple of years. Also removes the worry of whether you are going to hammer a nail into a pipe or cable!
Great idea! Thank you!
Mary, you never cease to amaze me with your embroidery. You are an inspiration for others, especially me. Thank you for all that you so freely share.
Great idea for little ‘casual’ needlework pieces. And inexpensive! I think a bunch of tiny ‘freebie’ designs that I’ve worked over the years are coming out of the “to be framed or finishing finished” stack!
This is a fantastic idea even for larger pieces that we want to enjoy for awhile but not enough to invest in long term framing. Using the mounted canvas gives the piece a little weight and stability. You could also add a ribbon around the outside edge to make it a little more “fancy”. I especially like the tile idea of putting together a collection of small pieces. JoyceAnne
I used to mount small designs in canning jar lids…with or without the jar. Great for little kitcheny designs and easy to hang…but I like the idea of the little ( and not so little) canvas boards better.
If you want a slightly more finished look, you can run a ribbon the same width as the depth of your stretcher frame around the sides of your piece.
Oddly, I’ve done a couple larger pieces this way, but it never even occurred to me to do a bunch of little samples/experiments like this.
What I have done for those little projects is I picked up one of those picture frames that have several openings for family pictures. This way I display a variety of styles and techniques in one frame.
I don’t have a question, just a comment. I think this is a fabulous idea. When redoing my studio last year I had a blank wall that I stared at for several weeks. I had thought about putting up some of my smaller projects, but discovered that I only had a couple that I had not given away. Instead, I pulled out family photos and framed tons of them in small frames. Now I can sit and stare at my family instead of a blank wall. Once my new mirror is up, I will have some slightly smaller wall space and that is where my stitching will be hung — probably on small canvases. Great idea. Thanks. I can hardly wait to see pics of your new dedicated space.
Mary, just wanted to say I love this idea! I ran across a few pieces I did when my mom was teaching me how to embroider on dish towels (over 50 years ago) want to keep them. One is a zebra. 🙂 This would be perfect and inexpensive. Thank you!
I have seen small framed pieces that are housed in a larger frame with section, like a shadow box, that you can move and arrange a s you desire. Just a thought.
That’s a very good idea! I will definitely keep it in mind!
What a great idea. I’d like to try a few of the new (to me) techniques I’m learning from you, and this will get me going. I hate to create something that will be just tucked away.
Thank you for this tip as well as all the other ways you are so generous with your expertise.
What a great idea, Mary, and affordable too. Thanks for sharing!
Another thought: leave the extra fabric from the back of the frame. You never know when that’s exactly what you need for ‘someday.’
If a ribbon is too floppy, you could also hang a few from a dowel, and then the dowel would only take one or two holes to hang.
Oh! Or, I grew up in a house with picture rails. We used to use one picture rail hook and then make a long fold of string with knots. The loop end goes over the rail hook and the knots support pictures, so you get a vertical column of pictures with whatever kind of spacing you want. That would work with a regular wall-hook just as well.
I think this is a fun idea! May I suggest, instead of backing with felt, taping an information sheet to the back of each title with the project title, date, technique and materials? I’m sure this will come in handy for the future if you use them for teaching samples 🙂 And just for “memory joggers” since you stitch so many pieces! It is a wonderful idea to get these testers out of the drawers and displayed 🙂
Mary – Have you ever used the prestretched artist canvas that comes already on the wooden frame for stitching? I have thought to do so with some small pieces as it would cut down on work for husband to do to frame them (and cut down on screaming while framing). I figured that the fabric stretched on the framing would hold the same as stretching it in a hoop (which is how I work normally). I was concerned about stitching through the gessoed fabric.
I have finished pieces that, similar to what you said, are not major pieces that I am planning to hang up in my house. Generally they are something small that I did to learn a technique or an EGA chapter piece. I have started finishing as a soft wall piece with no frame and stitching them to a backing – with or without batting between. It is easier to store them than if they were framed (especially if framed with glass). I demonstrate embroidery at period events and some are conducive to a display set up (as when my EGA chapter set sup at the Long Island Fair (tri county, county fair). The pieces are lighter and easier to bring and easier to put on display.
I think stitching through a primed canvas would be a bit of a pain! But I’ve seen people do it – even through painted artists’ canvases. I think you’d definitely have to buy the stapled canvases, as opposed to the glued. They’d be more secure.
Thank you Mary. That was my thought also about the finishing.
Thanks for sharing Mary. I have done a few of these and even used as little gifts. I have added the backing and even a trim around the edges. Department of Saint Benedict’s
On another note, I would like to share this exhibit with everyone. If you are in the area or close enough to make the drive, I strongly encourage you to do so.
There is an exhibit at the Haehn Museum featuring the Art Needlework of Saint Benedict’s Monastery. All items are designed and hand embroidered by the sisters. The majority of the work is done with silk threads and gold work. It is awesome. Workmanship, color choices and more. My favorite are the set of angels vestments and the wall hangings of lambs. There is also a small part in the exhibit of lace work and a couple of tapestries. I think you would love this exhibit, Mary.
Have a good summer of stitches.
Address is Haehn Museum, Saint Benedict’s Monastery, St Joseph, Minnesota
Nice! Given my experience with staple guns, I’d probably do a fast lacing job on the backs. I’ve also seen needlework mounted in embroidery hoops, although if you did not want to trim the backs, the sticky-out bits would need to be dealt with somehow.
Could one use scotch guard to protect their fabric and needlework? What is the long term effect of the spray?
I wouldn’t! Haven’t researched it, but pretty sure it wouldn’t be a great idea on embroidery… There’s really not any need for this type of finishing – it won’t be in a place where it’s going to get stained or dirty. It might collect dust, but the tube of the vacuum with a clean nylon stocking stretched over it works pretty well to lightly vacuum dust off things like this.
Trish Burr posted a newsletter showing mounting embroideries with acid free card and acid free double sided tape. I have tried it and it is super quick and easy to do and remains super stretched. I would not try it on anything that I intended to be around for generations incase there is long term problems but for demonstration or practice pieces it is ideal. Do you have any opinion Mary?
Yes – I have some acid free painters’ boards (canvas boards, rather than card, so they’re a little stiffer, a slight bit heavier, and sturdier than card / foam core board), and acid free framer’s tape, for just that type of mounting. It’s the same concept as mounting anything to frame, only you’re not putting in a frame, and you’re not lacing the back.
Hi Mary – Happy June 1st!!
I love you idea for the small projects. I will be using it for non-Christmas related gifts instead of framing them as I’m always interested in ways to display completed projects that don’t have to be hung on the wall! Have you considered considered selling any of your samples? Not the ones near and dear to your heart, but the ones you don’t use in your new location? I love your work and would be interested in purchasing some and I’m sure there are others out there who would too. That would be a good way to clear out some of your older projects and give you extra $$$ that you could use for setting up your new digs. Just an idea
I’m applauding your use of something cheap meant for something else, because we all know that if something is dedicated to a specific, and comparatively smaller, group of people (here: embroiderers) then it will be expensive. Example: lighting. It is far cheaper to buy light for reading or working than it is for embroidery. Even if they’re the exact same lights. Marketing! Ugh. (Kinda like how women’s products are, generally speaking, more expensive than men’s. You know, deodorants and razors and shampoos and whatever…)
Okay, that being said…. the painter in me is cringing and dying when you cover up the little canvases! Oh, it hurts. I currently have a single unpainted canvas that I cannot paint on until I get more canvases. Imagine a zombie apocalypse where the supply of canvases, or suitable fabric for embroidery, dried up. That last one, that last little bit of linen, would have to be a freaking masterpiece in order to justify its use! But… that may have nothing to do with my point. I haven’t slept, so I can’t really tell.
Love this idea. I know the idea behind the stapling is for ease and speed to get these little samples into tiles but I’m wondering why you didn’t just glue them to the frame? Cost? For me, I think (and I’m not sure haha) that gluing would be quicker. Just wondering. Thanks.
I love your site and I wish I would have found you 30 years ago. Your works are beautiful.