


I know we’re getting a wee bit close to Christmas, but if you have it in you to stitch something Christmassy over the next week or so, perhaps this project will tickle your fancy!
Remember last week when I showed you the holly & evergreen design that I had altered and started stitching?
These designs are now part of a three-towel ready-to-stitch set available in my shop, here. In the set, you’ll find three variations on the design: a large design, a medium design, and a lighter design.
The design is also available here as a single-towel full kit, including threads, needles, full-color instructions, and high-quality cotton towel with the design pre-printed and ready to stitch.
You’ll find more details below on each of these products – the three towel set and the full kit.
Today I’m going to share a few tips with you on how I stitched the design, along with a thread and stitch list.
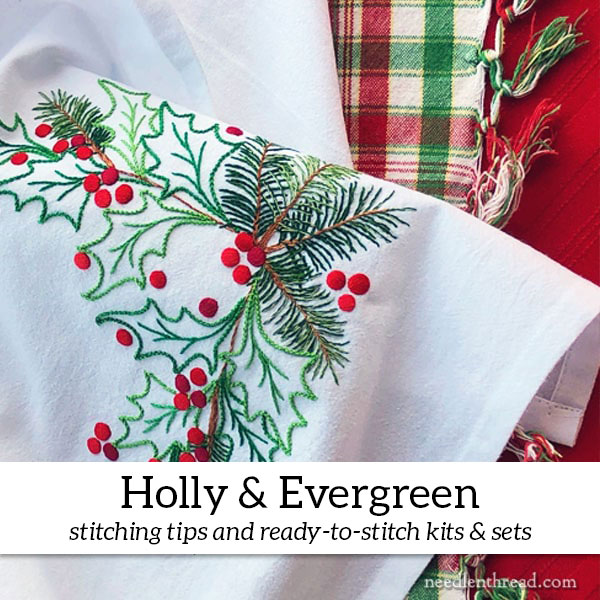
I’ve stitched this holly & evergreen decorative corner onto a flour sack towel, using only four very simple stitches. This keeps the whole project uncomplicated and relaxing. The results are not only Christmas-colorful, but they are just a little textured, to give some extra interest to the whole design!
The project is suitable for beginners and beyond.
Supplies
In addition to the three-towel ready-to-stitch set or the Holly & Evergreen full kit available in my shop (more details below), here’s a list of supplies you’ll need if you want to use the same colors, threads, and stitches I used on these samples.
You’ll need a hoop. I used a 6″ wooden hoop with the inner ring bound. You can find a tutorial for binding the inner ring of a wooden hoop here. Binding the inner ring helps protect your fabric and it also helps maintain good tension while you’re stitching.
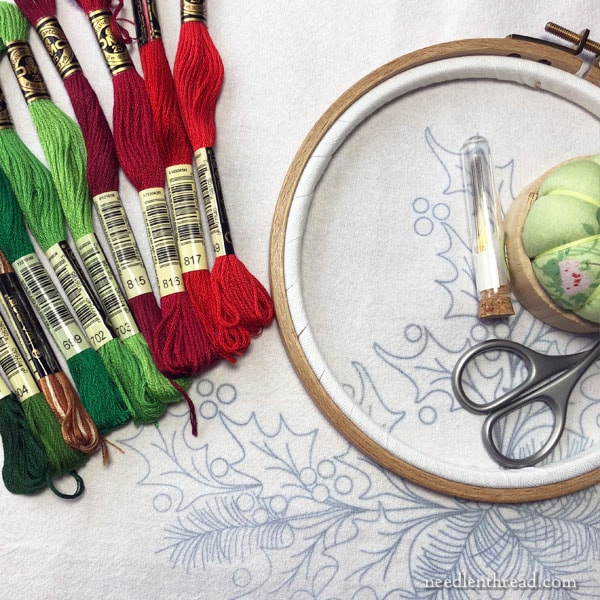
You’ll need needles. I used a #7 crewel for all the stitching.
And you’ll need a sharp pair of scissors.
Threads
Flour sack towels are meant to be laundered, so the threads you choose for this project should hold up to the wash! As a precaution, you might check your threads for colorfastness, to make sure they don’t lose any dye when laundered.
For threads, I went through my collection of DMC floss and pulled a variety of reds and greens that worked together. I didn’t use all the threads I pulled, and I ended up adding one extra green.

If you’re pulling threads from stash, you’ll want greens that work as evergreens (look for deep greens that might have a touch of blue in them or that might be a little olive, even) and you’ll want brighter, true green-greens that will work for the holly.
I chose a range of reds from a very dark berry-red (815) to a bright, Christmas red in 349. I ended up dropping the 815.
And then I ended up adding a dusty light silver-green (3053) to help out with the evergreens.
So, these are the DMC colors I ended up finally using:
105 (variegated brown for twiggy stems)
890, 904, 3053 (evergreen greenery)
699, 702, 703 (holly greens)
816, 817, 349 (red berries)
Stitches & Order of Work
The stitches are all very simple, and you’ll find instructions for all of them here on Needle ‘n Thread. I’ll link directly to them.
I’ll also include a few little tips, for stitching each type of element.
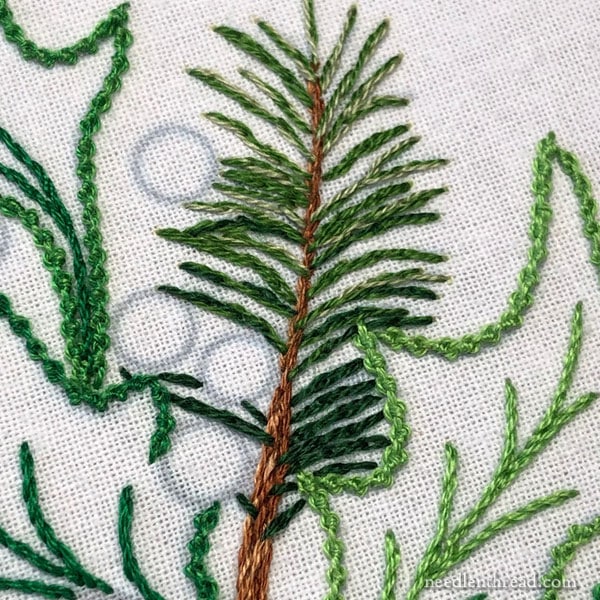
Stems
The brown stems are worked in stem stitch rows, close together and tapering into just one line where the stems are fine.
I cut the variegated brown thread in a length that included both light to dark brown. Then I stripped the floss, removing two strands, and I put those two strands head-to-toe. That is, I reversed the direction of one strand, so that both a light and a dark end went into the needle together.
Here’s a tutorial for stem stitch.
Holly
Even though the evergreen is often behind the holly, it is easier to work the holly before the evergreen because the holly is worked in Palestrina stitch. Otherwise, the evergreens get in the way of the Palestrina stitch.
You can find a tutorial for Palestrina stitch here.
To work the Palestrina stitch up to the sharp tips on the leaves, follow these instructions for working stem stitch to a sharp corner. It’s the same concept.
For the veins in the holly leaves, I used stem stitch in the darkest color of green used for that particular leaf. (See color blending below.)
Simplify It: If you want to simplify the stitching in order to work the towel more quickly, the holly leaves can be outlined in stem stitch or your favorite line stitch (backstitch, whipped backstitch – lots of possibilities!)
Evergreen
The evergreen greenery is all stitched in long split stitches. For the longer evergreen needles, you might fit three split stitches on one needle, but for many, you might only fit two split stitches.
You can find a tutorial for split stitch here.
Don’t worry about whether or not you’re coming up between to the two threads when you split your stitch, or whether you’re splitting just one of the threads! Either way will work fine.
Occasionally overlap the stem of the evergreen sprig with the needles, to give a more realistic look to the sprig.
Holly Berries
The holly berries are padded satin stitch dots.
To see how I embroidered my padded satin stitch dots, you can read these two tutorials, in the order given below:
Satin Stitch Padding – this tutorial will talk about how to build up the padding for the dots.
Padded Satin Stitch Dots – this tutorial will show you how to work the satin stitch over the padding.
I used two strands of floss when I worked the satin stitch. Normally, I would only use one strand for satin stitch, but this type of embroidery is a little more relaxed, and it takes a heck-of-a-lot longer to stitch satin stitch with one strand! Just make sure your thread isn’t twisting when you’re working the satin stitch, or the dots won’t be as smooth as they could be.
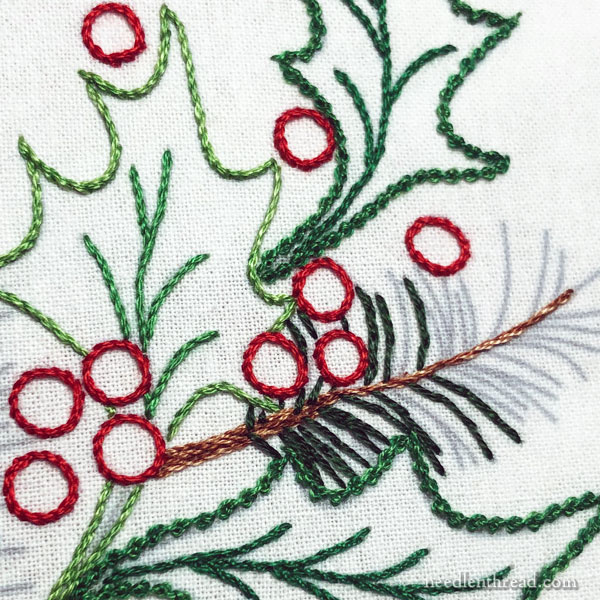
Simplify It: If you want to go for a lighter look – and a much quicker approach to stitching! – you can just outline the berries in red, using stem stitch or any other favorite line stitch.
You’ll find a tutorial for working stem stitch in circles with an invisible join here.
Color Blending
To keep the colors from being too flat, and to give me a better range of shades, I often mixed two colors in my needle.
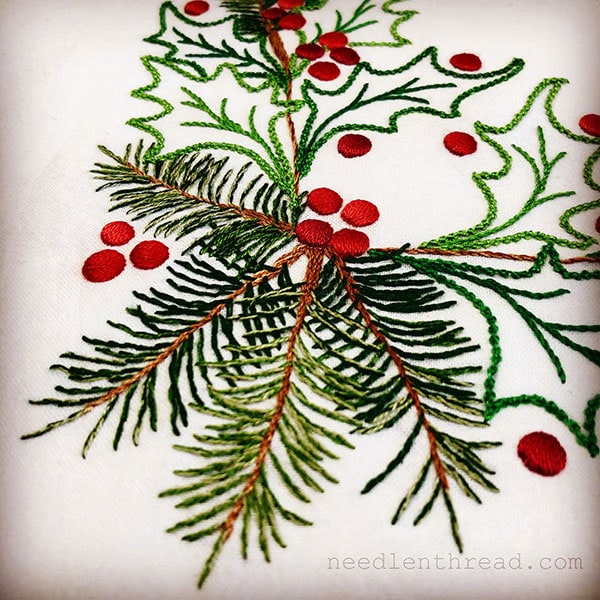
On the evergreen, for example, I used three shades of green. Let’s call them, from dark to light, A, B, and C.
At the base of an evergreen sprig, I used two strands of A. As I worked up the evergreen sprig, I combined one strand of A and one of B in the needle. Then, still working towards the tip, I switched to two strands of B, and finally, where I wanted things really light, I combined one strand of B and one of C in the needle.
Where evergreen sprigs overlap each other, I worked the back sprigs first, in darker colors. Then I worked the foreground sprigs on top of those (stitching right over the previous evergreen needles) using lighter colors.
For the holly, I combined threads in the same way, so that I would have a wider spectrum of shades of green. Play with your favorite combinations for the shades you want to achieve! Or, if you want to keep it simple, just use two strands of a single shade.
I stitched the berries in three different colors of red, using two strands of the same color in the needle at once.
Three-Towel Set
Right here in the shop on Needle ‘n Thread, you will find our ready-to-stitch sets of three flour sack towels with one of each of the designs above already transferred on them. The ready-to-stitch sets don’t come with instructions or thread, in order to give you perfect freedom in choosing your own threads, colors, and stitches.
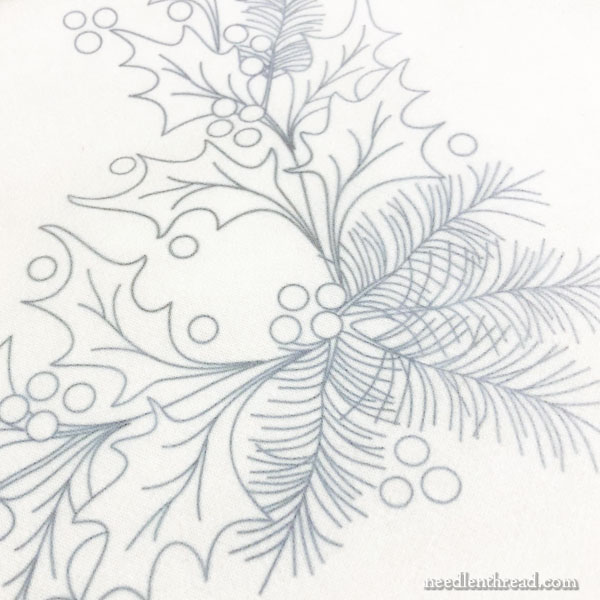
The designs are crisp and clear. The impressions will launder out, fading significantly the first time the towel is laundered, and then usually completely with the second laundering. Flour sack towels are meant to be laundered, so make certain you’ve chosen threads that can be washed.
The flour sack towels are bright white, soft cotton, approximately 27″ x 27″, hemmed on all four sides, with an inset corner twill loop for hanging.
These are very good quality towels (the best I’ve found).
Single Towel Full Kit
If you would like to purchase a full kit for this project, you will find it available here.
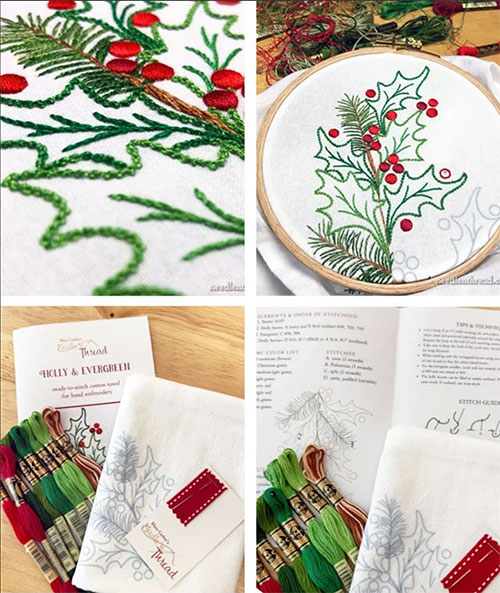
The full kit includes:
- One high quality cotton flour sack towel, with the design pre-transferred and ready to stitch
- 8 full skeins of DMC embroidery floss – sufficient to embroider additional towels
- High quality English needles
- Stitch guide, color layout, stitch instructions
The kit is ideal for those who wish to embroidery a single towel before committing to a whole three-towel set, or for those who would like instructions, threads, and a pre-designed towel all in one package. There is enough thread in the kit to embroidery towels, too, if you have the three-towel set as well.
The full kits make great gifts for stitching friends or loved ones who are interested in hand embroidery. Consider pairing it with our Embroidery Essentials Tool Kit for beginning stitchers who would benefit from good quality tools.
Hello this day, Mary! These are delightful and definitely earn a spot in my pattern collection–thinking a nice Christmas tote next year. The Palestrina stitch is so lovely on the leaves, just makes me want to get going now, but a bit too much on the old plate at the moment.
Anyway, thanks!
Blessed Advent to you,
Linda
I see your Holly and Evergreen set is sold out! If you decide to put together another, I would so love! The design is simplicity at its best!
Hope you have a Merry Christmas,
Michele Hill
Hi, Michele – Sorry about that! I didn’t have enough towels on hand or enough time to prepare a lot, so the few I had sold out pretty quickly. I’m going to order more towels and prepare a few more sets to have in the shop so people can order them if they want, but it won’t be before Christmas!
I do, would like to have been added to a would have list if there is one available.
When you do have more linens available wwith the three patterns pre-printed I would lo ve to purchace a set. Thank you.
Thanks again, Mary, for your patterns and generosity. Everything is so helpful.
I noticed you used an old DMC variegated floss 105. I never see those at the store any more, only the newer Variations. Was this an oldie but goodie from your stash? I’m sure people can blend threads or use a different brand if needed but I will caution that other brands are not always colorfast.
No, this isn’t an older skein. I bought it this summer when I was doing the children’s classes. DMC 105 is widely available.
Oh, Mary! I missed your email by 2! hours and all the pre-printed towels were gone.
I’ll have to purchase a transfer pen and paper and do it on my own! You are a VERY popular read.
Just saw your comment about doing more towels after the first of the year. Maybe I’ll get lucky then, since I don’t have time for the projects now.
I missed out on the tea towels but I downloaded the patterns and think this will be lovely on some holiday napkins. Maybe in a natural linen. I love how real this looks. I have never used variegated thread as you described and wondered how you got those brown stems so realistic. I can’t wait to try that technique.
Disappointed I missed out on the towels! How will we know when you have more in? What transfer method did you use to get the design on the towels?
The design is absolutely stunning! Thank you for sharing it with us.
Hi, Beth – Thanks for asking! I do plan to prepare more of the towels, but it won’t be until after Christmas. When I have more ready, I’ll put them in the shop and mention it here on the website.
Thank you for the great free patterns. Congratulations to the book winners. It was a fabulous offering.
Oh my gosh. This had me out there looking for flour sack towels, which I did find, and hope they end up as lovely as yours! This is all for NEXT year’s gifts, of course!! Thank you for this lovely, lovely pattern and instruction!
Thank you, ever-generous Mary!
So lovely, Mary! The needles of the pine look as if they’ll even give off that Christmas tree smell!
Could you remind me please…which company sells the flour sack towels that you use?
Thanks!
Thank you for these beautiful patterns and the detailed information on how you completed the towel. I plan to do these —but if I don’t get them done, I will still have this article to enjoy thanks to you!
¡Oh, Mary! ¡Tengo tantas ganas de hacer este bordado, con sus verdes y rojos tan brillantes! No soy buena bordando, pero aun asi… He comprado los hilos que me faltaban, he copiado el dibujo, lo he calcado en un pequeño mantel blanco, he visto todos los tutoriales con atención, y esta tarde me he sentado ilusionada a empezarlo.
Sólo puedo decir una cosa: ha sido horrible. ¿Cómo puedes hacer esos “berries” tan perfectos? Los mios no pasan de uvas pasas. Y he hecho muchos, esperando mejorar con la práctica. Pero no hay manera. Siempre se me resistirán. ¿Seguiré probando?
¡¡Cuánto lo siento!!
While I do like geometric designs, my absolute favorites are flowers, especially roses. I love stem stitching roses with floche, making bullion roses with wool, and I am learning to use long and short more effectively with your video instructions and those of Philippa Turnbull in crewel wool. Other flowers are also enticing to stitch. Working on free-hand embroideries by making fantasy flowers is great fun. too, little wheels using blanket stitch are very effective. I have an obstinately brown thumb, embroidery is the only way I can grow flowers. And there’s no stooping over a flower bed!
Thanks!! I am on a tea towel binge right now these these will be great!
Thank you for this lovely pattern and the instructions. Have a Merry Christmas and Happy New Year.
Whoa, Mary, you have really nailed the evergreen….love conventionalized work, abstract, geometric, etc…….but needled twigs that look real make me happy. I’m a couple days away from second cataract surgery but I have the evergreens on my list of “little things to try when I get my old lady reading glasses.”
Hi Mary. Thanks so much for the patterns. I love them. I have some flower sack towels, but I’m kind of at a loss as what to do with them. With hand towels I can embroider in the middle and then fold them in thirds. But the flour sack flours are really big. How do you display them? I thought about lining a bread basket, but it would hide a lot of the embroidery. I look forward to hearing what you do.
Thanks again,
Cynthia
Stitch the corners, Cynthia – then, if you use it for lining a bread basket, the embroidered corner is the part you fold over the top. Otherwise, they can hang from the opposite corner, or you can fold in thirds, with the embroidered corner out, to hang on a bar.
I want to thank you so much for your excellent blog! When I was a child, I learned simple embroidery from my grandmother and along the way taught myself other crafts. My career left little time for any handcrafts, but after retirement, I decided to pick up embroidery again and found your blog which has been such an inspiration to me. It is particularly well done because rather than starting at the beginning post, a novice can start reading posts at any point, and the links you embed lead to further instruction. Earlier this year, I decided the simplest and most practical thing I could do is to embroider flour sack towels as gifts for my friends, but I need to learn new stitches. This free Christmas design with detailed instructions for completion is such a gift! I look forward to learning more from you in the new year! Thank you so much!
Would you mind sharing how you transferred the design to the towels?
Hi Mary, Would you share with us the back side of your Holly and Evergreen?
I’m transferring the full pattern to a flour sack towel (tonight). Then onward to the threads. Will mention that I had difficulty locating color 105, took 3 major craft stores before I located 105! I want the back of my towel to look nice as I plan to give them as Christmas gifts in 2019. Thanks, Carol
Hi Mary,
I am working on the satin stitch dots for the Holly and Evergreen design. For one thing, I traced my own, so my circles aren’t exactly round. When stitching the dots with the split stitch outline, they look round. But after stitching the satin stitch, if I look at it from one direction it looks round. However, if I look at it from a different angle, it is oblong. Any suggestions?
Hi, Beth – here’s a tutorial on satin stitched dots: https://needlenthread.wpengine.com/2011/03/satin-stitched-dot-tutorial.html If you apply the principles, it should work with the holly berries!
An absolutely beautiful design. Congratulations.
First, I love your site! I am new to embroidery and find your site overflowing with fabulous information. Thank you for your body of work.
Second, I just purchased your Holly Tea Towel Set and would like to know how many skeins of each color floss do I need to purchase to complete the three towels?
Thank you again for this wonderful site.
Stacey Lynar
Probably just one of each, Stacey. Maybe with the greens, you might do two if you tend to pick out or if you’re not as conservative with thread as you stitch. But normally, I’d say one of each.