


If you’re a hand embroiderer, a quilter, a textile artist, or a crafter, you’ve probably run into situations where you could add words, text, and lettering to your projects.
Hand embroidery is an excellent way to personalize gifts, household objects, momentos, quilts, journal covers – just about anything! Writing with your needle and thread can also be a lot of fun! And while I wouldn’t necessarily advise you to take class notes this way, just think of all the instances in our lives when hand embroidered words could be the perfect form of expression.
There are so many ways you can include a signature, a special quote, or just a simple word on your latest project by using hand embroidery. To help you out, I’ve put together a series of lessons on adding lettering and text to projects with embroidery stitches.
Here’s a list of the 15 tutorials that will take you through the ins and outs of stitching beautiful hand embroidered words!
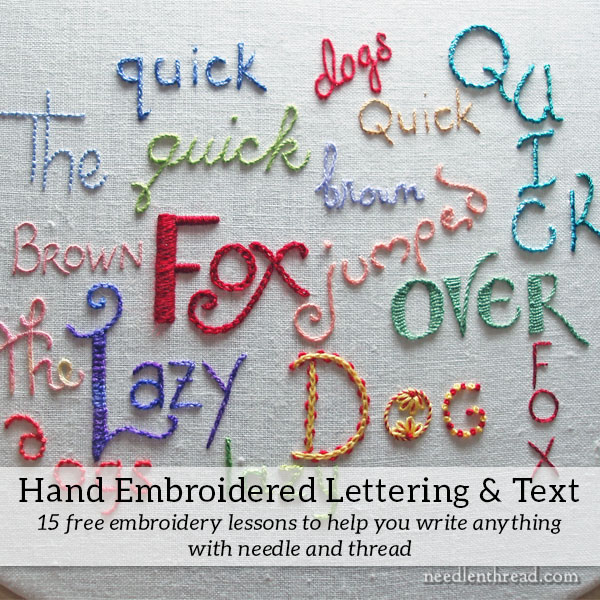
Hand Embroidery: Lettering and Text 1 – This tutorial covers setting up the lettering sampler. In this particular article, you won’t learn much about stitching your letters, but there are a few tips and tricks for design transfer discussed, if you want to take a look! You can also get a good look at the text sample that I’ll be using in this series.
Hand Embroidery: Lettering and Text 2 – This tutorial features lettering in backstitch, but it focuses mostly on how to “travel” your threads in order to achieve a clean, finished look from the front. I discuss the path of the embroidery, noting that the path you would follow for hand writing is not necessarily the same path you would follow for hand embroidery.
Hand Embroidery: Lettering and Text 3: Dot Your I’s. In this tutorial, I focus on one method of dotting I’s. You know how the dot floats so far away from the text? Well, how can you dot, without carrying your threads? I’ll show you how, and then the technique can apply for a variety of different dotting stitches.
Hand Embroidery: Lettering and Text 4: In this tutorial, the focus is on stem stitch, especially how to travel in the right direction to keep the stem stitch looking like stem stitch, and to keep the working thread in the right place in relation to the needle. This sample is in cursive, so we will also look at how to travel the threads to achieve a nice cursive text, without bulky double lines. Finally, this tutorial also addresses the question of crossing over previously stitched lines.
Hand Embroidery: Lettering and Text 5: This tutorial will focus on a suitable stitch for very small text – whipped backstitch – and how to keep the whipped backstitch smooth and consistent in its twist. We’ll look at the difference between whipping the stitch while traveling in different directions, and discuss how to avoid changing the direction of the stitching. Also, check out this article on stitch direction for whipped backstitch – it’ll show you the difference in the look of your stitching depending on the direction.
Hand Embroidery: Lettering and Text 6: Did you know that you can combine your stitches on the same lettering for very nice results? Well, you can, and this tutorial is going to look at using a combination of stitches on the same lettering, specifically buttonhole stitch and stem stitch.
Hand Embroidery: Lettering and Text 7: Working the initial letter in padded satin stitch makes it really stand out! The rest of the lettering in this tutorial is stitched in chain stitch. I used embroidery wool for this, in a beautiful red, and I’ve written up a little review of the thread (Simply Wool) within this tutorial.
Hand Embroidery: Lettering and Text 8: The split stitch works great for embroidered writing, especially when worked with a non-stranded thread, like floche or perle cotton. This tutorial shows you how to embroidery letters using split stitch and it talks a bit about threads, too.
Hand Embroidery: Lettering and Text 9: Combining herringbone stitch and split stitch works well with Stef Francis silk.
Hand Embroidery: Lettering and Text 10: In this tutorial, I’ve used different stitches for each letter of the word, including the French knot for one letter… Yes, it’s true. You can write with French knots!
Hand Embroidery: Lettering and Text 11: This little “lesson” is short – it covers the heavy chain stitch worked with a fine thread. This one’s not heavy on instruction – all the tips and tricks already discussed in previous tutorials apply to working the heavy chain on these letters.
Hand Embroidery: Lettering and Text 12: In this tutorial, I’m using coral stitch on smaller letters. I like the nubby texture of coral stitch! I found it somewhat difficult to stitch small letters (these are 1/2″) with coral stitch in a hoop. If you decide to use coral stitch on your letters, I recommend working in hand, without a hoop, for the coral stitch – it’s much easier to manipulate the fabric! Still, I like the way this word came out!
Hand Embroidery: Lettering and Text 13: Treenway Silk makes beautiful whipped backstitch letters. In this article, I’m working on larger letters with this heavier thread. The twist in the silk and the twist in the stitch play well off each other!
Hand Embroidery: Lettering and Text 14: In this post, I show you a small word (1/2″) written in half-cursive, and stitched in stem stitch. It would be helpful to review Lesson 4 above, which focuses on stem stitch, for more information on working with stem stitch on curves, etc.
Hand Embroidery: Lettering and Text 15: The Finish. In this post, you’ll see some of the “filler” words worked in different threads, but using stitches we’ve already covered in the previous tutorials. You can also see the finished lettering sampler!
Looking for inspiration & information on hand embroidery?
There are all kinds of reasons to sign up for the Needle ‘n Thread daily newsletter! Check them out and sign up today!
I'm excited to read and do all these tutorials – thank you Mary!
Mary, do you have a source for well made linen or cotton hankies? If not, can they be made by hand and how do I make them? I want to give embroidered hankies for Christmas gifts and I need to get started! Your Lessons are great.
Karole King
Hi, Karole –
I've gotten pretty good handkerchiefs from EmbroiderThis:
http://www.embroiderthis.com/handkerchiefs.html
If you click on "women's" or "men's" handkerchiefs, you'll see what they have in the way of cotton and linen.
Hope that helps!
MC
I'm so pleased you are doing these tutorials!! I'm doing my first redwork and I'll be applying your techniques to my project and other embroidery projects in my future. I can't wait for your next post! My redwork is of snowmen and I've been worried about showing the thread traveling to the french knots for the buttons and mouth.
This will be so useful!
Thankyou, Mary
vos cours sont clairs et très instructifs .Merci
Thank you for posting this excellent primer. This is the sort of thing that makes the internet a great invention.
Hi Mary,
I happened upon this site while looking for new stitches. This was more than I thought I would ever find. There are so many amazing ideas and exciting projects to dive into. I am starting with text since that is why I was looking in the first place, but I will be returning to use this site for a very long time. Thanks for putting so much work into it.
~Christen~
Hi, Christen! Welcome aboard – I’m glad you found Needle ‘n Thread! Enjoy your browsing!
i would like u are help,i like to it so i can change my life style,send for me more techniks books p/s.
Hope this does not sound cheeky, but could anyone give ideas of the best places to advertise my embroidery work cheaply apart from craft fairs?
Many thanks
Continued from last message…..
What is the best stitch and thread to use when embroisering babies bibs?
Many thanks in advance.
Are you talking about knit baby bibs, or linen, or…? With baby bibs, I’d suggest a thread that can be washed without worry – DMC or Anchor stranded cotton, for example. As for stitches to use, that completely depends on the design more than anything else, I think.
~MC
I just discovered your site, thanks for all the great detail! I am so inspired and going to use all your great tips to start a project this weekend.
The quick brown fox jumps over the lazy dog
1880’s!!
Alas, my typing teacher made us learn the above long sentence … and we had to be able to type it and other sayings with our eyes closed.
“Now is the time for all good men to come to the aid of their country.”
That is another saying — and we also had to learn to do it eyes closed and NO spacing between words.
Although my typing teacher told me ‘You’ll never make a living as a typist’ — she was dead wrong. I was a statistical typist and typed numbers at 125 wpm and drove proofreaders nuts when there were no mistakes for months at a time!!
Oh regular words typed only at 95 wpm. I didn’t like typing words.
I don’t stitch fast … and, glad there is no reason to do so.
Mary,
I am so excited to find your website. It is so well done. Thanks for opening up this world to those of us who are “self-taught”.
Jodi
The stitches I found on this page page are so beautiful ,i like them very much ,but I`d be glad to see more stitches like the feather stitch . I `d also be greteful if you wrote the name of the stitch and how it is performed
Thanks,Samira Saleh
Hi Mary!
I hope it is okay but I own a website, Snippets of Design, & I have been very impressed with your hand embroidery tutorials. I was hoping that I could reference back to your blog every so often when hand embroidery instructions are helpful for one of my posts. If you have a problem with this, please let me know. Thank you for compiling such great tutorials!
amber
Hi, Amber! Thanks for your note! I don’t mind at all if you reference Needle ‘n Thread – in fact, I appreciate it very much! – MC
HI, I would just like to say thank you for putting everything on the net. You have inspired me to use the stitches in my textiles project at school. Thank you so much.
Tara
Hi Mary
As a child I learned 3 hand embroidery stitches,and never thought of hand embroidery again.After college I some how got into it,searched internet to learn more stitches and found your web site.I thank god for the day I found it.
I am hoping to get your opinion on some thing.
I am going to embroider my daughter’s name on stretched canvas and used your pattern, Flowered Monograms from La Broderie Blanche, 1912.after coping it into the canvas I realized that-too late-it is too hard to embroider on artists canvas.Any way I have to finish my project,no time limit,which is a good thing.She is only four.
Which stitches will be the best for embroidering those letters,I started with button hole stitch,and don,t like them.
Thinking of raised stem,or raised buttonhole,but may be difficult on the pockets-don’t know what else to call the little holes in the letters-.Please give me your advice on which stitches will be the best.
I also embroidered few pieces of 8×8″ canvas for my daughters teachers,used caston stitch ,bullion,long and short etc for them .Floral patterns are easier to work with than the letters.Please help me
Thank you so much for your inspirations.
Caroline
Hi, Caroline – Monograms are often stitched in satin stitch – maybe that would work for you? You can also use stem stitch as a filling, or chain stitch. You could outline the letters rather than filling them in. Lots of possibilities! ~MC
Mary
Thank you so much for your advice.I want a filling stitch,so I will use the stem stitch even though it is hard to work on canvas.
I will send the pictures of the canvas embroidery before christmas.Please give me your opinion.
CAroline
Hi Mary
I send you some embroidery works i did on canvas.I got the patterns from various websites.hope to hear back from you.
Caroline
Hi, Caroline! YES!! I got them – I will reply to you via email. I love the photos – the canvases turned out great? -MC
How did you use the yellow and red on Dog. I missed or could not find the tutorial..
It’s laced chain stitch – the yellow is chain stitch, and then a red thread is laced underneath it…
Unbelievable what you folks can make with a needle and thread. Great imaginative effort as well, keep up the great work and site.
Derek
Hi Mary,
Thank you very much for your reply and more so for this link too..very very helpful.will definitely go through all the links and decide on one. thanks alot.
wow, oh, wow! When you – if ever – are not too busy, I think you might like to know that you have reached a type of person you might not have expected.
I am doing 11 needlepoint projects for our grandchildren, sons-in-law and daughters.
It took me this long to decide what I wanted to leave them of myself for the time when they might look back and wonder who I was.
Three projects are done. Because of the Internet and my now experiencing it (the last two months only) I am stunned by the accessibility of materials, information, and good ethics and values, not to mention the wonderfully kind and bright people with whom none of us could otherwise ever connect nor learn to appreciate.
To me you are amazing.
You are a real person, one who knows how to write, how to use capitals and apostrophes (excuse me, capitols and apostrophe’s…I am so frustrated about what we are losing in this country).
I needed to put an advertisement in a small newspaper in our rural area.
The person accepting the ad at the paper suggested I used a “few apostrophes.” I asked why, since I was using plurals. We had two motor scooters to sell. She replied, “Oh, I just thought it might look pretter!”
This was already under way when the Webster’s Dictionary decided to include the mispronunciation of the word “nuclear” by an ex-president of the United States!
That being said, thank you for your patience and devotion to an more than one art – that of language and also that of needlework by hand.
I am a harpist, 75, with 6 dogs, 2 cats, 1 husband of over 50 years, who is also a musician.
We did the classical thing for a long time, and I taught as many as 60 students a week while John worked three jobs (public school band director, tuning pianos, performing in the Fort Wayne Philharmonic.) Since we had a severely handicapped child I found ways to supplement our income for college expenses for the other three children while I remained at home, other than the ten years I spent in the Philharmonic, then quit and made a lot of money free-lancing. I gigged when John could be with the kids.
I tell you all of this because I am absolutely stunned that you could be a full-time professor – I presume “graduate degrees” might include either two masters or a doctorate. And for five years you juggled this business as well.
We now play in four community bands. I am on trumpet, and John is playing baritone saxophone.
I am also learning to play trombone because one band lacks a third trombone and is a performing group. I have filled in on snare and suspended cymbal, string bass, tuba (it did not work…mouth too small to get low notes), baritone and now clarinet (the latter only in our house).
So, why am I writing you? Because I thought you might like to know that, at the time I began developing an interest in needlework, there was a needlecraft store in Ann Arbor, Michigan. And there was nothing at all in Fort Wayne, Indiana, when we moved there.
At Michigan my husband was finishing up his master’s degree and we had not yet started our family, I having decided that I did not want to continue with graduate school. Because U. of M. is where we attended, I had access to the town and located a yarn shop that summer.
I had fallen in love with Erica Wilson’s two Jacobean pictures/pillows. They were pretty intricate for a non-stitcher. Her explicit guides taught me. I had to completely finish, look at and bemoan that I had indeed sewn the first one too tightly. So, since there had been no one around to assist me at that time in the U.S. to my knowledge, I tore it all out and totally started over. I still have these…never mounted, but a reminder of my humble start.
Then there were Elsa Williams kits. I was too busy to do them all but I scrounged the money to get several…and did six or eight seat cushion of fruits, some Jacobean and ome Delft. One of the fruits was a gorgeous cluster of blended grapes. So when reading your observations about various needles….this is when I decided to write to you. I would have benefited from knowing the difference a needle can make when coming up through a stitch to blend the colors as afore-mentioned.
I am now doing needlepoint. I gave all my accumulated counted cross-stitch away to someone who does not use her eyes as much as a musician must, in addition to other daily functions.
The 14-count needlepoint is a far cry from petit point as we call it in this country, differing from what the United Kingdom calls petit point., as I understand it. I would go blind!
In fact, I recall reading in an old encyclopedia, that the twelve-year-old Chinese boys employed (1900 A.D.) went almost blind after a year of very close work painting their symbols on tiny objects and heads of pins.
Thank you for your website, for being who you are, and for your delightful explicit instructions about your blackwork fish. I fell in love with blackwork – again through Erica Wilson’s abilities and books.
Nancy Morse
It’s so nice to see all the hand embroidery enthusiasts out there! Thi is wonderful!
Mary, this practically melted my heart when I saw it. Thank you for sharing this project and tutorials. I can’t wait to start this project!
Let s take provide each one to is as critical to shell out for help.
My webpage web site (Jamika)
Muy buenos dias le saludo cordialmente y la felicito sus bordador y todos sus proyectos son lindisimos , Dios la bendiga y mil gracias por compartir su talento yo estoy encantada de poder aprender atravez de usted , bendiciones.
sra. Karen sus rabajos son preciosos Dios la bendiga por compartir su trabajo estoy muy emocionada de poder aprender gracias.
Hello Mary,
What kind of thread should I use to outline my satin stitch using the split stitch? I was going to use white dmc but looking at your video I am unsure that would work? Would DMC work?
Thank you,
Sandra
Normally, you just use the same thread you’re satin stitching with, so that there isn’t a difference in color with the satin stitches that are worked over it.
These are fantastic! Thank you so much for sharing, it is so difficult to find anything on lettering. Anna
Trying to find a website or book that provides old monogrammed embroidered letters of the alphabet. Do you know of any? Deeply appreciated if you do. Thanks Cindy
Hi, Cindy, do you mean that it features already embroidered monograms, or the patterns? You can try pattern maker charts (google it) and I also have some monograms available, here: https://needlenthread.wpengine.com/2008/06/monograms-for-hand-embroidery-index.html
hand embroidery is my thing!
I love your tutorials and your in depth instructions! You have broadened my embroidery knowledge by leaps and bounds! Thank you for sharing your tremendously amazing skills! I only wish that with this tutorial you could label each instruction or include in the description with the word you used for each stitch, for example the herringbone stitch combo for the word ‘Lazy’. Just an idea… not that I don’t mind learning more, but sometimes it would save time. Keep up the great work!
Mary,
Your website is BY FAR the best source of help, tips, videos, and all over information for embroidery that Imhave ever seen!! Thank you sooooo much for sharing all of your expertise with us!
Blessings,
Pat
I love these tutorials and the types of fonts that you use.
I was wondering if you have any tips to make those kind of letters on dark backgrounds?
Thank you for sharing this lovely work of yours!
How to do a Straight Stitch? Some of the letter stitches call for a Straight Stitch and I can’t find a tutorial on it.
Hi, Betty Jo – a straight stitch is the simplest of stitches. Up in the fabric and down again a distance away. It just makes a line with the thread, however long you want the stitch to be.
This looks like an amazing tutorial. I am a beginner and would like to follow along, but I am stuck on the actual size of the lettering. I am using 1/4″ grid paper and counting the squares in the picture to match, but it seems like I am ending up with something significantly larger than my 8″ hoop and when I look at your image of your 10″ hoop it looks like it would fit within an 8″. Did you use a smaller grid? Any help would be greatly appreciated!
I usually use 1/8 grid paper when I’m drawing designs out. But you can use the 1/4″ grid – just write your letters and words a bit smaller! I just use gridded paper to give me lines to keep things straight. But you don’t really have to use the gridded paper. You might trace out an 8″ circle on your paper and then draw your design inside that, to make sure it fits.
Thank you so much for these tutorials. I have always desired to learn to embroider but have had no one to show me. I wanted to make a lovely felt banner embroidered with a message for the birth of a friends baby – a mammoth task for someone who had never done any before. Then I came across this site, and with a little practice, completed a very simple split stitch message! I was so proud of myself 😉
I miss coming back again for my next embroidered project!
Thanks , can’t wait to try each
Hi Mary!
I hope you can help with a decision if need to make using your Modern Roman letter J from Needle N Threads’ monogram book. I am adding tatting and hand embroidered monogram to a set of napkins for a friend. What stitch would you recommend I use for the monogram? I plan to stitch with DMC floche because I like the color I have on hand, so I can be open to changing threads if you so advise.
Hi, Mary Kaye – just checking… in case I’m going a little batty – did we email back and forth about this? I think I sent you an email yesterday or the day before on this very subject. If not, please let me know!
Funny thing about the phrase you are using as an example. As it stands, there is no “s” in it. When I was learning to type the phrase was “The quick brown fox jumped over the lazy dog’s back” thus having an “s” in it. These lessons are invaluable as I have a special project in mind.
🙂 Well, I quoted the initial line incorrectly. It’s “The Quick Brown Fox JumpS over the lazy dog” – so I through the S in on the dogs when I realized it.
Could I get a pattern for this tutorial? I would love to practice this before I start on my Micah 6:8 project.
Hi, Donna – I just scripted this out with a pencil. You can probably write out your own version, and adapt the style to your own handwriting. It would help you to prepare for future projects that you might want to write out yourself. If you’re not satisfied with your own handwriting, try playing around with computer fonts – just type up what you want and cut out and arrange the words into a design.
This is very helpful thank you
Thank you very much for the wealth of information on this site. I have been creating six Christmas stockings during this pandemic and have come back to this site many times for inspiration and education. Have not done embroidery for many, many years. What little I did know came back once I watched the videos plus I learned so much more. Excellent website. Thank you!
Can you advise when you might be expecting your embroidery hoops to be restocked
Thank you
Linda Lewis
Hopefully some time in the first half of this year…? If you drop me a line, I’ll add you to the advanced notice list for them.
Thank you so much, Mary! These tutorials are exactly what I was hoping to find somewhere on the internet. Excellent and so inspirational – I’m looking forward to a hobby weekend.
I’m curious where you find inspiration for the fonts used for hand lettering embroidery. It would need to not be too complicated, which could happen with many of the computer fonts these days… The cursive “hello” shown in a recent newsletter picture is a very nice, smooth font, just saying 🙂
Hi, Taralyn – I’m glad you like the lettering. Yes, there are a plethora of great handwriting fonts available today! But that’s actually just my handwriting. LOL!