


I’m in a tight fix. I’ve let the spot sampler slide a bit, because at one point, I had gotten pretty far ahead on it… so I haven’t embroidered on it for quite a while. But rats. My students are almost caught up with me! This week, they’re filling in a few leaf motifs and learning the stitches associated with those, and then they’ll be where I am.
This could be a good thing. It could also be a bad thing. It could be a good thing, because it might motivate me to move ahead quickly with some stitching. It could be a bad thing, because I don’t have a lot of time for stitching right now! But I’m pretty certain I’m not supposed to fall behind my students. Hmmmm……
In the meantime, I thought I’d show you what my spotty spot sampler looks like. This isn’t really my favorite type of stitching, but I have enjoyed working on the sampler. I just need to get back to it!
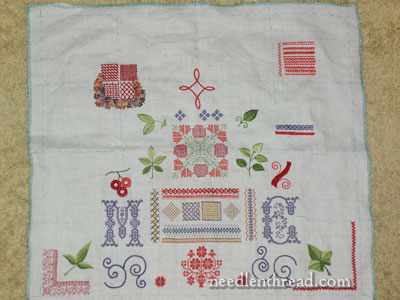
Here the sampler is, in it’s cluttered glory. To name the embroidery stitches that have been done on it so far:
1. Counted work (cross stitch, blackwork, backstitch, pattern darning, herringbone on the grid, and various filling patterns, including cloud filling, lattice filling, Japanese darning, Bosnian filling, fly stitch lattice…) Granted, these aren’t all solely counted techniques, but they work really well on counted ground, and they served their purpose, which was to get my students to understand how counted thread techniques work.
2. Surface (non-counted) stitches: stem stitch, Portuguese knotted stem stitch, stem stitch as filling, chain stitch and variations (see below), detached chain, French knots, split stitch, cretan stitch, fly stitch (as a filling), buttonhole stitch and a variation (still more to come on that), basket stitch, and… I think that’s it. We still have a lot to cover this quarter!
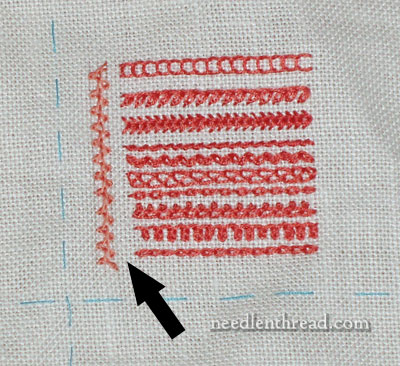
I’m not sure what the heck went on here, but it took the picture for me to notice it. I think, because the sampler is fairly wrinkled up, I didn’t notice that this is indeed crooked and not just a matter of the messy fabric. I’ll have to fix this. (Or not! After all, it is a sampler!) It looks as if I ended each row of variation a little bit shorter as I worked down those rows.
These are all variations of chain stitch. From top to bottom: open chain, pendant chain, wheat stitch, twisted chain, zig-zag chain, double chain, cable chain, crested chain, rosette chain, and… chain stitch. Down the left side is Spanish knotted feather stitch, which really is just kind of an alternated twisted chain stitch pattern. There’s also a spot of heavy chain stitch on the sampler (the periwinkle scroll on the lower left side), and some braid stitch (in a line on the right).
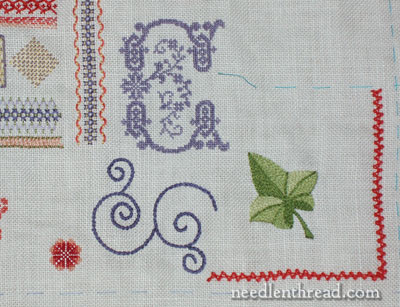
The lower corner here is also worked in Spanish knotted feather stitch, which I’ll be showing you how to work later on. It’s a fun stitch, and I love the look of it for edges. So it’s a must, as far as learning goes!
While I like the corner treatment, I’m not too fond of the leaf. It’s worked in split stitch, as a filling. It’s so blocky, isn’t it?
Woe is me! Looking at the sampler at this point makes me rather uneasy. We have only 4.5 weeks of school left this quarter, if you take into account Thanksgiving break. (Oooooh. Thank Goodness for Thanksgiving Break!!!) Not only do I have to stitch like a mad woman to get ahead again, but I have to light a fire under my students, too, to get them through the push at the end of the semester, if I want them to accomplish everything that we set out to accomplish. The latter will be more challenging than the former. But the former has its drawbacks. This isn’t the type of stitching I want to do right now! (Oh, yes – I would like some cheese with my “whine”, please!)
So that’s where I am. Where are you?
Actually, I rather like the leaf. I’m stitching little silk butterflies using very fine floss. It is very tedious and time consuming, but fun all the same.
Thanks, Cynthia! I’m planning on applying the technique to an upcoming project, so I wanted to test it here. I think I’ll work a bit an softening the blockiness. It could just be the shape of the leaf, though….
I saw your butterflies – and the Initial!! The initial is gorgeous! It’s a beautiful project!
Cynthia’s butterflies (and the initial, worked in raised stem stitch) are here: http://californiastitching.blogspot.com/2010/11/back-to-silk-embroidery.html – do check them out!
Gee Mary, if your students are truly understanding all they you are having them do, you have accomplished a great deal. They are very lucky to have such a broad, complete, accurate exposure to all the basics! Remember that they have another 75+ years to ADD to their knowledge!! I wish I had a teacher like you in school. I could have started my stash that much sooner! lol!
The students are actually doing really well, Bobbi! I’m pleased! But admittedly, I thought it would go a little faster. Whenever I set a deadline, I end up having to adjust it. But that’s ok! It’s a good lesson for me, that’s for sure!
Funny about the stash!! Next semester, they’ll be playing around with different threads. There are a few in the class who may very well end up being stashers!!
MC
Glad your students are doing well… They have a wonderful teacher.
Since you asked….
For the last 2 weeks I’ve been practicing some different stitches…. referring to Needle ‘n Thread often.
I’m tickled with the Lattice Work stitch, including Satin filling. Tried the Trellis Stitch, need some more practice with that one.. Love all the links you included with the Trellis Stitch… How to Video post.
I can’t imagine trying these without your video tutorials!
Hmmm… What should I try next?
Love your Sampler…
Thanks again for the inspiration!
It’s looking just lovely, Mary 🙂 You have such lucky students! I hope that they all finish in time!
I’m liking this sampler! I don’t think the leaf is too heavy at all. In fact, I think it balances out the little window bit on the opposite corner. And as far as the “mistake”, it’s an example of how different surface stitches will take up different amounts of fabric, and “if you want to come out even, you need to plan ahead”. I have confidence that you will get it finished before the students catch up!