


Back to the Mission Rose embroidery project here! The rose is coming along….
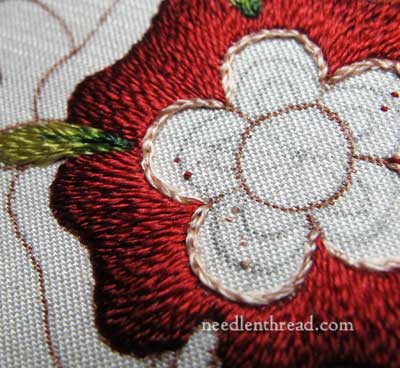
Last time we visited the Mission Rose, the outer petals in the dark reds, worked in long and short stitch, were finished. Today, we’re looking at the inner petals on the rose.
These five inner petals are worked with the two pinks in the color scheme for the rose, and then touched in with some dark red.
So I began the inner petals by split stitching the outline of the petals in the lighter of the two pinks (Soie de Paris 2641). I worked the split stitch just inside the edge of the red.
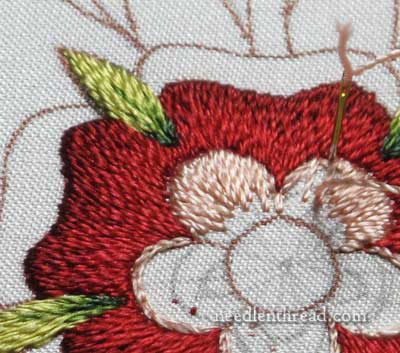
The little dots of thread inside the petal areas are the starts and stops of my embroidery threads. I use a waste knot on the front of the piece, in an area that will be covered with embroidery, and then take several tiny anchor stitches and cut off the waste knot.
This is a really good way to start and end threads on this type of embroidery, as long as you can do it an area that will be covered. It keeps you from having to flip your frame each time you need to start or end a thread.
Using a pencil, I marked in guidelines for the layers of shading in semi-circles and the guidelines for stitch direction radiating from the center of the flower. The space is so small that guidelines aren’t necessarily required, but they do help if you have trouble keeping the direction of the stitches, or judging how long your long and short stitches should be.
The first layer of long and short stitches is quite long, taking up about two-thirds of the petal area. The stitches begin by bringing the needle up inside the petal area, and they end by taking the needle and thread down over the split stitch line.
Here’s the completed first layer of pinks. They look a little wonky on the left side, but this is mostly due to the reflection of the light on the silk threads and the angle of the photo. Or maybe I just stitched them wonky! I’m pretty sure I followed the stitch direction (more or less!).
The nice thing about long and short stitch is that it is a forgiving stitch!
Here’s the second layer of pink going in. This is the medium pink in the color line up, Soie de Paris 2914.
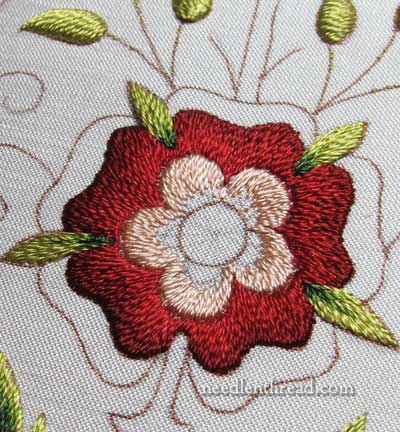
As it turns out, I’m not using the ivory Soie de Paris on the rose. Initially, I planned on the first layer of these inner petals being ivory, but there really isn’t room to work four layers of color in here, so I stuck with the pinks and skipped the ivory.
Notice that this medium pink is taken all the way down to the outline of the middle circle of the rose.
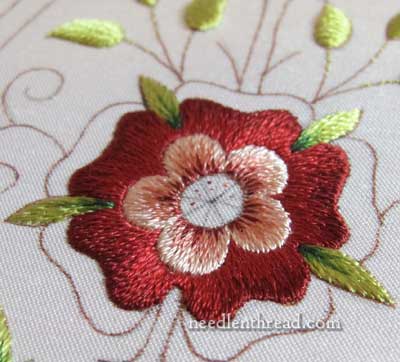
And finally, after finishing the medium pink, I took the dark red used in the outer petals (Soie de Paris 4624) and cut in just a few tiny “sketchy” dark stitches, to finish the petals. I wanted some darker contrast in the center there, right next to the middle of the rose, because I plan for the center of the rose to be worked in gold. The gold will stand out better with the darker stitches in contrast around the outer edge.
Plus, I just like that third layer of dark in there – it gives the pink petals a little more life!
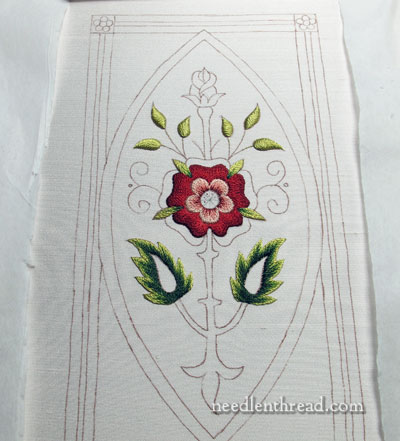
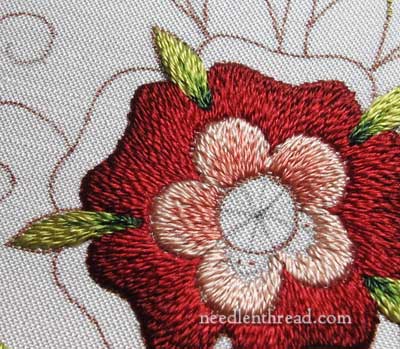
And here’s the Mission Rose so far, stepping back a little.
Next up in the order of work are the outer “turn-over” petals on the rose. The last rose I worked (this Tudor Rose in silk and gold), the outer petals were worked in gold threads. But on this rose, I want to work those turn-overs in silk.
Each layer of the rose will have a tiny gold thread between it and its neighboring layers.
We’ll be adding the gold after all the silk embroidery is finished, though (except for some tiny touches in darker outlines), so it will be a little while before we get to that point!
I’m regretting changing that rose bud style at the top of the design. Rrrrrgh. I have tested a few “overlays” with tracing paper, to see if I could change the design there without messing everything up, but it’s a difficult proposition. I’ve even considered changing that to a larger leaf. We’ll see if anything comes of these trials – no guarantees…
Questions, comments, suggestions? Feel free to have your say below!
If you’d like to read the backstory on the Mission Rose project and follow it along step-by-step as it develops, please visit the Mission Rose Project Index, where you’ll find all the articles relating to this project listed in chronological order.
This is so gorgeous, Mary. I love the reds and pinks.
The middle petals are superb – it’s really looking three-dimensional now, and very, very rich.
As for the top rosebud, it definitely doesn’t read properly to me as a rose bud. I think it is because the sepals are too short for it. Of course you’ve got the curvy-out bits on them, which have to become part of the design so that the pen lines can be covered, but there can be spikey-bits on the sepals curving out, rose buds do that. If the tops of the sepals are made longer than the petals, then it should work. You get a bit less pink petal showing, but that should help the overall balance. The base of the bud could be a little larger in comparison, too. That’s just my personal opinion, for what it’s worth. I hope you find a solution you are happy with.
Beautiful, can’t wait to see it finished!
It’s coming along beautifully, Mary! I so enjoy reading why you make the changes you do.
This is really looking lovely . I love the red you added in with the pink
the red made it “pop”. Its lovely.
Mary,
I think that the problem with the rosebud at the top is that it is too big. It seems to be out of proportion with the rest of the design. Is it possible to turn it into a tight rose bud with the sepals going up the outside and just some color showing between them?
Mary….your stitching is beautiful.I love the design….do you really need to change it? Can’t wait to see more as you go along….so much to look forward too.
Thank you
That is so BEAUTIFUL 🙂 I’m testing the shading based on your guidelines… I’ve been learning a lot! That you so much for sharing you knowledge.
It looks beautiful as always. I’m still very happy with the way you changed the small leaves. 🙂 Time to move on irene. LOL
I think some of the other comments are right on about the rose bud. It seems a bit too large, chunky, obvious. And what bothered me was the petal turn over part. It’s a bit wide and looks like the bud is wear a fur stole, ready to go to the opera. LOL I’m sure you’ll figure out something to make it even better than it is. Even if you just have to do some fancy shading to lean it out a bit. Then again, I tend to be stuck in the realism rut. I keep thinking everything has to be realistic. And that’s why I’m not artistic.
Aw, I love the rosebud at the top. 😀
Hi Mary! The Medalion Rose piece is incredibly beautiful. I can’t wait each morning to see what has blossomed on your canvas. It is stunning. Thank you so very much for your inspiration.
Cris
Dear Mary
It looks great, I Love the red and pink coloured thread you have chosen for the rose the colours blend in nicely with the leaves. I know what you mean about changing a design already drawn on the fabric it’s difficult, but I’m sure you will find a way.
I look forward to the development of this project, thanks for sharing your expertise with us.
Regards Anita Simmance
It is looking so beautiful, Mary! I laughed at myself when I logged on this morning —- Mission Rose: The Inner Petals. It sounds like a mystery! And I eagerly away the next chapter!! But I already know whodunnit: You Did!! Fun!
No problem about the rosebud scale (think of early English stumpwork) and as a fan of the talking flowers in Alice’s Adventures in Wonderland, petals that enrobe a figure just spark my imagination. Your details give us so much to enjoy.
Hi there Mary,
Just a question for you, from the looks of it you aren´t splitting the silk threads, right? You´re just using them as they come?
thanks,
candice
Hi, Candice! The thread comes off the spool in a divisible group of threads made up of six strands, so you separate one strand from the group just as you would with floss. I’m using one strand at a time. -MC
Dear Mary:
Goodness me, cut yourself some slack! The rosebud at the top is perfectly fine, if you make the leaf bigger it will detract from the main central rose. Just leave it as is, and don’t lose any more sleep over it! I truly do understand the need for perfection in embroidery, I am the same. You have such talent and skill, I am constantly amazed by all your projects. On this one though, your design is done and beautiful. That is my opinion, and I am sticking to it!
Mary: as a compulsive quilter and elementary embroiderer, I trust your judgement in all things embroidery especially gold work but I feel that I need to tell you that I believe that the shape and design of the rose bud in this piece is truly a part of its charm, at least for me. I love that part of the design just the way it is. Just one person’s opinion and a novice one at that.
It’s really interesting to me how much those dark red inner stitches did for the rose. It’s looking great.
I’m also a little troubled by the top rosebud but the design is after all very stylized. Will be interested to see how it works out.
Your stitching is beautiful. I really love the way you added the dark to the light rose to add dimension to the inner part of the flower. It makes me feel happy just to look at it, especially on a day when I discovered that my sewing machine is broken and not going to be ready to pick up until next week! GRRR!
As far a your rose bud, I actually think the bud itself is fine, but I would round out the top where it looks like a leaf and shade it in rose instead to look like a petal getting ready to open. It could be done in the stitching and your lines would be covered. If it doesn’t show when I’m finished, the story under the thread can die with the stitcher. Thanks for the inspiration.
well goes to show how much I know…I LOVE IT LIKE IT IS! but…will be very interested to see if u make some drastic change…your keen eye amazes me!
Mary – This is looking so lovely, the design would look great as a lead light panel for a window, will have to speak to my husband and get him working.
Sandy Sthn Highlands NSW AUST
Although this is not my favorite thing you’ve done; it is still quite lovely. No matter how much I practice, I know my embroidery will never be any where the level of yours. It is enough to drive a person to drink… or atleast eat a lot of dark chocolate!
Absolutely stunning, your most remarkable demo and follow along to date. Love the rose and all of the comments.
I’m in awe of your talent, Mary! Beautiful work, indeed!
Wow!
In reply to your response to my writing a single word WoW!
I was never allowed on this site before now so do not understand. nm