


The other day, we took a general glance at the embroidery on the flowers on the Secret Garden project, with an overview of the thread colors and embroidery stitches I’m using on the flowers.
Today, we’ll cover some stitching tips for the flowers. Even if you’re not stitching along with this project, these are the types of tips you can apply to your own embroidery projects. We’ll be looking primarily at satin stitch here, since it’s the only stitch on the flowers that might be a little challenging.
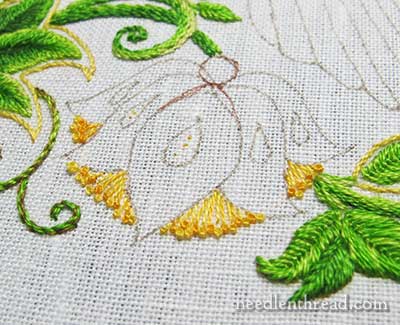
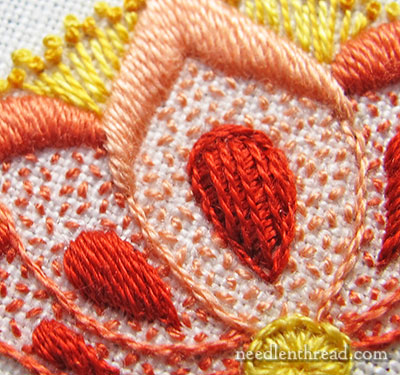
When working the first flower (in the corals, which you can see in this article), I stitched the little pistils after doing the satin stitch on the petals. With the second flower, I wanted to see if working the yellow pistils first would be a good idea or a bad idea.
I used a combination of elongated French knots, straight stitches, and regular French knots in the darker yellow (742) and the middle yellow (743).
So, on the purple flower, these went in first. In retrospect, I was right the first time. Do your petals first, and add these last. Especially if you’re doing satin stitch on the edge of the petals, these little guys get in the way.
For the petals, I drew in extra lines so that they would be “tipped” with satin stitch.
On the flower petals, my color arrangement is light for the large center petal, medium for the two on each side of center, and darker for the next two out from the center.
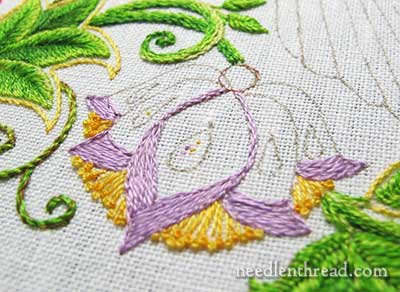
Using the lighter purple from the purple color range, I did all the outlining and filling. You can (and probably should!) outline and fill with the color you’ll be satin stitching with, but I’m lazy. I didn’t want to keep switching colors. If you’re not super confident with padded satin stitch, outline and fill with the same color you plan for the satin stitch. The padding can help hide separations between stitches.
First, outline the satin stitch area with split stitch. Some people prefer split backstitch, and some people prefer backstitch, but you’ll get the best results with regular split stitch. You can read about the difference between split stitch and backstitch in outlining here. And you can read about the difference between split stitch and split backstitch here. They’re all three different stitches, and they produce different results with the finish, so it’s worth reading up on them.
After working the split stitch outline, work long split stitches inside the satin stitch area, horizontal to the petal. These are your padding stitches, and you want them to be perpendicular to the top layer of satin stitch that will go over them.
When you work your satin stitch, start in the middle of the shape, and work to one side. Then go back to the middle on the other side, and work to the other side of the shape. This establishes the slant of your satin stitch, and it’s important to do it this way, for the best end results.
You can read my previous article “Satin Stitch: Why Start in the Middle?” to better understand why it’s important to start in the middle of a shape.
Concerning the order of stitching here, it’s actually easier to work the center petal first, and work out to the sides. I started with the dark outer petals first, because I wasn’t quite sure about the center petal yet, and I was holding off on stitching it until last.
But on the other flowers so far, I’ve worked the center petal first, and it does work out better. You can see that, when I work the center petal on this flower above, I’ll need to be very careful not to interfere with the satin stitching on the petal just to the left of center. If I had started with the center petal, it wouldn’t be a concern.
So, start with the middle petal and work outwards. Do as I say, not as I do! (Which is the worst way to teach anything! Still, you get the point!)
When you embroider the center petal, with the first satin stitch in the center over the tip, extend the end of the stitch a good thread space or so beyond the outline. This helps bring the petal to a nice sharp tip.
In fact, I’ve already covered this subject before, too, in this article on satin stitching to a sharp point. The leaves in question are tiny, but the same exact principle applies.
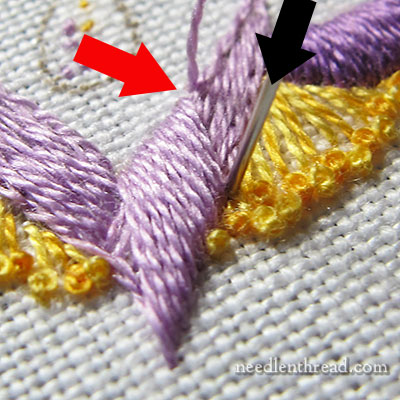
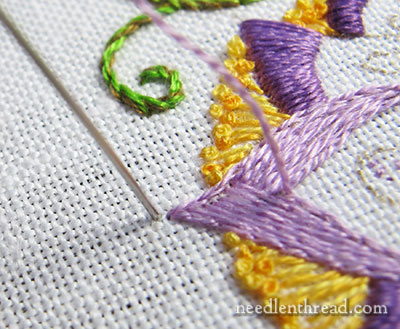
To keep the stitches over this area straight up and down on the petal, come up on the inside of the petal (outside the split stitch outline) and go down on the outside of the petal (outside the split stitch outline).
The stitch needs to start (inside the petal) a little distance away from the previous stitch. See the red arrow above? There’s a good sized space between the thread that’s coming out of the fabric and the previous stitch.
The satin stitch ends outside the petal right up next to the previous satin stitch, with no space between them. (The needle in the photo above is where the stitch is going down to end it.)
If you try to work the satin stitches so that they are right next to each other on both ends of the stitch, your stitches will end up shifting direction along the curve of the shape and crowding towards the lower parts of the shape, which will make the shape bulge where it gets narrower.
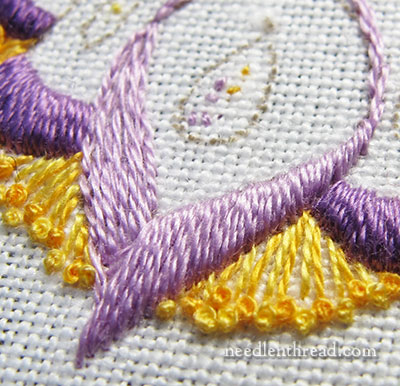
Here, you can see one side of the satin stitching on the center petal finished. Notice that the stitches are pretty much straight up and down, aligned with that first center stitch over the tip.
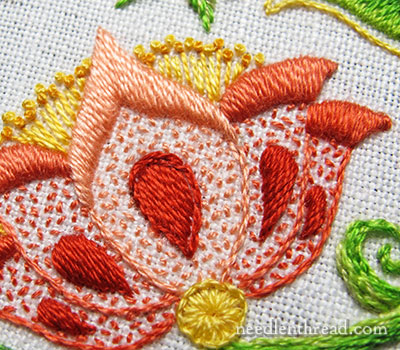
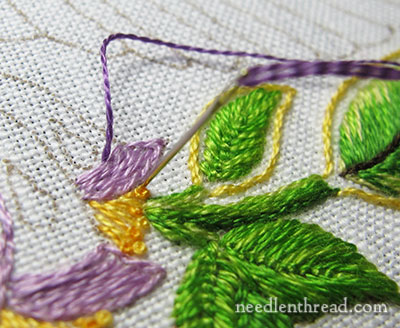
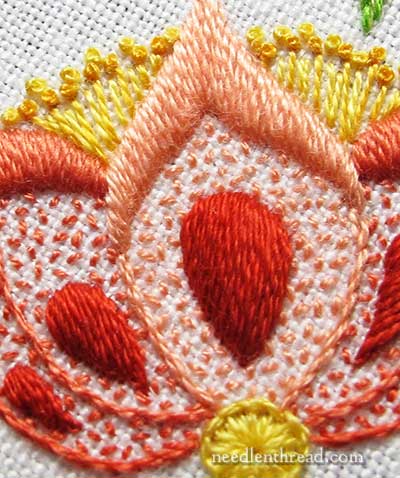
Switching flowers here, let’s talk about the middle of the petals. I used seed stitch to give a sketchy, softly colored, textured filling. You can definitely substitute any stitch you think will work in there, if you don’t want to use seed stitch.
To contrast with the padded satin stitching, though, I’d use a stitch that is relative flat and close to the fabric. I wouldn’t use a bulky filling in there. So, long and short stitch could work. If you go with something like long and short stitch, do it before doing the satin stitch.
In fact, even if you’re doing the seed stitch, you might want to do it before doing the satin stitch. That’s up to you, really. Technically, in the order of stitching an element, the seed stitch would normally come first here, and then the satin stitch. But I like to get those satin stitched tips onto the petals, because they define the flower, and I want them perfectly smooth, with no interference from other stitches around them.
In any case, once you finish your petal fillings, the last part of the petal you’ll work is the tear drop shape on the inside.
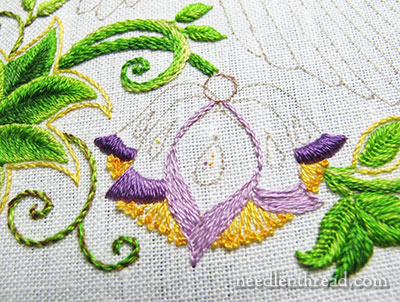
On the larger tear drops on the large petals, I super-padded them, because I wanted them to stand up pretty high and round.
You can read this article on satin stitching a raised dot, for a clear step-by-step on this type of padding.
The tear drop shapes are first outlined with split stitch. The side smaller tear drops only have one layer of padding stitches in them.
On the large tear drop, though, I have three layers of padding. Remember that the last layer of padding cannot lie in the same direction as your satin stitching. Since the satin stitch layer will work diagonally across the drop, the last layer of padding here is worked vertically inside the drop.
Here’s the satin stitching. It almost looks as if it is stitched from tip to top, but it’s not.
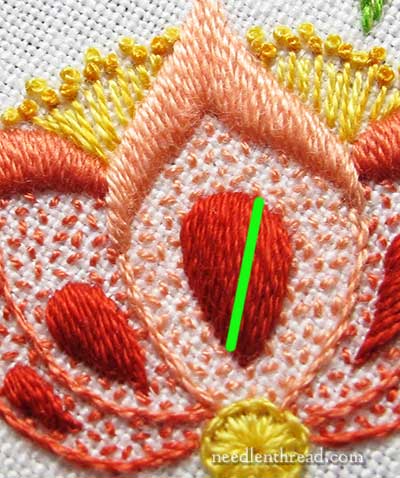
The green line indicates the direction of the stitching across the drop, and also indicates where you’d start the satin stitching, moving to one side, then going back to the starting point and moving to the other side.
So, those are the stitching tips for the flowers! Feel free to ask questions, or leave comments or suggestions below!
Of course, along the way, I’ve made a mistake or two on the flowers. I’ll share one of those jolly mistakes later on, show you the fix, and discuss an aspect of stitching that we don’t always think about.
If you’d like to follow along with the Secret Garden Hummingbirds project, you can find all the articles relating to this project arranged in chronological order in the Secret Garden Project Index.
I am in awe!
Dear Mary
I always find it hard to decide what stitches to use when starting a new project. There is the dilemma of how stitches compliment each other to the overall look of the design. The padded satin and seed stitch in your flowers really compliment each other and added to this the elongated french knots, stem stitch and buttonhole stitch blend in well together and I like the dark and light shades of different coloured threads you have used which makes the flower stand out, it’s lovely. Thanks for the photo tutorial and the tips and techniques of how to sew the satin stitch very useful.
Regards Anita Simmance
So pretty! I bought a copy of this book, and I’m almost ready to start my own project from it. I can’t wait to see what you do with the hummingbirds!
You? Lazy? Bwahahaha! But, seriously, Mary, the project is looking great. The colors are lovely and sharing your experiments on the order of stitching helps one save time by not having to discover these things oneself. If I didn’t have sooo many UFO’s I would probably do this project because it’s just so pretty! Thanks for your continued tutelage.
Wow! This is fantastic to see the steps and order for each creation.
The work you put in to each post on this project, besides the actual stitching, is amazing. I’ve learned so much even though I’m not doing this one.
Thank you so much for your efforts in doing this for everyone interested in the fine art of embroidery. Really classy.
I agree! So much detailed information that even a beginner like me can attempt such a flower and feel as if there is a teacher just at my elbow! Although my work won’t have the exquisite finish shown here. Love you Mary!
Hi Mary,
I have looked at your link to how you made a padded dot, but it isn’t quite what I would like on my petals. In the post of 05/06/14 (yesterday) there is a picture of whitework – that flower’s padded petals aren’t as rounded as yours. Do you have a tutorial for making the edges more sharp, for lack of a better word, rather than rounded? Or perhaps padding with a 2nd row of splitstitch on top of the first?
Hi, Tracy – I think you mean you want the lift more “flat” than rounded? If so, then just use one layer of padding, or, in small spaces, none at all (just the split stitch outline).
C’est juste magnifique. J’attends votre prochain article. Hello from France.
Dear Mrs. Corbet, my grandmother (and teacher) is visiting this week, and as she’s not the most tech-savvy person I’ve been waiting for a chance to show her your blog. She’s very impressed with your gorgeous work and she LOVES the Seed Stitch! You’ve made a wonderful moment I’ll always cherish. THANK YOU
Thanks, Kristina! I’m glad your grandmother likes it! 🙂
Hi Mary, Your sumptuous ‘Secret Garden’ has certainly got my creative juices flowing !
So I have just ordered the book…..Reading through your post, I found some tips so helpful ! Being a stitcher for more years than I can remember, I thought I knew it all so thank you !
Cannot wait to get this lovely book,
hugs
Chris Richards
xxx
Thanks, Chris! There’s lots of scope in the book, too, with the other drawings in it…Hope you enjoy it! ~MC
Mary, this is a treasure you’re giving us! Once again, many thanks!
Satin stitch is the only one about which I have any degree of confidence, but I learned so much from this tutorial. I have a really hard time doing seed stitches because I can’t get it to look right–I either don’t cover enough or too much. Do you think this is a place where a lightweight version of one of the lattice stitches would work, perhaps with one thread in the needle?
Certainly wouldn’t hurt to try, Nancy! It would lend a definite “Jacobean” look to it! Try, and let me know how it goes. I’m organizing a place where we can all share photos – I’ll try to move a long on that a little faster! ~MC
Mary – Your project looks very lovely.
I have some more satin stitch tips.
If your thread has an obvious “nap” to it, (i.e. it looks different if you lay 2 threads side by side one going left to right and one going right to left), then you need to ensure that you always go in the same direction AND as you grab your thread you place the same end in the needle.
I do a lot of Brazilian embroidery with rayon threads. If I’m going to do a lot of satin stitches, I always travel in the same direction, usually left to right. I also knot the thread I’m working with and also one more thread in the thread storage so that I always know which is the correct one to thread through the needle eye. This means that the satin stitch has the Z-twist going the same way, no matter how many times I’ve threaded the needle.
If I don’t do this, I invariably have satin stitch embroidery that looks “funny”.
Judy C
Hi Mary, Once again a brilliant tutorial with many helpful tips. I’ve been working on a Mother’s Day stitching project (stylised flowers) and came to a final section that I just couldn’t decide how to fill. Despite my last posting saying how my seed stitches just don’t quite ‘work’, I decided to follow your lead and fill this shape with seed stitch. Wow! It looked really nice – a lovely contrast to all the padded satin stitch and long and short stitch fillings. Thank you once again for the ongoing inspiration.
If you ever wanted to do a post on the general philosophy of order of stitching (where you have been specific in this post), feel free!
Hello Mary,
I have just found your website through the recommendation of another crafter.
Firstly I wish to thank you for putting together so many tutorials and designs and creating this amazing website for your fellow crafters.
I have just purchased the Secret Garden and I am awaiting it’s arrival with great anticipation! I look forward to stitching this project along with you and stitchers whom have already begun and learning new techniques as I go.
I am a cross stitcher and just starting enjoying hardanger. After seeing some of the work displayed here and on forums by other members I find myself asking “how did you do that!” and I am eager to learn this!
Again, thank you and I am so looking forward to making a start and following your tutorials!
All my love,
Kelly……xx
Hi, Kelly! So glad you’re enjoying Needle ‘n Thread! The Secret Garden project is a lot of fun. If you have questions along the way, feel free to ask. The community here is very knowledgable and there’s a lot to be gleaned from the comments on the posts, too. Welcome aboard!
Love the colors! Quick question – for the coral flower you have all of the satin stitch tear drops slanting in the same direction. What would it look like if the center tear drop was vertical, the ones on the right slanted to the right (as they are now) and the ones on the left slanted in the opposite direction. Everything would be slanting toward the base of the flower.
Hum…
Hi, Julie – I usually follow the curve of the shape on satin stitching like this. So, the shape pretty much determined which direction I slanted the stitches, to get the best coverage with the satin stitch. But you certainly can do it that way!
Mary, love your work! I’ve just found your website and WOW. I’m wondering, will you be publishing an ebook on your wonderful 26 stitch letters?
Hi, Belinda! Thanks! Yes, I will – it’s coming soonish….
Hi,
I have a question. When I work with padded satin stich, where the two area I need to fill is next to each other (like with the Matyó Rose motive) what do I do? Do I only make a border for one petal (as they are overlapping), or one for each of the two petals? I am not sure if I make sense, but as I saw you make a border for the satin stich before filling it, and I wonder what to do with motives nect to each other.
No, just one outline. With the first section, outline everywhere except where the two satin stitch areas meet, and then satin stitch that section. Then with the second section, outline where you didn’t with the first section, and everywhere except where the third satin stitch area touches the second. Satin stitch the second area. Then, when working the third section if there is one (there often is in that style of satin stitched rose), outline where section two and three meet and all around section three (except where a fourth area might meet the third) and then satin stitch it. Continue that way until the last section is stitched, which would be outlined all around. – MC
Thank you very much! This helps a lot. I only did flat satin stitch before, but now I started experimenting with this method, but got stuck at this point. Your comment is really helpful and appreciated!
I’m in awe at your beautiful work and it has inspired me to attempt a cross stitch design from the book…any tips on how to make the pattern? I can’t find much online…I’d like it to have the same beautiful detail so will use 18count Aida I imagine….any tips much appreciated!
I cannot follow the directions To form petals in ‘The Secret Garden’
I get to illustration 4 with the knot pushed back to the eye of the needle. How is it released? In illustration 2 (lower) it seems the petal is a loop
Regards
Will
These are pistil stitch – basically, it’s just a French knot with a long tail. You can actually just stitch a long straight stitch and then put a French knot just above the straight stitch.