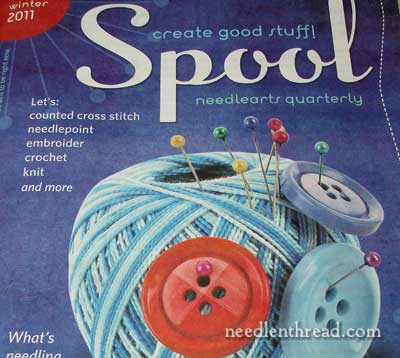
About

Mary Corbet

writer and founder


I learned to embroider when I was a kid, when everyone was really into cross stitch (remember the '80s?). Eventually, I migrated to surface embroidery, teaching myself with whatever I could get my hands on...read more

Contact Mary

Connect with Mary


Archives

2025 (76) 2024 (135) 2023 (125) 2022 (136) 2021 (130) 2020 (132) 2019 (147) 2018 (146) 2017 (169) 2016 (147) 2015 (246) 2014 (294) 2013 (294) 2012 (305) 2011 (306) 2010 (316) 2009 (367) 2008 (352) 2007 (225) 2006 (139)
 

A Tale of Two Hoops


Amazon Books

Did you ever find yourself working along on one part of your embroidery project, when suddenly you have a hankering to move to another part and try something out?

This happens to me a lot. Maybe I’m too sanguine. I like to jump about and try things out! And if I’m getting bored with one part of a piece, moving to another part can re-kindle my interest and enthusiasm for the piece overall. So perhaps sanguinity can be a good thing….

Using Two Embroidery Hoops at a Time
Continue reading “A Tale of Two Hoops”

Chain Stitch Tip: Circles


Last week, we looked at how to switch to a new thread when working the chain stitch. And we found out that you can actually get away with be Technically Incorrect when you start a new thread.

Today, we’re going to look at joining up the end of a circle with the beginning of it, when working the chain stitch. Now, keep in mind, this techniques isn’t just for circles. It’s for any time you need to join one section of chain stitch to another section from the “back end.” You’re not continuing forward with a length of chain stitch, but you’re running into some already-stitched chain stitch at the point where the previous stitches started. Ovals, irregular shapes, twists, stars, knotwork – there are lots of instances where you bring your chain stitching back to where it began.

So let’s take a look at how to join up the chain stitches when you arrive back at where they began.

Joining Chain Stitch in a Circle
Continue reading “Chain Stitch Tip: Circles”

Developing a Spot Sampler: A Bit of Blackwork


If you’re following along in this series on developing your own spot sampler, and you’re sticking pretty much to what I did on mine and my students are doing on theirs, then the next step after adding a little Quaker motif is adding a bit of blackwork.

We’re getting close to the end of the counted thread work on this series on the embroidered spot sampler. In fact, everything after this section on blackwork belongs to both surface and counted embroidery, depending on your fabric. So if you’re hankering for surface stitches, they’re a-comin’!

Adding Blackwork to a Spot SamplerStudent’s Sampler
Continue reading “Developing a Spot Sampler: A Bit of Blackwork”

Stitch Sampler Winners! Yes! More than One!


Thanks to all for your participation in this week’s book give-away! I read each one of your 300+ comments and it was great fun hearing about your favorite stitch dictionaries. Your favorites and mine seem to coincide, for the most part – there were a couple mentions of little gems that I haven’t gotten my grubby paws on, though, and with your glowing recommendations, I find myself compelled to check out some of your favorites that I haven’t seen yet.

OH NOOOOooooo! You know what this means, don’t you!!? No! No! I must not succumb!!!!

I’ll just keep repeating to myself, “No More Books. No More Books. No More Books….”

But I don’t think it’ll work.

Well, today being Saturday, and the weather being happily autumnal, and darn it, because I want to, I’ve decided to give away three copies of Stitch Sampler. There are just too many people out there who need another book (or a first stitch dictionary!), after all.

Stitch Sampler Embroidery Book
Continue reading “Stitch Sampler Winners! Yes! More than One!”

Developing a Spot Sampler: Add a Quaker Motif


Still working with counted stitches on the spot sampler, the next step that I took on mine (and that my students took in the Needle Arts class) was to add a Quaker motif to the sampler. In class, along with the Quaker motif came a lot of history on samplers, the Quaker samplers, the various school girl samplers, and so forth, to fill in some background information on samplers for my students.

If you don’t prefer to add a Quaker design to yours, you don’t have to! But if you’re following along on developing a spot sampler and want to follow the same steps we took, then the Quaker motif is the next thing to add to your sampler, and to that end, here are some motifs for you.

Quaker motifs on a Spot Sampler
Continue reading “Developing a Spot Sampler: Add a Quaker Motif”

Embroidery Hoop Talk: Binding Both Rings


When it comes to embroidery hoops, there are hoops, and then there are Hoops. Ideally, wooden embroidery hoops are made of smoooooooothly finished wood, and have good, strong metal hardware on them. The screw that tightens the hoop hardware normally has a slit in it, so that a screwdriver can be used for tightening the hoop further than the fingers can manage.

There aren’t a whole lot of Really Good wooden embroidery hoops available in the world today, but there are some. Hardwicke Manor hoops are a favorite of mine. If you’ve been reading Needle ‘n Thread for a while, this probably doesn’t surprise you, as I’ve covered the subject several times! Today, my purpose isn’t to be redundant. Sure, we’ve talked about embroidery hoops before. We’ve discussed what makes a good embroidery hoop, and we’ve talked about binding embroidery hoops. I’ve told you why I bind my hoops, and I’ve even shown you how to bind your own embroidery hoop if you want to.

So, why more hoop talk?

Binding Both Rings on Embroidery Hoops
Continue reading “Embroidery Hoop Talk: Binding Both Rings”