


Here’s a little update on my whitework embroidery sampler. I haven’t gotten tooooo far, but I did manage some stitching last weekend. I’m still working on my 15 minute sessions, and I haven’t forgotten the goldwork iris, either! Juggling two projects at a time has its drawbacks – but more on that later!
The last time we visited this project, I was doing some drawn thread embroidery in the scrolls, in a 15-minute session. I haven’t finished the scrolls. Come to think of it, I haven’t finished the Schwalm pomegranate motif, either. Don’t worry! I will. That’s part of the fun, perhaps, of a sporadic embroidery sampler – you can pick up and leave off different parts, moving around hither and thither as the creative spirit moves you, reinvigorating your interest in the piece if need be.
So, this past weekend, I placed a monogram:
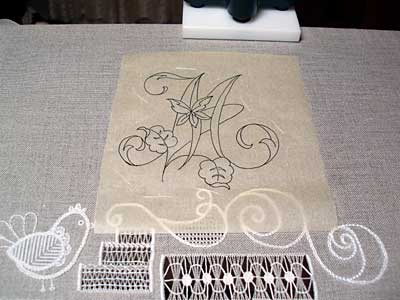
It’s a large monogram. I chose the “M” for unusual reasons, actually! It has nothing to do with the letter itself – I would have chosen any letter that fit my plan. See the last downward stroke on the “M” on the right? It’s perfect for demonstrating a satin stitch technique called trailing. Hence, the “M.”
I like this monogram style, by the way. I think it’s really pretty. It’s from an early 20th century ladies’ magazine, too, so eventually, I’ll clean up this set and share them with you. (First, I will finish the Celtic monograms, though!!)
To transfer the design, I’m using tacking stitches and tissue paper, as I demonstrated before with a photo tutorial. I would like to have used regular tissue paper – the kind you use for wrapping gifts – but I didn’t have any on hand, so I stuck with this yellowish stuff.
After using large stitches around the monogram to hold the tracing paper in place, I turned the frame around to work the tacking stitches.
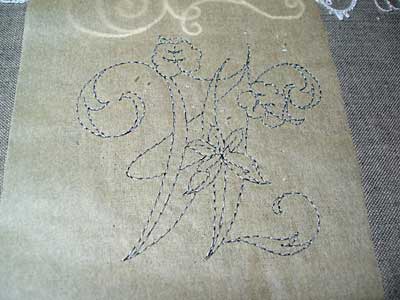
It was easier to reach the top of the design that way. I suppose I could have re-adjusted my frame and stand, but I didn’t. I just turned the frame… After stitching the tacking stitches all over the design, I took a sharp needle and ran it over all the stitches to split the paper and make it easier to remove. It came off great!

So, here’s the transfer. It’s nice and clear. This time, I worked the stitches in white (rather than green, as in the tutorial on transferring patterns this way.) MUCH better in white, methinks. Whatever possessed me to use the green, I shall not know. Anyway, the white worked great, and I don’t have any worries, in case I can’t remove some of the tacking stitches. They’ll work right in to the embroidery.
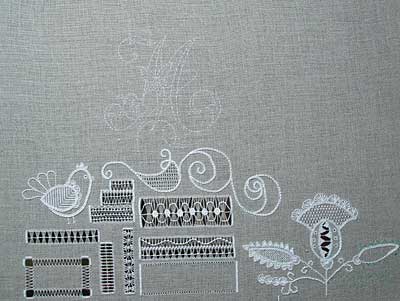
Farther away, you can’t see it so well, but you can get a hint of the size of the monogram placed on the sampler. You can also see all the little bits I haven’t finished!!
I’ve found a nice cutwork design from another early 20th century magazine, too. It’s a fairly complex design, but complete in itself (not the edge of a tablecloth or runner or anything). It’s not too big – perhaps 4.5 inches tall and about 3.5 inches wide. I’ll be transferring that on, right above the Schwalm pomegranate somewhere. Those will be the last two “large” motifs on the sampler, and everything else I do will fit between and around everything that’s there, I think… though there is that upper left corner that could accommodate something a bit larger. Hmmmm…
So, that’s where I am. Keep your fingers crossed that I can squeeze in some 15(0)-minute sessions and make some progress on this thing, will you?
Have a terrific Wednesday! (Halfway there!)
Here’s my “further information” blurb:
More Drawn Thread and Whitework Embroidery
Drawn Thread – Securing Edges with Re-Weaving
Drawn Thread – Securing Edges with Satin Stitch
Drawn Thread – Hemstitch Tutorial
Drawn Thread – Chain Loop Bunches
Sampler Update with Schwalm Embroidery
Online Book on Drawn Thread Techniques
Diamond Stitch in Drawn Thread Work
Coral Knot Bunches in Drawn Thread Embroidery
Zig-Zags in Drawn Thread Embroidery
All Whitework Articles on Needle ‘n Thread
You can find more tips and tricks for hand embroidery – including all the above tutorials – indexed on my Tips and Tricks for Hand Embroidery page.
Can I ask a question about samplers? When I am going to do a project, I plan it and work out what I have and have not done before – which stitches, which techniques etc. Then I start the project and as I come to the bits I have not done before, I work a small sampler of that technique or stitch. If I can, without ruining the learning process or test of the suitability of the stitch, I even use a bit of left-over thread or fabric where it will save the thread that I want to use for the project and therefore time and money. This way I am doing lots of “spot samplers”, rather than anything particularly beautiful or for display. On the other hand, I once spent two months working on a sampler with a huge number of different styles, techniques, stitches, etc for my parents’ Golden Wedding present. Now my question is this – when I look back – I cannot always actually recall how to do all the stitches I supposedly “learned” by putting them on my big “presentation” sampler, or even the spot samplers I worked as I progressed through it! I still have to look them up sometimes if I want to use them again. I only remember things I do regularly (hemstitching, satin stitching, double running etc etc.) So, how does this work for you, Mary, and for other people? Do you remember all the stitches and techniques you use on samplers? (I may be particularly “challenged” in the memory department…)
Hmmm…That’s a good question, Ruth. (Not about being particularly “challenged”! The other question.)
I have a friend – Christiana, who sends me photos of her work, etc. – who keeps a notebook and actually draws out the stitches and locations and everything as she works different projects. She writes down things on what she should have done, compared to what she did, or visa-versa. She’s pretty faithful about it!
I have a small notebook in my sewing stuff, and if I need to remember something that I might forget – like the color or size of a thread in a particular motif, I’ll write it down. For example, in the Schwalm pomegranate up there, I used several different sizes of coton a broder, and it’s been a while since I’ve gone back to it, so I’m glad I jotted down the sizes I used for the different elements of the design.
If I’m timing how long it takes to stitch a project (esp. commissions), I also note times on stitching sessions in my notebook.
But, you know, I don’t note types of stitches. I’ve never looked back at anything (so far) and wondered how I did it or what stitch I used. The memory of the thing is the stitch, if that makes any sense. I think in terms of stitches. It’s kind of weird to analyze, but that seems to be the best way to explain it. When I think of a project, I automatically think of the stitches I used.
I’d be interested to hear how other readers answer this question!
Beautiful monogram! I look forward to you posting these!
I wish I were time to go along with this sampler – I began but I need to restart. The posts are here and one day I’ll be back to follow this sampler.
For now I decided to make a sampler following your video stiches – some of them I’ve never tried – and I am addicted! Tomorrow I’ll post about it.
And Ruth and your’s comment arrived just in time – I never thought of writing about threads…thsnks for speaking about.
I always have A-Z of Embroidery Stitches close at hand in case I need to look up a stitch. I don’t always remember how some of the stitches ‘work’ especially if I haven’t used a particular stitch in a long time. There are other good references available, but I really like this book especially the photos. I think I learn best visually rather than by description.
I also keep a little notebook that has notes about projects that I have designed or am working on. I take the same notebook with me to needlework classes so I have all of my reference notes in one place. (I don’t know what I’m going to do when the notebook fills up. I like having a single source. 🙂
Mary, I look forward to seeing your ‘M’ (good letter choice, by the way, for any reason! 🙂 and the cutwork.
Mary,
I’m so glad you included the tip about taking a sharp needle and tracing around the design to “release” the paper better. I’ll definately have to try it. I often use the tissue paper and stitches way of transferring a design, but then have the task of carefully removing the paper without messing up the stitches and the design. This sounds like it would make the job a whole lot easier and safer.
Thanks!
Tess
My mouth is watering over the “M” and the rest of the sampler!!!
I am so grateful to have found your site … and love your creativity and sharing. Thank you!!
Gentle as you go,
Marny