


Here’s the end of the Goldwork Pomegranate! This was a great needlework project for me, and I really enjoyed sharing it with you. Sure, there are things I’d do differently if I were starting over, but I’m satisfied with the results. I think it was fun! It was a good “goldwork fix.” I got to work with my favorite embroidery floss – Soie d’Alger silk – and my favorite metal threads. What more could a person want? So here are the final pictures – I hope you enjoy them!
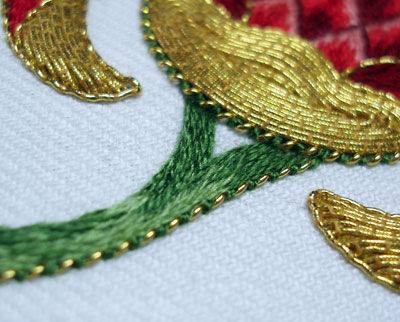
The final step in this embroidery project was outlining the stem, and I chose to do that with stretched pearl purl, couched with the silk floss, just like the outline on the turn-overs on the swashy things on the stem. I really like working with the stretched pearl purl. Admittedly, it is very easy to stitch with, so there’s no great skill going on here – I didn’t even have to pay attention to stitch spacing, as the thread took care of that for me!
I began by the body of the fruit, and worked from the right side of the “V” below the body, around the outside of the stem first. This was easy – it was just one length of pearl purl.
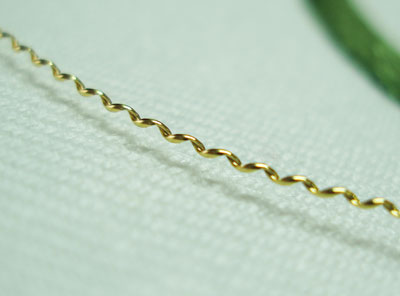
Remember, if you’re stretching pearl purl, when you cut it before you stretch it, don’t cut the full length! With the outline on the stem, I stretched the pearl purl to it’s full extent, really. I pulled it until the “pull” was gone. I didn’t want it to form a ridge around the stem, and the more it is stretched, the smaller the bumps are. I cut about 1/3 the length of the outline I was stitching, and then pulled the thread out – I still had leftovers! (It’s a great way to use pearl purl and make a little go a long way!)

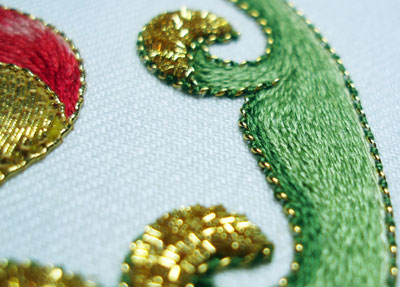
After finishing the outside of the stem, I moved back to the beginning, at the base of the body of the fruit, and worked on the left side. You can see the difference in the size of the pearl purl on the “bowl” at the base of the fruit and the pearl purl on the stem – this is only from stretching, as I used the same size pearl purl.

The inside of the stem was a bit more “difficult” – not really hard to do, but once I reached the waves in the stem, I had to cut small pieces and start and stop often.
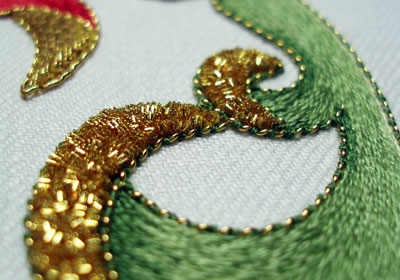
You can see here where the larger wave ran into the smaller one on the inside of the stem. I don’t mind it, really. If I were doing it again, I might adjust it, but it still looks ok, I think.
Here, you can see the three colors of green silk I used in the stem.
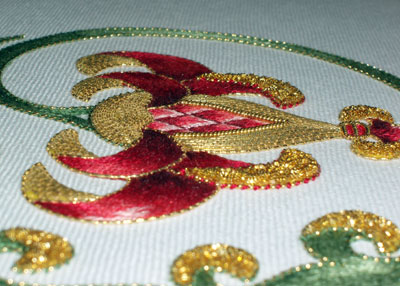
I always like to take a side shot, just to see the height of the stitches and the difference in the lighting!
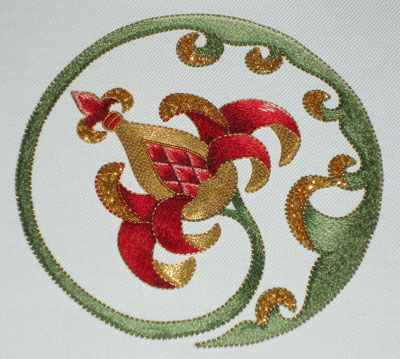
And voilá – there’s the finished project!
Thanks so much for following along. I hope I didn’t bore you to death with my “tunnel vision” on one project! And I hope there were some useful tips that might help you in your stitching. I appreciate all the feedback along the way! Thank you!
For the rest of the posts in this series, please visit the following links:
Stylized Pomegranate Pattern used for this project
Setting up the Project on a Frame
Preparing the Ground Fabric with Felt Padding
Selecting Colors of Silk for the Project
The Stitching Begins – SIlk Shading
Continuing the silk shading – the left side
Finishing the silk shading
The Goldwork Begins: Smooth Passing Thread
Check Thread for Outlining
Chip Work Filling with Check Purl
Outlining with Stretched Pearl Purl
Filling the Bowl with Passing Thread
Finishing the Tips with Passing Thread
Finishing the Fruit
Beginning the Stem
Continuing with the Green on the Stem
Almost finished! Chip work on the Stem
Oh wow, that's gorgeous.
That is absolutely beautiful! I enjoy watching it "grow" as I don't think I would have patience to work with the gold purl. I do admire your work!
Kathy in Kenai
Dear Mary,
That is the most incredible pomegranate ever!!!!! I enjoyed watching your progress- you are a master. I lived vicariously and loved every minute. I have learned so much and thank you for sharing. Peg
Boring, are you kidding, that was fascinating! Thanks!
Hi Mary,
you did a wonderful job, the end result is just beautiful. Thanks for all the useful information that you pass along to your readers.
Joan from Richmond BC Canada.
Magnificent!!!!
Thank you for sharing this project with us. It is beautiful. I enjoy your site and have learned a great deal in the months since I first stumbled across it.
You are so very generous with your time, talent and information. I am thrilled to be able to learn from you.
WOW!!WOW!!WOW!!
BEAUTIFUL MARY!!!!!!
Annie in Michigan
Beautiful!
Excellent work! You certainly inspire to try goldwork.
And I will.
Thank you very much.
Larissa, Moscow
Simply exquisite! Thanks to your inspiration, I am saving my extra pennies and dollars (not many of those!) toward the materials and supplies for a goldwork project of my own. Your tips and stitches will be a terrific resource when I am finally able to begin!
Thanks,
Betsy
Hilton, NY
Spectacular piece of work!!!!
Thank you for sharing the step-by-step process with us.
Can't wait to see your next project.
Helen in SW FL
Beautiful!
Another resounding WOW from this corner. Have so enjoyed following your process with this gold work piece. Thanks so much for allowing so many of us the vicarious pleasure of stitching along with you via reading and ogling the photos only. Jane
Wow your embroidery is really exquisite. I can't really find words to express how impressed I am.
Well done
Bore us? Perish the thought. This was completely fascinating to watch.
Thanks!
Ahhh. I did resist peeking ahead and I'm SO glad I did. What a delight it was just now to read down through your post and unveil each photo one at a time until I could see the end result. It's a grand finis Mary!!
This is just beautiful, Mary. It's been great watching your progress from beginning to end. Thanks for sharing this with us.
G'day Mary,
An amazing journey from the drawing board to the final stitch.
I've surprised myself at my interest in the goldwork side of this project.
Congratulations and thank you.
Cheers, Kath
That sure was a lot of fun! Thanks, Mary!
Beautiful!
That is a gorgeous pomegranate. Thank you for sharing each step as you worked the project.
What a wonderful project with wonderful results. You really, really understand what stitchers want to see/learn. Thank you so much, Mary.
Hii Mary…This looks reaaly really beautiful.. You definitely did not bore us even a bit.. I was actually eagerly waiting to know about ur updates abt this work.. And the results are really amazing.. congrats on finishing this one..
Now I'm also eager to know what you r going to do with this..!!!
This is lovely Mary, it's turned out beautifully.
Hi Mary,
The work is very elegant and lovely!! Great!! this is the first gold work project that I'm following. Before you began the project, I was of the opinion that gold work should completely be done in gold – courtesy: my gold-worked white top but that is machine embroidered (of course not by me :)) in a light, thin golden thread.
I especially like the chip work and I wish I get such purls here in my place… (all that glitters is not gold, but none glitters as much as Mary's gold work :):))
I too, like many other people here, had been waiting for this finish… and I'm absolutely overwhelmed by the whole piece.. It's really wonderful!!
Thanks for sharing it with us!
Hi Mary,
The design turned out just lovely. Good step-by-step teaching. Not sure I am ready to launch into a goldwork project just yet, but was so interested in understanding the process.
And by the way, what are your plans for this finished project? It's too pretty to languish in the back of the cupboard!
-Sharon
OMG! It is stunning! Positively STUNNING! I need to go buy thread this weekend when I'm in a metro area that has stores with selection. Thank you so much for the progress and sharing all of your steps on this. I learned so much from this project and it is beautiful. Thank you!
Smiles,
Great to see the whole design now it's finished – Well done!
Thank you for the time you spent on the embroidery and the blog as well. I'm very impressed.
I really like the green edging you made at the end, it looks fantastic.
Hi, Mary!
I’ve never seen the Goldwork.It’s amazing!. Thank you for sharing this.I thought gold work is a kind of long and short stitch with golden thread.
Can I stitch the long and short stitch on the felt padding? with golden thread?
Regards,
Radha.
Hi Radha –
Yes, you can certainly stitch long and short stitch on the felt padding, using gold colored threads (silks, art silk, rayon, cotton, etc….). I think it would be difficult (if not impossible) to work long and short stitch with real metal threads, but certainly it would work with gold colored threads!
Hope that helps!
MC
Mary, I'm in awe of your work! It is just amazing! Thank you for sharing each and every stitch you take and your thought processes. What a magnificent way for us to take the journey with you! Thank you, thank you for sharing!
that is fabulous picture
Thank You Mary!
Many thanks for taking the time to
help me out with my question.
I appreciate you.
Regards, Radha.
Lovely! Thanks Mary for sharing All the process – I have saved all your lessons together – who knows if one day I'll make goldwork embroidery? After getting all the materials, of course…
Thanks again, Mary
Just Beautiful.
Thank you for sharing this project with us. It is beautiful. I enjoy your site and have learned a great deal in the months since I first stumbled across it.
i made my husband sit with me and see your amazing embroidery as it progressed.
keep it up.
Stunning! Gorgeous! Awesome!
Thank you for sharing your incredible love of art!
Gentle as you go,
Marny
Wonderful !
Mary, you’re a genius and an inspiration to us all. God Bless you!!! Ursula
Wow Wow Wow!!!! I am MESMERIZED!!!! You have so inspired me!!! I don’t care how long it takes me – I have only done crewel work when I was a teenager – am 55 now! haha! Thank you so much!! What a GIFT you have. May God continue to bless you.
<3 🙂
Lori
May I add that this should be considered as highly addicted and pure form of “potnography”. I should be working right now instead I am reading this gorgous blog. Ahh sweet Lord help me to go back to my work.
🙂 Funny, Hemlock! Thanks for the chuckle!
Mary,
Your work is truly stunning! You are an embroidery master.
Thanks, Wendy! Without your wonderful #12 crewel needles (not to mention plenty of other goodies on your website), I’d be sunk!
I’m speachless. It is an amazing work!
magnifique je voudrez le faire je les fil d or merci pour les conceilles et mes félicitations Ruth
very beautiful
I just read from beginning to end this project. When I became interested in embroidery, I said I probably would never do gold work, beads or Crazy Quits. Since reading your process and explaining what each thread does/doesn’t do, reading the article on your using gold in crazy quilting, I promise you I will never say never again on a type of embroidery. I will try and sample each type of embroidery that I comes along. And, never say never again. I think what a person has to do before saying “nah, that’s not for me” is to see some piece and the process in which it was created, by someone who does the technique well. Beautifully done embroidery, no matter what type, holds an interest. It’s when you’ve seen it done badly (like my practice pieces- I laugh so hard at those) you don’t really want to try that technique. Well, at least I don’t.
Great project, looks and from what I have read, a really fun project to do. Thanks for sharing it with us!
The website is amazing. I know nothing of embroidery as I am a quilter – mostly patchwork and hand quilting but I have a coat of arms for my family that I think would benefit from being embroidered rather than patched. Not sure if I am confident enough to produce a quality piece but I may have a go. Your instructions and illustrations are inspirational. Not sure where to get all the necessary silks etc so some detective work still to do. So here goes!!!!!
Many thanks
Jean
Well, once again, I’m wandering around Pinterest (embroidery, of course) and one particular picture jumps out at me. Wow, that’s pretty, gorgeous, original, well-done, or whatever that embroidery happens to be. This time it was pretty, but once again, it was done by … Mary Corbet. So I came here and looked at a project from 2010 and had a grand time. And I agree with you, Mary. The couched pearl purl is just beautiful.