


Hello, Stitching World!
Today, let’s chat about beginner embroidery supplies.
I answer questions about beginner embroidery supplies very frequently. I thought this might be a way to compile some simple answers in one place and to open the topic up to other stitchers who can contribute some good advice.
There I was, in the Massive Metropolis of Topeka, Kansas. I was finished shopping, but I was waiting for my sister (who takes a lot longer to shop than I do…).
Weary of the prospects around me, and always concerned with what’s going on with Needle ‘n Thread, I checked my website email. And lo! There was a plea for help!
This plea, as a matter of fact:
Mary, I’ve been reading your website for awhile but I haven’t started stitching yet. I want to stitch, but I’m just not sure what to buy. We have craft stores around but no embroidery stores. When I go into a craft store, I’m always confused by the selection. What hoop should I buy? What thread? What needles? I want to save money, but I don’t want to waste money on junk. And some of the supplies look like junk to me. Help!
It just so happened that, right across the street, a craft store loomed.
Abandoning my slower companion with absolutely no qualms, I traversed the busy thoroughfare, putting myself in the shoes of a beginner who would approach the needlework section in any of the major craft stores in the US (Hobby Lobby, Michael’s, JoAnn’s, Hancock fabrics, and so forth).
What would I see? What would attract my attention if I were looking for supplies to try out embroidery for the first time? What would stump me?
And, musing over the difficulty of the absolute beginner, I betook myself to the needlework aisle and started browsing, camera ready.
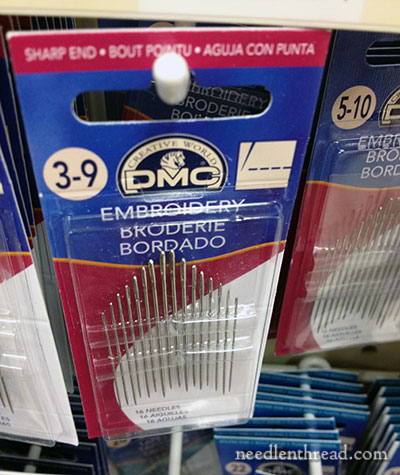
This is a yes – I would buy these. Embroidery needles (also known as crewel needles) are pretty much essential, and for the beginner, a combo pack of sizes 3-9 or 5-10 is a good choice.
While these particular needles are not my favorites, they are pretty much widely available in most sewing and craft stores. You can’t really go wrong with them when starting out.
Why “embroidery needles” or crewel needles? They have a sharp tip that pierces the fabric and a longer eye that accommodates embroidery thread. If you’re contemplating trying surface embroidery (as opposed to cross stitch), then you want a needle that will pierce the fabric. These are the needles you want.
This is a yes and a no.
You want a hoop. It is easier to learn most surface embroidery stitches with a hoop, and while there are some stitches that can be worked just fine “in hand” (holding the fabric without a hoop), the majority of stitches work better when your ground fabric is drum tight in a hoop and your embroidery, in general, will look better if you use a hoop.
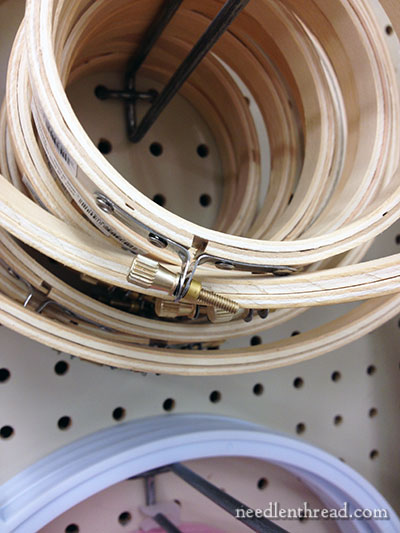
But which hoop? The top hoop in the photo above is a no.
Don’t waste your money on these wooden craft hoops, unless you are just planning on crafting. If your goal is to embroider something fun and simple and frame it in the same wooden hoop and display it like that, then fine. These are the wooden hoops people use for that.
If you’re not doing that crafty-hoop-framing thing, then opt for the hoop barely peaking out at the base of the picture. These plastic Susan Bates hoops with the “lip” hold the fabric better than the wooden craft hoops shown above.
There are several problems with the wooden craft hoops, for beginners who really want to get into stitching.
The wood is generally very rough and unfinished – it can snag your fabric and it can give you splinters. Personal experience here on the latter!
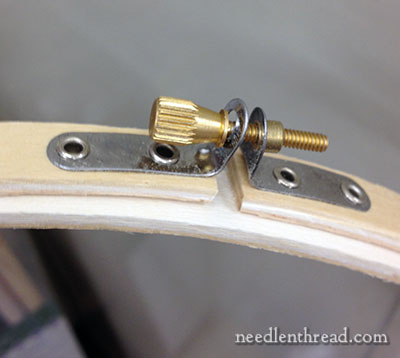
The hardware is flimsy. Tightening that screw really well without the hardware bending beyond use is pretty much out of the question.
The hoops themselves are generally not well matched, resulting in an uneven hold on your fabric, tighter in some places, looser in others.
With the plastic hoops, opt for a smaller size. I usually go no larger than 6″ when I’m teaching beginners and using these hoops.
A good way to measure the maximum size of hoop you should buy for hand embroidery is to hold the hoop in your less dominant hand and see if your fingers on the same hand can stretch easily to the center of the space inside the hoop while you’re holding it.
Some stitchers, however, prefer that their hoops fit around the outside of the whole design that they’re embroidering, so that they don’t have to move the hoop around. This is something you should decide for yourself – but I think, for starting out, a 6″ hoop is just fine.
Keep in mind, too, that the larger the hoop you buy – especially of lower quality hoops – the more wobbly the hoop will be.
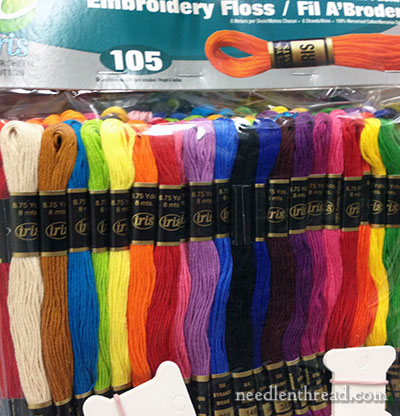
This is a Big Fat Furry No in my book.
It looks like a really good deal, doesn’t it? All that floss – 105 skeins of it – for around $10. But “craft floss” is not a good deal, pretty much ever – not for embroidery, anyway!
When it comes to floss, opt for well-known, tried-and-true brands like DMC and Anchor. They are long-staple, mercerized Egyptian cotton threads that are smooth, sturdy, colorfast (though it never hurts to check), easy to work with, and they have a good sheen. And you can always purchase floss later by color number and be guaranteed an accurate match.
Craft floss is not always long staple cotton, it’s not necessarily colorfast, it tends to knot and pill, and it is generally frustrating to stitch with. You can’t always be ensured of a good color match should you run out of one color, and to replace a color, you have to buy a whole “bargain pack.”
When it comes to craft floss, skip it. Invest in a small range of colors that you like in individual skeins of DMC, and work with those. As you gain skill, you might try other threads, you might expand your color selections and so forth. But to start out, you can be economical by choosing a small range of colors of good thread and practicing with those.
What Else do you Need to Start Embroidering?
You need fabric! You can embroider on anything, though. An old (still good) pillow case, flour sack towels, muslin by the yard. Surface embroidery is more suited to fabric that does not have a lot of space between the threads that make up the fabric (though loosely woven fabrics can be used, too – just avoid very heavy or dense stitching).
You need scissors! If you’re just starting out and are not yet ready to invest in a really good pair of scissors (they will be your life-long friends!), choose a pair of small, sharp, well made scissors that open and close easily, that your fingers fit into, and that have blades that meet.
You need good light! Sit outside on a sunny day, sit near a sunny window, sit under a good light. If you don’t have a good light, eventually, you’ll need one if you decide to pursue hand embroidery.
More Information on Embroidery Supplies
You’ll find loads of information here on Needle ‘n Thread about hoops, needles, and embroidery thread. Here’s some reading, if you want to do a little more research:
Embroidery Hoops
Embroidery Hoops & Frames
The Embroidery Hoop (what makes a good hoop)
Binding an Embroidery Hoop
Binding Both Rings on an Embroidery Hoop
Using Two Hoops at Once
Embroidery Hoop Talk
Embroidery Needles
5 Things You Need to Know about Hand Embroidery Needles
Embroidery Needles
Taking Care of Embroidery Needles
Making an Easy Needle Roll
Bohin Needles
Embroidery Fabrics
There are many articles on Needle ‘n Thread about ground fabrics for hand embroidery. My favorite fabric is linen.
Scissors
Small & Sharp: Scissors for Hand Embroidery
Folding Scissors
The Woe & Disappointment of Bad Scissors
Curved Scissors for Embroidery
Goldwork Embroidery Scissors
Embroidery Scissors by Premax
Your Beginner Embroidery Advise
What would you advise the beginner to look for (or to avoid) when shopping for embroidery supplies for the first time? Have you ever made a mistake and invested in The Wrong Stuff? Have you discovered a good tool that’s readily available that might be handy? Do you agree or disagree with any of the points made above? Feel free to join in the conversation below!
Keep you scissors safe from predators. i.e family!! All of mine were tagged with ribbon and the kids were on ‘pain of death’ if they touched them, their father would have suffered a fate worse than death, after the episode of the putty in the mincer 🙂
Ah! The age-old putty in the mincer trick! LOL!
A good tip, to mark your scissors… I do it, not just to keep them safe from others, but to keep them safe from myself, too. Some scissors, I use for paper cutting (tiny paper cutting), and they look like embroidery scissors (they are embroidery scissors), but I don’t want to use my real embroidery scissors for paper cutting or confuse the pairs, so I have decorative fobs or ribbon and the like on my confusable scissors.
Perhaps (to ward off predators), some beginners should try snips, since all they have to do is snip floss and they are less attractive than usual scissors. I have been using snips (years) since I purchased a pair at a local museum. :-)They are not pretty, but they work for me, and I could leave them in plain sight and no one even looks twice at them. Just my two cents. 🙂
I know about the ‘pain of death’ threat for touching scissors, but can you please explain the putty in the mincer. It sounds more than a tad yucky. It seems it hasn’t reached these shores as yet as I haven’t heard of it before.
A place to keep it all together and clean. At the very least, a sturdy zip lock bag. A basket, a box, an old handbag. Eventually, a handmade embellished bag with pockets, needle case and scissor holder.
I use a toilet bag for my “carry around” project. They are reasonably cheap to purchase and have lots of handy pockets 🙂
The clear plastic pouches that bed linen comes in are great! Lots of space, solid zippers, usually a sleeve for the label where you can put notes or a picture.
Hi Mary,
I totally agree with you – it is much better to get small quantities of good quality materials than lots of lesser quality.
I would also suggest anybody starting embroidery be willing to trial different brands of needles. What suits one person doesn’t suit another and finding the perfect needle makes such a difference to embroidering.
Cherilynne
Read Mary’s articles on organizing a work space and organizing your floss. Make a 12″ travel bag with a small project or sampler to keep with you for appointments or while waiting at an event. I made business cards to hand out to interested people who wanted to learn how to embroider and we meet in the park. Join the local American Embroidery Guild or a church sewing group. It is nice to have an older mentor who may not be able to use their crippled hands but they are a wealth of encouragement and wisdom.
What a good introduction. I would add that there’s no reason not to start out with a small kit from a reputable company, like DMC or Anchor. Find one that’s for a beginner or (probably more important) one that you can’t resist, and go from there. Then the difficulties of fabric choice, finding and tracing a design, deciding on threads and colours, which needle to use, and so on are all taken care of. If you are truly bitten by the bug, then at least you are exploring from a position of a little bit of experience. And we all know how easy it is to build up stash!
Just a couple of things I would add to this great list! First, when talking to new and aspiring stitchers, I always reccomend a needle threader, especially when you are using more then one strand of floss. There is nothing more frustrating then trying to convince those multiple strands to just GET IN THE NEEDLE all at the SAME TIME, and a threader is a life saver in that situation. Personally I prefer the LORAN threader (a little flat piece of metal with 2 different sized hook at either end) because they are sturdy and one will last you a long time (I’ve been using the same threader for two years) unlike the wire threaders with a bit of metal or plastic at the top which have a tendency to break, but I keep both in my sewing box. Either style can be the job done.
Second is a bit of felt. Just a square of felt cut from a sheet if craft felt (usually costs all of a dollar) that you can stick your needles in between embroidery projects. You can purchase or make a nesdlbook eventually if you like, but in the meantime a little square of felt will save you a lot of frustration and pricked fingers.
Finally, a box to keep your supplies in. Any old box you like will do. A cigar box, a cookie tin, whatever you find suits you. Personally I use an old jewelry box my sister found at an estate sale. Again, you don’t have to spend a bundle, channel your “make do and mend” spirit” and get creative.
One last bit of advice, regardless of how pretty they may be, at first you may want to stay away from the metallics and satin threads. They take a loooot of patience to work with, and when you are starting out that can suck the joy out of embroiddery. If you are absolutely set on using metallics I would recommend you to stay away from metallic floss and instead opt for krelnik braid (at my craft store its hanging above the DMC, its in a plastic package and wound on a small spool) its more expensive, but I find it much easier to work with.
And always, always embroidery should be fun!
The teacher that taught me in 4th grade taught us to use the foil, loop style needle threaders, (you know, the one with the head on them) and she hot-glued two buttons (one on either side) of the coin shaped part of it so that they would last longer in the hands of 4th graders. Just a thought for teaching kids! 🙂
As for metallics and satin flosses, yes, they are not for beginners, for several reasons, one being that even with a threader they are harder to put through the eye. Later on, after a bit of stitching experience, a bit of beeswax or Thread Heaven can help thread the needles with them, but you have to snip the waxed end off before you begin stitching. 🙂
Mary –
What a great article! Sure wish I had had your vast knowledge when I first started getting into embroidery – there’s no telling how many needles I have thrown away, or threads, etc. until I learned what I was doing. LOL! And thimbles? You didn’t mention those and I just have a little addition to your article, if I may. I use ‘Thimble Pads’ instead of the metal thimbles (even tho I collect them!). I find the pads very easy to maneuver around on the fabric and not near as bundlesome. They are kind of expensive, but really last a long time as you can reuse one pad several times. I would not be without them.
Thanks for all you do, Mary!
Barbara in TN
P.S.
DITTO on the scissor tagging!
Thimbles, I purchased my brass ones (no sizes) at a local museum. They were in a basket on the register counter and you just test them to find the right one. 🙂 I had to because the “sizes” on the store bought ones never fit my fingers. Again, just my two cents. 🙂
I like Thimble Pads! I also like silicone type thimbles – they look like colored jelly. They’re great for gripping needles if one has problems pulling needles.
For anyone who is new to surface embroidery my advice would be to go through Mary’s stitch tutorial videos one by one. Work each stitch until you are satisfied with your results and feel that you understand the technique.
When I transitioned from cross stitch to surface work I was overwhelmed at all the stitch choices “How was I going to master them all?” In reality there are so many stitch techniques that you won’t master them all. And you will find that a lot of your projects will only use the basics. The basics when executed well will be lovely.
Start with kits. I like kits myself as they provide me the opportunity to try new stitches and supplies. When you gain your confidence try one of Mary’s projects that she has posted. With her projects she tells you the supplies and stitches that she uses.
Wendi
Absolutely no go for me on those M.I.C.P.O.S wooden hoops. When I began learning in 4th grade those are what I used and every few months the brass screw tore through the cheap (balsa I was told) wood and I had to replace them regularly. Hobby Lobby is the only craft store I know of that offers real wood ones (Hardwicke Manor I think) but I actually purchased (online)some of various brands years and years ago to determine the best, and have not had to replace any of them. DMC, Anchor, Hardwicke and even Elbesee (my father sanded them smooth for me:-) ) are the ones I have, and they all work for me. I have not tested the plastic ones, or the old fashioned metal ones so I have no comment about those. The craft stores that I have close are (closest to farthest) are Michaels, Beverlys, Joanns and Hobby Lobby, so those are all I am talking about. 🙂
Hobby Lobby carries Edmunds hoops, I believe they’re called, in about a 5 or 6-inch hoop. They’re not sold loose – they come in a clear hanging bag on the rack. I forgot to mention those – they’re pretty good! They’re not quite as good a quality as Hardwicke Manor, but they’re a close second. When sending a list of supplies for kids and parents in summer classes, I always included Edmunds wooden hoops as a first choice of locally available decent hoops, over the plastic hoops, but if they can’t find them, then the plastic ones.
I only said Hardwicke because the ones (in a bag) sold at our Hobby lobby have the Hardwicke “house” along the edge of the hoop. I do not know what brand the bag said they were because I only noticed them in passing and because Hobby Lobby is the farthest from us, we only go there if we have other errands in that area. 🙂
Wow! Mary, you covered quite a bit above, and very well.
I might add this:
1. The craft stores will usually have beginner’s kits that include everything, have the design already stenciled on, and needle is included. You could give one of the kits a try first to see how embroidery feels for you. It may not be your thing, and you’ve not gone overboard in investing lots of $$ to find out you don’t like the technique.
2. See if there is an Embroidery Guild chapter near you, or other stitching group. The EGA chapters usually invite you to attend one or two meetings before asking you to join. These chapters have classes at each meeting, during which you could get hands-on lessons on embroidery. You will also meet others who have some experience and could help you as you are starting out, as well as possibly meeting others who are beginners like yourself, making the journey into stitching easier when sharing with someone on your own level. And you’ll make new friends! Who can’t benefit from new friends??
3. Do invest in a good pair of scissors! This is one purchase that will serve you well throughout your stitching experience.
4. Have fun! Don’t stress over the knots, the stitches not looking perfect. Even seasoned stitchers still experience knotted threads, stitches that aren’t always even. As we say in the stitching world… if the man on a galloping horse doesn’t notice it, then it’s okay…
5. If after all this you’ve decided that embroidery is the creative outlet you can’t live without, then find a good needlework shop online that can supply you with threads. Check out locally to see if there are any needlepoint shops, because they carry threads that the chain craft stores do not. I’ve got two needlework shops (one cross stitch, one needlepoint) that I always stop at when I travel up north to see my parents. So, if you’re traveling somewhere, use the internet to see if there are any shops in the area that you will be. Don’t limit yourself to looking just for ’embroidery’; you may have to search out shops that cover other needlework techniques, and you may have to look outside your own area, but the search is always worth it.
Sharp scissors. Small embroidery scissors and a larger size for fabric, etc. Inexpensive thimbles at first. (I actually still use the 50 cent ones. Small applique pins and longer thin glass head pins. Thread Heaven or bees wax.
Things you don’t need to get from an embroidery shop: A plastic container that has divided sections and a secure top in case you drop it. Bandages in case you poke your finger (you don’t want to bleed on fabric.) Emory boards so you don’t snag fabric or thread on your nails. A three ring binder For notes, patterns, etc. Mechanical pencils. Zip lock bags in different sizes.
Rubber fingers from office supply section. I use the size that fits my thumb. I cut of the top because it feels awkward. I use it to help grip and pull the needle through.
Hehe, I have said in the past that I do the same things! 🙂 I have an alcohol wipe and some of those spot shaped bandages in a breath-mints (cleaned) tin in case my needle attacks me. I also keep a packet of wet wipes and kleenex for cleaning my hands and anything else that needs cleaning. I also keep one of those emery boards in my box for my fingernails, but also a large strawberry shaped one for cleaning needles and pins. 🙂
I also keep a magnet in my box, you know one of those flat and wide refrigerator freebies that they give you when you order a pizza or is sent to you with a calendar on it from the plumber your insurance company?? That way, if you drop a needle or pin you can easily pick it up. 🙂
When I was new to embroidery I chose a cotton percale with a high stitch count to embroider a tablecloth. It was so tough! After one corner, I had worn a hole in my finger and had to learn to use a thimble. I learned two things from that experience, use a little looser weave fabric, linen is best as your said, and thimbles are good things.
My fingers threatened to file for divorce also… 🙂 I still use old-fashioned style thimbles.
Thanks for a very informative article. I am learning so much from your blog. A newbie always appreciates much needed help!
This is such a helpful discussion ~ I can think of two other things I wish I’d known at the start of my stitching journey.
Firstly: choose your starter kit carefully from a reputable company. Some of the cheaper, small so-called ‘beginner’ kits have instructions smaller than the kit itself. The first kit of this type that I was given to start with, neglected to tell me that I needed to divide the embroidery floss strands in order to stitch with it. That led to a very frustrating first stitching experience, until my Nana came to my rescue and showed me how to strip the floss strands in order to use them successfully. If you buy from a dedicated needlework shop (rather than a bargain craft store), the assistant should be able to help a beginner make a suitable choice. Initially, I also subscribed to a few embroidery magazines which had lots of useful tips for beginners.
Secondly: consider buying a pair of needle magnets. This inexpensive bit of kit enables you to park your needle safely at the edge of your embroidery and will save you hunting for so many lost needles. I wish I’d discovered them earlier.
Oh, and thirdly 🙂 Have Fun!
Marie,
Thank you very much and thank you all.
In a kit I put together for my grand daughters, along with everything you and others have mentioned, I put in a magnet. A sewing style wrist magnet. One never knows when that needle will or where it will fall. Just run it over your clothing first then the chair and floor. Wonderful tool!
1. Never use the adhesive-back boards! They are not your friends for use on needlework.
2. Mistakes happen to all of us — even the most experienced stitcher. We all have done the “frog” stitch — we rip-it, rip-it out!
3. Have patience with yourself. Enjoy the journey. Embroidery is suppose to be a joy, not a chore.
Lovely reading everyone’s tips, there’s always something new to learn.
I think I would add ‘sit comfortably’- it may seem obvious, but not all chairs that we may watch TV in will also suit as a sewing chair. Also, take regular breaks; it’s easy to get engrossed in the work, but breaks to relax shoulders and fingers are important, I think.
Thanks, Mrs. Corbet! This article was very helpful.
Hi Mary
I have been embroidering for 60 years and I always tell someone, who says they are interested in starting embroidery, to buy a small kit. They will have all the threads in the right colours, a needle, a finished picture and step by step instructions. It is a good way to learn about stitches, thread and “how to” and is usually sucessfull when finished. They can then they can go on to something else and build on that knowlege.
Regards
Joyce
I have always found thimbles to be clumsy so I buy glue dots. cut a small piece of suede and stick it on the finger that I push the needle with. You can buy pre-made ones but they are expensive and don’t match what you are sewing. I find it enhances my experience of my suede matches my project.
Years ago I bought the needles in your photo above Mary, and every one had a wee small burr on the tip. The strawberry on my pin cushion didn’t get rid of them, so I used the lighter side of an emory board nail file. I just lightly dragged the very tip across, rolling it between my fingers, and it did the trick!
My advice to beginners would be to take it slow, and keep it small. If you try something too big too early, you may lose interest. If it isn’t fun, then why do it?
I agree that a kit is a good place to start. I’d also consider starting with crewel wool on linen rather than embroidery floss, because in my opinion it’s easier at first. Dimensions have some simple kits for the rusty embroiderer or new embroiderer. I see them sometimes at Joann’s & Hobby Lobby, but you can also get them online. They generally have few stitches to master and the wool comes pre-sorted, which eliminates one of the trials of kits — that they often expect you to be able to distinguish between many similar shades of the same color & work out which is which. You will want to move on from Dimensions kits soon, but I still think it’s a good beginner kit. Beware, though, the instructions do not teach the difference between outline stitch & stem stitch. Look at Mary’s tutorial for that!
I also like Tapistree Fiber Candy crewel sampler kits, but you will need to supplement the instructions with Mary’s video tutorials & you can’t buy them at local craft stores.
[Tip: don’t use the wrong keyboard short cuts — I just lost a long comment that way… 🙁 ]
When embroidering I often use one of a couple of hoop I “inherited” from my aunt and grandma (they died before I was born and dad got most of their stuff so I don’t know who owned what). They’re good, but it wasn’t until I needed a smaller hoop that I realised how good. Got a new hoop from the craft store and it was all warned about above: rough edges, flimsy metal, poor quality wood. My old hoops are made from much, much thicker metal, sturdy wood with a smooth finish and rounded end. While the new hoop works ok it’s not a buy I ended up being pleased with. It was relatively cheap, but had it been a hoop in the same size as my old ones they wouldn’t have been worth the price at all! Stay away!
Only thing I don’t like about hoops is that I move it around and every now and then, the screw is positioned so that the embroidery thread loops around it without my being aware of it, causing the tread to get stuck as I pick up the needle. *Grrr* Also, the more I embroidery, the more I miss not having a square hoop instead for my small fabric scraps so I can bead/emboidery closer to the edge.
It’s ages since I learned how to embroider in school so I don’t remember that many newbie mistakes or great advice that would be useful to pass on. But I guess some of my advice as a beader applies to emboidery too.
Like not going “oh, I’m just a beginner practicing so why spend money on anything but the cheapest materials and tools?”. That attitude will just create unneeded frustration and grief as poor quality will make the work harder. Better to start out with just a few tools (in this case needles and scissors) and good — and if possible, forgiving — materials. Spend money on quality from the beginning. You don’t have to buy the de luxe version of everything, just promise to stay away from the really cheap stuff in the craft store or supermarket.
Something I’ve also learned and which applies to many crafts and arts is that some things look hard, but are easy, while other things might look (relatively) easy, but are hard to go well. Don’t be too afraid to try something just because it looks complicated. If it works, you’ll be happy about the result and if it doesn’t you know it’s because it’s a more advanced technique and you have to try a few other things first to get the experience.
Wash your hands before you sit down to stitch. Even things like hand lotion which is not ‘dirty’ can stain your work over time.
I agree with everything Mary suggested. My one suggestion would be to pick a tote you already have or a basket to put all your supplies in. If everything is together and ready to go it is easier to get started. Diane
I’m glad you recommend the Susan Bates hoops for beginners. They hold the fabric really tight and are readily available. Beginners don’t need $20 hoops. They need to try different sizes and things. I like a small hoop, no more than 6 inches, because, with small hands, I can reach the center to stitch there. I have a large, expensive heavy hoop for a major project, but often I start out at the beginning with a small plastic hoop. How many expensive hoops do you need for all the WIP you have? Needles too, but the fabric in the craft store is usually bad for embroidery. A rank beginner might try it, but should quickly move on to something better.
Good advice, but on going to Five Things You Need to Know About Hand Embroidery Needles, I was rather shocked to find you stating that licking the end of the thread when threading needles would cause the needle’s eye to rust! I have licked my threads for more than 40 years and never once experienced a rusty needle. I suppose it is possible that a cheap steel needle might rust but most needles these days are stainless or nickel plated are they not? And some have gold plated eyes.
I too was a little surprised by that injunction by Mary, but since it came from her, who is the fount-of-all-wisdom in this field (well, one of a very few whose words I value), I tried very hard to use a needle threader but eventually it became just too tiresome and I reverted to licking the end of the thread. Then I recalled that my mother, a dressmaker from the age of 14, always licked her thread and she never had any problems with rusty needles, even in the tropics. But, in this place where I now live, which isn’t overly humid, I have had needles rust along the shaft but not in the eye itself.
Sorry, Mary, but I am back to licking.
I do agree with the need for good quality needles though and now go out of my way to find Bohin needles on line as they seem to be the least likely to have burrs – the worst are the ones where the eyes haven’t been properly finished so when your thread passes through the burrs in the eye shred the thread. Grrrr.
Mary,
Thank you for this article..it was just what I needed. I too have been reading your blog off and on for years, and am getting ready to take the plunge. This has been very encouraging.
Thank you, again!
Very good advice, but I want to add my two cents.
1. I use a ribbon to tie my LoRan needle threader to my scissors, then I know where it is when I need it. It also warns others that these scissors are for threads, only. I also tend to use the tips of my scissors for cutting DMC (etc.) threads, and I use the area at the back if I need to cut something harder, like metallic threads.
2. For the person who wanted a square frame, I like using my Q-snap frames. I use them mostly for cross stitching, but they can be used for embroidery. If they don’t hold tight enough, put another piece of fabric over one side of the frame before snapping it on. It’s hard, but it works. They also make little elastic bands with clips to use when stitching something like a bookmark that is too narrow for any of their frames.
Along with the previously mentioned thimble, I highly recommend keeping a Tide Pen handy. I try to avoid using it on threads, but it has removed a lot of my accidentally donated DNA from pristine, white backgrounds. Have I mentioned thimbles?
Dear Mary
I agree with everything you have said above Mary. When I first started embroidery I started off with 12 Christmas card cross stitch kit I really enjoyed embroidering these and searched around on the internet on how to embroider, then I came across Needle n’ Thread and I practised all the How To stitches and browsed your site and I have learnt most of my embroidery techniques from your site. I agree that good hoops, good thread, good needles (which is a personnel choice) and good fabric are essential for the enjoyment of embroidery, as well as the other accessories such as scissors, light etc, and I would recommend searching Needle n’ Thread before starting any embroidery project because there is bound to be something on here to help you along your with your embroidery.
Regards Anita Simmance
I found that I need great lighting, a magnifier, and a floor stand to attach a frame to. I learned about two handed stitching. I learned that fabric matters. Then I learned about needles. Oh boy, needles sure matter. And then there’s where I sit. My daughter and I rearraged furntiure so that I can sit on a kitchen chair in front of our living room picture window to stitch. Use of natural light during the day helps my eyes quite a bit. Anyway, Mary is a gem in info on needles and threads and learning the process of hand embroidery!
Great advise, Mary! I’m not a beginner, exactly, but I do appreciate these tips. 🙂
A small padlock on a good pair of scissors will keep little (and larger) hands off!!
My advice, might not be that great but I might as well throw it into the pot…
1. Check this website every day! Do it often and never skip the comments.
2. Don’t be ashamed of a plastic hoop! At the very beginning, they’re quite friendly.
3. Don’t be afraid of finding unique ways to do stitches. Sometimes, the “proper” way just won’t work, but that doesn’t mean it’s hopeless. Experiment, and you might find your very own method.
4. Have favorite songs or movies to watch/listen to as you stitch. I find this helps alleviate frustrations with mistakes.
5. Stamped kits are your friends! Eventually you will get sick of them, but they’re wonderful for refining you stitches.
6. NEVER DO A PROJECT YOU’RE NOT IN LOVE WITH.
I agree with almost all of what you’ve said here. Just one reservation and that is that wooden hoops tend to be better here in the UK. With one exception (that someone gave me in Taiwan, so doesn’t count), all of my UK bought hoops have been nicely finished, all rounded off without a stray splinter between the whole batch of them.
Hi Mary, I have learnt all my embroidery from your wonderful videos. As a beginner, I use stranded cotton all the time for obvious reasons. However, I was always very frustrated with it particularly when doing the dreaded satin stitch. My thread twisted and knotted and wouldn’t lie nice and straight when using more than one thread. Lo and behold, one day you published a tip about separating your thread, one strand at a time even when using two threads as I was. I can’t tell you what an enormous difference this made when I separated them one by one and then put the required two in the needle. There are still frustrations when I accidentally split the thread with the needle when doing chain stitch, but this is minor compared to my previous experiences. I wouldn’t be doing and enjoying embroidery if it wasn’t for your wonderful site. Many thanks.
Fantastic article for beginners. Thank you so much for posting it. I have just ventured back to embroidery after a 40 year absence. I haven’t embroidered since I was at school. I fell into the ‘trap’ of the wooden hoops after they were recommended to me by the salesperson. I had been struggling with them thinking I had done something wrong. Thank you so much for setting me straight. I’m heading out today to replace them. I must admit I’m also struggling with my first project – but – im going to keep trying. I read all the helpful hints on your site at every opportunity. Thank you again for all the useful information on your site.